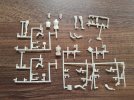
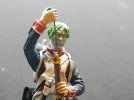
Airfix 54mm Napoleonic French Line Infantry

Steve Brodie

SMF Supporter
Joined
Sep 17, 2014
Messages
3,734
Points
113
Location
Shropshire
First Name
Steve
Amazing stuff neil, i could probably cut the figures from the sprues and butcher them, but that would be it, they would all end up as zombie fodder !
 

Neil Merryweather

SMF Supporter
Joined
Dec 29, 2018
Messages
4,427
Points
113
Location
London
First Name
Neil
Amazing stuff neil, i could probably cut the figures from the sprues and butcher them, but that would be it, they would all end up as zombie fodder !
Thanks, Steve, I find this bit much more fun than the painting part- each to his own, I guess
 

Neil Merryweather

SMF Supporter
Joined
Dec 29, 2018
Messages
4,427
Points
113
Location
London
First Name
Neil
Even though I’ve been silent on this for a while I haven’t been entirely idle over last couple of months.
I realise I haven’t stuck very rigidly to the principle of using up the stash- in fact I’ve added quite a bit to it for the purposes of this build alone ….
As it turned out, though, in that second job lot there were not just some Fusilier arms but two almost complete Fusiliers-

2 line infantry.jpg
So in order to use up the stash I feel I just have to do Fusiliers 7 and 8 …..

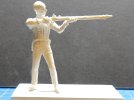
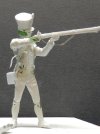
Number 7 is standing firing, but I want him to be slightly different to Fusilier 1 so I used the Fusilier body but the arms and legs from a 95th Rifleman. I had to tweak them a bit because the butt of the Charleville musket is longer than that of the Baker rifle and the hand didn’t reach the trigger. I filed a groove in his shoulder and all is good now. I will have to alter the cuffs. The head is another of my World War 1 gunner sculpts

IMG_20220801_212519179.jpgIMG_20210329_201945652.jpg

So, the same only different, hopefully.

Fusilier 8 will be kneeling with bayonet fixed, so I will use a pair of Rifleman’s kneeling legs, but I will graft on some gaitered feet and calves from a fusilier- in the next exciting instalment…..
And I'll need to revisit the composition I think.
Many thanks for looking in
Neil
 

Neil Merryweather

SMF Supporter
Joined
Dec 29, 2018
Messages
4,427
Points
113
Location
London
First Name
Neil
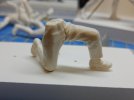
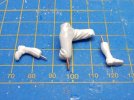
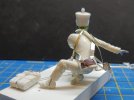
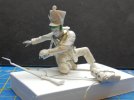
And so on to Fusilier 8. He will be kneeling with his musket grounded and bayonet fixed, so I am using some kneeling legs from the Airfix 95th Rifleman.

IMG_20220801_210911347.jpg
These are trousered though and I want them gaitered ,so I am going to perform some transplant surgery.
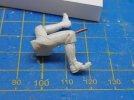
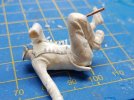
First step is to remove the gaitered parts from the standing legs and then using them for measurement, cutting the trousers off at the knees. I pinned them with 1mm copper wire which gives me an instant fit and a bit of bend if I need it.
IMG_20220801_211534962.jpg
His right foot needed to be bent so I sawed a V almost through at the toes

IMG_20220801_211827330.jpg

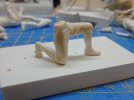
And glued it into position

IMG_20220801_212042368.jpg

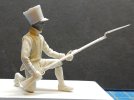
The body and arms come from the Fusilier,

IMG_20220805_111847537.jpg

The shako and musket are Historex spares and the head is another of my own sculpts.
So now I’ve got that out of my system it’s time to get back on track with Fusilier 5 , who still needs piping and buttons on his tunic, a bit more hair and his equipment fitting. Hopefully that will happen this coming weekend.
I'm still Mojo-less as far as painting is concerned, though
Thanks for watching

N
 

Neil Merryweather

SMF Supporter
Joined
Dec 29, 2018
Messages
4,427
Points
113
Location
London
First Name
Neil
Tim, Paul and Jim,
many thanks for your kind comments, but this is the part that comes easy to me- it's the damned painting part I worry about.
cheers
N
 

JayCee

SMF Supporter
Joined
Aug 13, 2019
Messages
1,002
Points
113
First Name
John
Were you a surgeon in a previous existence ? Lovely work Neil.
John.
P.S. painting isn't so bad. A 2" brush, close your eyes, and that's it ! At least that's what my figures look like. :smiling: ;) .
 

Neil Merryweather

SMF Supporter
Joined
Dec 29, 2018
Messages
4,427
Points
113
Location
London
First Name
Neil
Were you a surgeon in a previous existence ? Lovely work Neil.
John.
P.S. painting isn't so bad. A 2" brush, close your eyes, and that's it ! At least that's what my figures look like. :smiling: ;) .
PLASTIC surgeon, maybe :tongue-out3:
But thanks John
 
  • Haha
Reactions: JR

JR

Member of the Rabble and Pyromania Consultant
SMF Supporter
Joined
May 26, 2015
Messages
17,275
Points
113
Location
lincs
First Name
John
Someone's certainly enjoying himself . Thought that photo of the sprues you showed had the look of a family tree about it :smiling3:
Fantastic stuff Neil, out of interest what size is that copper wire please .
 

Neil Merryweather

SMF Supporter
Joined
Dec 29, 2018
Messages
4,427
Points
113
Location
London
First Name
Neil
Someone's certainly enjoying himself . Thought that photo of the sprues you showed had the look of a family tree about it :smiling3:
Fantastic stuff Neil, out of interest what size is that copper wire please .
Cheers John.
I use 1mm for arms legs and heads and 0.5mm for hands. I drill with a pin vice, and I have one permanently set up for each size, so there's very little mucking about.
 
  • Like
Reactions: JR
Joined
Aug 6, 2022
Messages
11
Points
3
First Name
Bill
I've never kit bashed miniatures before so I'm really interested to follow this thread. I normally buy Perry's or victrix but I like the detail in the airfix
 

Neil Merryweather

SMF Supporter
Joined
Dec 29, 2018
Messages
4,427
Points
113
Location
London
First Name
Neil
I've never kit bashed miniatures before so I'm really interested to follow this thread. I normally buy Perry's or victrix but I like the detail in the airfix
I look forward to seeing what you come up with, Bill.
The secret is to get the anatomy right, so maybe start by copying a pose you like, rather than making one up out what bits are available... .With mixing and matching of arms on torsos you need to watch that the shoulders follow what the arms are doing. It can look strange when an arm is raised but the shoulder is at rest.
With legs it's the hips that move with the change of weight. And with a standing figure the head is usually more or less over the weight-bearing foot.
I would say just dive in and see what you can do.
 

Neil Merryweather

SMF Supporter
Joined
Dec 29, 2018
Messages
4,427
Points
113
Location
London
First Name
Neil
So, let’s get on with Fusilier 5.
I made the piping from 0.3 lead wire as before, stuck with CA. Sadly my cheapskate button punch(0.7mm propelling pencil) has died, so I thought I would try the hobnail technique, but this time using plastic rod.
IMG_20220811_200300164.jpg

I drilled 0.8mm holes and used 0.75mm plastic rod. Glued in with EMA model weld, and left to dry overnight.
I guess it worked but I think I will go back to the old way next time.
Anyway, here he is with his hair and kit, ready for priming.

IMG_20220817_194411032.jpg

IMG_20220817_194431596.jpg

Also, as promised, Fusilier 2 has a hair on his new head.

IMG_20220817_193800695.jpg

His ramrod and musket need a bit of TLC…..

So I’m going to knuckle down and get the painting done. It’s over a year since I last had a go, but I’m sort of ready now, and I’m not going to work on any more figures till these are all painted.
Thanks for looking
Neil
 

Tim Marlow

Little blokes aficionado
SMF Supporter
Joined
Apr 27, 2018
Messages
16,792
Points
113
Location
Somerset
First Name
Tim
So, let’s get on with Fusilier 5.
I made the piping from 0.3 lead wire as before, stuck with CA. Sadly my cheapskate button punch(0.7mm propelling pencil) has died, so I thought I would try the hobnail technique, but this time using plastic rod.
View attachment 461121

I drilled 0.8mm holes and used 0.75mm plastic rod. Glued in with EMA model weld, and left to dry overnight.
I guess it worked but I think I will go back to the old way next time.
Anyway, here he is with his hair and kit, ready for priming.

View attachment 461124

View attachment 461126

Also, as promised, Fusilier 2 has a hair on his new head.

View attachment 461127

His ramrod and musket need a bit of TLC…..

So I’m going to knuckle down and get the painting done. It’s over a year since I last had a go, but I’m sort of ready now, and I’m not going to work on any more figures till these are all painted.
Thanks for looking
Neil
Looking good Neil. The way you’ve done those buttons is how I used to do boltheads on my railway stuff before nut and disc punches had been invented. Problem I had was that plastic rod at that time only came in 10, 20, and 30 thou, and I really needed 15 thou :disappointed2: so they never looked quite right….
A wrinkle I used once they were in was to drill a suitable hole in a scrap of plastic sheet of the right depth for the nut, place it over the rod, and slice the excess rod off to leave a nut of the right depth. Gave a good even finish so might help with the buttons.
 
Top