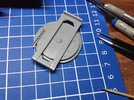
Allen's 1/35 Brach Models 16 tube Reihenwerfer auf Somua MCG S307(f)

Allen Dewire

Proud Rabble Member
SMF Supporter
Joined
Apr 27, 2018
Messages
4,105
Points
113
Location
Bamberg
First Name
Allen
Evening fine folks,

Not a whole lot getting done at the table at the moment. Had to work Monday and have to work tomorrow and Friday too!!! Am I retired???

A most interesting build Allen. Really giving an insight into the issues of a resin kit. I reckon you are doing a great job, very neat and well thought out.

Thanks, and I'm trying Jim. This is the first full resin kit I've built. Used lots of resin accessories before, but I knew this would be different to do. Thinking through all the steps, then re-arranging them in the order to make life easier with the CA was the toughest. So far, so good, but the worst is yet to come my friend...
Nice IP Allen......The thing about getting old is yer not as good as you once was.......but yer as good once as you ever was! Just takes a little more patience and don't be watching the clock cause there ain't no schedule to keep!! :tongue-out3: :smiling3: :smiling5:.......now what did I come in here for?:thinking:

Uhhh, what you said Buddy..............Ya been nipping the Sherry again Rick??? And I don't know why you came in here either. Thanks for stopping by and........................Uhhh!!!.................Got any snow yet???...
Good work Allen, you are as old as you feel, just do not get caught!

Sound advice from a dedicated old fart!

Thanks Bob, but you are still a dedicated youngster!!! Some days I feel 20, others 90, but I always remember Bro, 15 will get you 30 in most countries. Best wishes to Julie too, 'Admiral'...
Resin.......better man than I......Dude2.
Well I've found grounding your brush hand on the bench helps w/trembles.
Nuttinmuch. Working Red Ball dio, US Engineer Dump Truck Company elements, US Engineer Bridging Company, & WWII German inf. hvy. weapons elements.

I know Paul, that's what I tried to do. I then supported my brush hand with my left hand, sort of like shooting a pistol, on the table. I'll keep practicing the proper support system. I know deep down that you don't mind doing resin either. Look at that 15cm howie you built and I'm sure you'll enjoy your Sd. Anh. 116 too!!! Good to hear you have a lot on the bench and please keep posting pics of your 1/87 madness!!! Best wishes to downtown Ohio and hope you guys are ok...

On Sunday, I added the IP and then started weathering the driver's compartment,
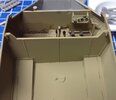
IMG_3244.JPG
I think I got the IP straight, at least it looks like it. Slapped some mud and some wash around on the flooring. I did some more today, but didn't take any pics. DOH!!! I had also test fitted the ammo storage bins and had to scrape off the mud and paint where they are mounted,
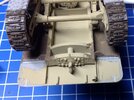
IMG_3245.JPG
That's when I noticed a couple of things. There are two bolts that are mis-cast on the tow pintle mounting plate (left side) and the two tubular pieces in the middle that shouldn't be there. They were left over from the mold casting block that was attached to the rear deck for the casting. I'll just snip them off and smooth the area out, hopefully not pinging the taillight off in the process. Today, I also gave the complete underside a wash with AV's European Dust. Again, no pics.....

While looking at the few reference photos of this vehicle, I noticed that the ammo bins were added after the first couple were built. Here's an initial Somua during field testing in France,
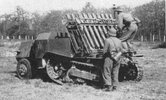
R.jpg
You can clearly see there are no storage bins mounted under the firing table deck. Makes you wonder where they would store the extra 81mm mortar rounds...Then,
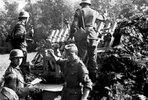
S1.jpg
Here you can see the bin under the firing table deck. Just a little tidbit to keep you all awake and thinking for a minute...

Short and sweet tonight......Thanks for looking and have a great week everyone...

Prost
Allen
 

Mini Me

SMF Supporter
Joined
Jun 1, 2018
Messages
10,161
Points
113
First Name
Rick
Nah Allen.....no snow yet, been in the 50's daytime and Hi 30's evenings so technically just not cold enough. We have had some rain showers though. As to my beverage of choice....Whiskey, Whiskey or Whiskey....neat or rocks.
Really a nice bit of progress on this, loving the IP in place....should add a lot of interest to the drivers station. I assume from the box art, it will be visible from the top. Too bad yer working all the time, is this just a temporary thing or will 3 days a week be your SOP from now on? ;)
 

Allen Dewire

Proud Rabble Member
SMF Supporter
Joined
Apr 27, 2018
Messages
4,105
Points
113
Location
Bamberg
First Name
Allen
Evening everyone,

Time for an update as I haven't just been sitting around on my duff. Had a little loss of resin Mojo for a few days, but it's back now...

Nah Allen.....no snow yet, been in the 50's daytime and Hi 30's evenings so technically just not cold enough. We have had some rain showers though. As to my beverage of choice....Whiskey, Whiskey or Whiskey....neat or rocks.
Really a nice bit of progress on this, loving the IP in place....should add a lot of interest to the drivers station. I assume from the box art, it will be visible from the top. Too bad yer working all the time, is this just a temporary thing or will 3 days a week be your SOP from now on? ;)

Thanks so much my friend. I only work 5 hours a day, 6 days a month and last week was a holiday vacation week here. My apprentice had the week off, so I filled in for him on Monday and Wednesday. I didn't have to work Friday though, as there wasn't a lot to ship out. Usually, I only work on Wednesdays when he has to go to school and 1 or 2 other days in a month. That's enough!!! I haven't had a good Bourbon or Whiskey in about 9 years. Used to love my 8-year-old Wild Turkey on the rocks.......Those were the days!!!...

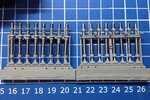
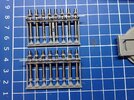
As I said in my answer to JimR above, the worst has arrived, and it is the mortar row assemblies. I have been working my way through it after studying the instructions over and over again. The first step was to clean up the resin mold flash on the tubes without cutting off or busting any of the delicate parts. A hobby knife and tweezers did the job,

IMG_3247.JPGThe set on the left still needs cleaning. The set on the right came out pretty good. There were two things I found out while doing this, First, the tubes just sit on/in their bases and can wobble around. The second, the little vertical rods on the right set, between the tube collars and the upper frame needed to be removed from both sets. Nipped them off and found you can slide the barrels up and down in their mounts. I decided it would be better to CA the tubes to the bases for more structural integrity and strength,

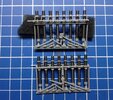
IMG_3248.JPG
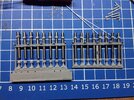
There were a few holders that weren't cast correctly and needed to be deepened to hold the barrels in place. others also needed cleaning out to give them a good seat for the CA. I managed to break one off while doing this, but it can be easily fixed. I also managed to break off one of the collars while cleaning the flash under the lip of it. This could be fixed later after attaching the wire framing. I then went on to CA'ing the barrels in their bases,

IMG_3249.JPG
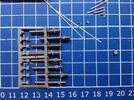
I slid the barrels down leaving just enough room to apply the CA (left). I did 4 at a time, applying CA with a toothpick, and seated them into the bases. Then it was on to making the support framing for them. The kit includes 0.30 wire stock and 0.80 plastic stock for this. You also have the holders for it. You need 4 pcs of wire, 46mm long and 2 pcs of plastic rod, 51mm long. These are the holder pieces slid on the wire stock for one tube row. You have to make two of them,

IMG_3250.JPG
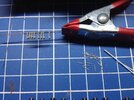
The little rods pieces are from the tube collars, and they could be useful later. In between, I did a test fit of the tube rows into their mount holes on the turntable. The base rods were too short and didn't even fit into them. I had to shim the sides with 2 pcs of 0.10 sheet, cut to size and drilled,

IMG_3251.JPG
With that done, I moved on to adding the frames to the barrel assemblies. This was very tedious work and took quite a bit of time to accomplish. I finally arrived at this,

IMG_3252.JPG
It's hard to see in the pic, but the collar lip piece goes between the two wires to hold them. The white rod length has to be 3mm longer to attach other pieces to adjust the tube row degree difference. You will see this later when the rows are finished. There is a bit of work to CA the little supports between the 0.30 and 0.80 rod lengths to make them straight. It was now time to add the adjusting mechanisms for the barrels,

IMG_3253.JPG
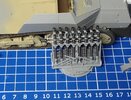
Now I could re-attach the broken collar and you can see how the collar lips fit between the 2 wires (upper row). The mechanisms allowed the outer 3 barrels to be adjusted outwards for a wider and better saturation of fire. Lastly, I wanted to do a test fit to see how the rows fit on the turntable. Very carefully I popped them into their holes,

IMG_3254.JPG
The shims worked perfectly, and the tube rows sit good in their place. I'm pretty damn happy with the whole affair!!! It was a bunch of hard, fiddly and nerve-wracking work, but in the end, I'm still sane and the kit is still on the table, not in the bin. As it stands right now, this build has had 4 broken parts, all fixed and only 2 scratchy plastic pieces added. The rest of this build is OOB and I hope to keep it that way......

Thanks for your patience and for looking in. I also hope what I've described is not too confusing. The instructions are very basic and sometimes hard to follow, like most resin kits. I can only wish Luciano will make a better set of instructions one day. So, people, all C, C, and abuse is welcome any time and have a great week.

Prost
Allen
 

Mini Me

SMF Supporter
Joined
Jun 1, 2018
Messages
10,161
Points
113
First Name
Rick
Looks Good Allen, steady as she goes....
 

JR

Member of the Rabble and Pyromania Consultant
SMF Supporter
Joined
May 26, 2015
Messages
17,278
Points
113
Location
lincs
First Name
John
Well you've certainly beaten that into shape brother. Top class work in all respects .
I can see this getting a double Dogs award at the rate you are going .
The committee have been hard at work discussing this extremely rare occurrence.
 

Airborne01

SMF Supporter
Joined
Mar 30, 2021
Messages
3,177
Points
113
Location
Essex
First Name
Steve
I've never attempted a resin AFV but you are making such a good job of it I may be tempted in the future! Nice job so far!
Steve
 

Jim R

SMF Supporter
Joined
Apr 27, 2018
Messages
13,753
Points
113
Location
Shropshire
First Name
Jim
You really are making a great job of this. As Steve says it may tempt us scaredy cats to try a resin kit in the future. Very neat work and well done for figuring out the less than ideal instructions.
 

adt70hk

I know its a bit sad but I like quickbuild kits!!!
SMF Supporter
Joined
Sep 4, 2019
Messages
9,507
Points
113
First Name
Andrew
Allen,

Sorry got very behind on this. What can I say, other than......WOW!!!

simply brilliant!!

Very well done so far.

Andrew
 

Allen Dewire

Proud Rabble Member
SMF Supporter
Joined
Apr 27, 2018
Messages
4,105
Points
113
Location
Bamberg
First Name
Allen
Late Afternoon Fine Folks,

As some of you may have noticed, lately I have been occupied by other things, but I still have been working on the Somua. For the late replies, I truly apologize to you all.

Looks Good Allen, steady as she goes....

Thanks Bro, and steady is a big prob as you will see below...
Well you've certainly beaten that into shape brother. Top class work in all respects .
I can see this getting a double Dogs award at the rate you are going .
The committee have been hard at work discussing this extremely rare occurrence.

Thanks Dude 2, but It's not worthy of 2 Dogs awards in my opinion. I don't think it will be even good for 1 award the way it's been going lately...
Cracking work my friend.

Thank you too Buddy!!! I damn near cracked the thing with a hammer though...
I've never attempted a resin AFV but you are making such a good job of it I may be tempted in the future! Nice job so far!
Steve

Much appreciated Steve and you should really try a resin kit. I would suggest one with fewer tiny parts though. Trying to get them together without 3 hands can destroy your nerves for sure. See below...
stunning stuff Allen, that's quite a challenge

You are too kind Mr. Merryweather!!! A more correct term for 'challenge', in this build, has to be 'PITA' Neil. Thanks for looking in...
You really are making a great job of this. As Steve says it may tempt us scaredy cats to try a resin kit in the future. Very neat work and well done for figuring out the less than ideal instructions.

Thank you Jigs!!! There is nothing to be afraid of with a resin kit. Nerves and patience are your best friend Sir. Give one a go!!!...
Allen,

Sorry got very behind on this. What can I say, other than......WOW!!!

simply brilliant!!

Very well done so far.

Andrew

No worries Andrew, as I know work has been beating you up of late. I do appreciate you looking in and with so much happening here on the forum, it's not easy to keep up with it all. I'm proof of that my friend...
Outstanding. Pretty amazing result.

Thank you too Paul!!! I only wish I had the talent to make the mortar rows fully workable. With plastic, I'd have a chance. With resin, I'd have better luck sandpapering a Wildcat's ass in a phone booth...
That's just showing off that is!! ;)

Not really Mr. Smiff. The kit itself is pretty amazing and very well cast. One just has to put it together without sticking your fingers to the parts or to each other Andy. If I can do it, you could do it too, plus, you have Cohan to help if needed!!!...

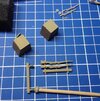
Now I knew the hardest part of the build was coming up and it took 2 days to finally accomplish it. First though, I added the stowage bins after I had mucked them up as one couldn't do it after they were CA'd. I also decided that the rifles in the racks needed to go and I thought about giving the gun commander an MG instead of a 98K rifle. Here's a pic,

IMG_3257.JPG
I nipped off the rifles on the first rack and drilled out the remaining resin. Worked great on the upper holder, but my sausage fingers broke the lower one while drilling it out. That's where the idea for the MP-40 came into play. I gave them a shot of color, along with the bins and will paint the rifles carefully later.
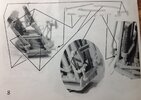
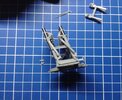
Now it was time to assemble the elevation mechanisms for the barrel rows. I knew from the start that this would be the most tedious and nerve-wracking bit of this build. A few of the parts were tiny and the assembly had to be put together w/o CA to set them in their proper positions. An overview of the instructions,

IMG_3298.JPG
You had to CA the two elbows onto the tube frames first. There is no given spot where they go, so I used my guesstimation system and put them on,

IMG_3294.JPG
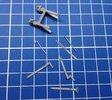
I sort of used a bit too much CA as I didn't want them to ping off when I started to add the rest of the parts. The parts,

IMG_3293.JPG
We are using the bottom 3 parts and I have placed the long bent arms in the L-shaped connectors. The pin in the L goes into the elbows on the frame and the adjusting handle goes in the other pin on the ends. If you look at the pic with the elbows above, you will also see the two arms on the white rod. these have to go into the other end of the long bent arms. Are we confused yet??? I am...
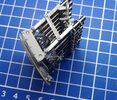
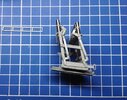
Luckily most of the pins stayed in the parts so you could assemble the mechanisms to get an idea where to CA the L- brackets to the elbows. Man needs at least 3-4 hands and 2 sets of tweezers to do this. I spent 5 1/2 hours yesterday and an hour today to finally get the parts in their place and hit the L's with CA. What a freakin' beatch that was. I stopped yesterday before I lost my cool and grabbed the BFHammer!!!!........Today, we ended up with this,

IMG_3297.JPG
I still needed to add the barrel row connectors. After another 1/2 hour, they were finally placed and I could CA all the joints, so it didn't fall apart (for the 20th time). I used ladder from my Mossie build as a support under the long bent arms above the frame U-arm,

IMG_3301.JPG
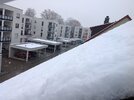
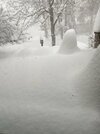
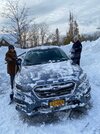
I only need to CA the ends on the plastic rods to finish this PITA step. Then I can add the last few parts to complete the mortar table. With that done, I can hit it with the hissy stick. I can't say when I'll fire up the hissy because when I got up this morning, we had this,

IMG_3295.JPG
0° C and I just love winter!!!...

That's all for now good people and I need a cold one. Sorry again for the late replies and keep on slinging glue!!!

Prost
Allen
 

Tim Marlow

Little blokes aficionado
SMF Supporter
Joined
Apr 27, 2018
Messages
16,797
Points
113
Location
Somerset
First Name
Tim
Excellent work going on here Allen. Fiddly, but worth it!
 

JR

Member of the Rabble and Pyromania Consultant
SMF Supporter
Joined
May 26, 2015
Messages
17,278
Points
113
Location
lincs
First Name
John
Dude1,Your confused ! Well I am just looking at the photos. Glad to see the Sand Pit looking so festive, you can keep the white stuff on your side of the same please .
 
Top