And another slow build - Antar Mk.3 + Trailer....

Scratchbuilder

SMF Supporter
Joined
Jul 2, 2022
Messages
2,031
Points
113
Location
Luton
First Name
Mike
I’ve not built many Accurate Armour kits, but in the ones I have, all have had parts whose moulds had shifted. Especially round ones like an Strv 103 gun barrel and the equilibrators on their T26E4 conversion kit.
Jakko, tell me about it. I am a novice caster regarding casting my own resin items, but for crying out loud how easy is it to check you have the mould set up correctly....
 

Scratchbuilder

SMF Supporter
Joined
Jul 2, 2022
Messages
2,031
Points
113
Location
Luton
First Name
Mike
Michael,
Sorry to hear about Mavis. Accurate Armour as I said previously do put out some interesting kits, but it also appears from this build and others that I have seen that the moulds are well past their useful life given the finish on the parts. Luckily you have the skills and patience to put them right.
scottie, I do not think it is the age of the moulds, I put it down to a lack of proper quality control coupled with the excuse that you are an experienced modeller - sort it....
Mike
 

Scratchbuilder

SMF Supporter
Joined
Jul 2, 2022
Messages
2,031
Points
113
Location
Luton
First Name
Mike
Update,
Many thanks to you all for your condolences, SWMBO had also added her thanks to you all.
Can I draw a line under the standard of the kit and production failures - we have actually been here before with my Chieftain Bridgelayer build/marathon. But thanks for all your input. Just off now to spend a week on the centurion and then back to this build.
Cheers,
Mike.
 
  • Like
Reactions: JR

Scratchbuilder

SMF Supporter
Joined
Jul 2, 2022
Messages
2,031
Points
113
Location
Luton
First Name
Mike
Update,
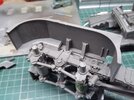
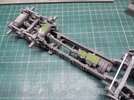
A bit more work on the Antar today, still adding parts to the chassis...
20221130_145627_HDR.jpg
Still plenty of filler to fill in the seams and air bubbles.....
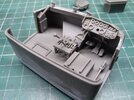
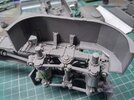
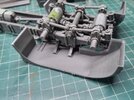
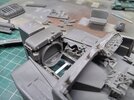
Started work on the cab by first joining the back to the floor and then adding the dash board, gear levers/gates and the floor pedals along with the handbrake and foot pedals....
20221130_145542_HDR.jpg
I will spread a bit of filler over the foot pedals to smooth them out and get rid of the seams. What looks like a fork handle is actually the hand throttle....
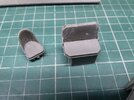
20221130_145557_HDR.jpg
The seats during clean up and will be added once the cab is ready for the roof and top to be added.
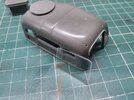
20221130_145549_HDR.jpg
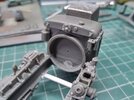
Here is the roof part and in front is part one of the glazing you have to add and cut to size yourself, such fun....
And that is where I am today. Next it will be finishing off the glazing and then spray the inside with primer and top coat - wondering if aluminium was used, I know the inside of the 432's we had was painted in 'silver'..... Suggestions.
Cheers
Mike.
 

Jakko

Way past the mad part
SMF Supporter
Joined
Apr 28, 2018
Messages
10,936
Points
113
First Name
Jakko
wondering if aluminium was used, I know the inside of the 432's we had was painted in 'silver'..... Suggestions.
British AFVs were painted with that silvery paint that apparently never really dried because it was supposed to help reflect the light and so make the interior a bit less dark — which would probably not be needed in the cab of a lorry. But I don’t know for sure — could well be there were painted like that too?
 

Tim Marlow

Little blokes aficionado
SMF Supporter
Joined
Apr 27, 2018
Messages
16,856
Points
113
Location
Somerset
First Name
Tim
British AFVs were painted with that silvery paint that apparently never really dried because it was supposed to help reflect the light and so make the interior a bit less dark — which would probably not be needed in the cab of a lorry. But I don’t know for sure — could well be there were painted like that too?
That stuff was aluminium based and very soft when dry…..…we used it to paint handrails and such when I first worked at Porton. Awful stuff, like painting with water…….I think the tins we got had been in store since WW2 :tongue-out3: . The pigment had settled so hard to the bottom of the tin we had to literally chisel it up with a screwdriver before it could be mixed.
If you went down the stairs too fast it would burn pigment into your palms……and it always felt wet…..
 

Jakko

Way past the mad part
SMF Supporter
Joined
Apr 28, 2018
Messages
10,936
Points
113
First Name
Jakko
The pigment had settled so hard to the bottom of the tin we had to literally chisel it up with a screwdriver before it could be mixed.
Oh, it was made by Humbrol, was it?

I’ve seen interior photos of Dutch Centurion MBTs that had been repainted inside with the pale green used in M113s, presumably because the Army had had enough of that silvery stuff that the tanks had been delivered in. Since the green was put over the silver paint (you can tell from how it went over many of the labels by careless brushwork), I wonder how securely it actually stuck to the vehicle.
 

JR

Member of the Rabble and Pyromania Consultant
SMF Supporter
Joined
May 26, 2015
Messages
17,363
Points
113
Location
lincs
First Name
John
Wibble nice to see this and sorry I'm late .
I have the Dinky model of this complete with the Cent , unfortunately the later has a broken barrel :crying:

Wobble . Look out for men with pointed shoes, they are about !
 

Ian M

Administrator
Staff member
Administrator
Moderator
SMF Supporter
Joined
Dec 14, 2008
Messages
19,802
Points
113
Location
Falster, Denmark
First Name
Ian
Just had a look in Mike Starmer's British Camouflage notes, Soft skins interiors where normally painted with the same paint as the main external body colour as given at the factory.

I must admit that the price AA take for their models, I would expect them to be pristine A1 mouldings! I Have seen three 'much needed' kits from them, the 4.7 Heavy AA gun. the 4.5 and 7inch guns. But from what I have seen of other kits, I think I will pass.
 

Scratchbuilder

SMF Supporter
Joined
Jul 2, 2022
Messages
2,031
Points
113
Location
Luton
First Name
Mike
Jakko & Tim,
Now I remember!!!! Yes it was absolute cr4p to apply, you would start off with a flat brush and after ten minutes it would look like a tiolet brush, and we used to remove any excess with petrol soaked cotton waste which made it even worse, and after six months the stuff was still tacky.... So 'silver' it will be. Thanks for reminding me.
Mike
 

Scratchbuilder

SMF Supporter
Joined
Jul 2, 2022
Messages
2,031
Points
113
Location
Luton
First Name
Mike
Just had a look in Mike Starmer's British Camouflage notes, Soft skins interiors where normally painted with the same paint as the main external body colour as given at the factory.

I must admit that the price AA take for their models, I would expect them to be pristine A1 mouldings! I Have seen three 'much needed' kits from them, the 4.7 Heavy AA gun. the 4.5 and 7inch guns. But from what I have seen of other kits, I think I will pass.
Ian,
Many thanks for the reminder about Mike Starmers booklets, I have them on the shelf and totally forgot.
As for the AA kits, I fully agree, if you paid out for a plastic kit of the same price it would be an all singing all dancing kit. But needs must and being flush with cash at the time..... well the rest is a long story....
Mike
 

Scratchbuilder

SMF Supporter
Joined
Jul 2, 2022
Messages
2,031
Points
113
Location
Luton
First Name
Mike
Wibble nice to see this and sorry I'm late .
I have the Dinky model of this complete with the Cent , unfortunately the later has a broken barrel :crying:

Wobble . Look out for men with pointed shoes, they are about !
Hello Wobble, no need to panic, this will be long and slow, so plenty of time to catch up... I have people on here that arrived, fell asleep and are now covered in cobwebs with their families advertising in the lost and found columns.....
Shame about the Dinky Centurion, if it had been 1/35 scale I could have sent you a replacement metal barrel....
The pointy shoe brigade are in hibernation or deceased as I have not heard him late at night having his normal clear out....
Bet you laughed about the chair, Yvonne did, was laughing as she was about halfway up the stairs.....
Wibble.
 
  • Haha
Reactions: JR

Mini Me

SMF Supporter
Joined
Jun 1, 2018
Messages
10,162
Points
113
First Name
Rick
So sorry to hear about Mavis. :disappointed2:

More great work on the Antar. My favourite Dinky when I was a nipper was the Mighty Antar, with, of course, a Centuion on the back.
Pete
Just for you Pete!........my Antar was played with but the Centurion is still Mint in the Box. :thumb2:P1012477.JPG
 

Mini Me

SMF Supporter
Joined
Jun 1, 2018
Messages
10,162
Points
113
First Name
Rick
Just had a Ketchup on this Mr. Wibble The dreaded resin kits are a last resort for me........just a matter of how bad I want the model that it represents. I would rather spend hours cutting up a plastic model and adding untold amounts of scratched details even though the model is available in resin with nicely done detail on it already.........just hate gluing me pinkies together I guess. You on the other hand are doing a great job on this so far hope to see more on it soon.
Sorry to hear about Mavis.....When I lost my last Springer Spaniel I had to take a week off.
 

Scratchbuilder

SMF Supporter
Joined
Jul 2, 2022
Messages
2,031
Points
113
Location
Luton
First Name
Mike
Just had a Ketchup on this Mr. Wibble The dreaded resin kits are a last resort for me........just a matter of how bad I want the model that it represents. I would rather spend hours cutting up a plastic model and adding untold amounts of scratched details even though the model is available in resin with nicely done detail on it already.........just hate gluing me pinkies together I guess. You on the other hand are doing a great job on this so far hope to see more on it soon.
Sorry to hear about Mavis.....When I lost my last Springer Spaniel I had to take a week off.
Hello Rick,
Thankfully I now have very few resin kits in my stash, and I agree with what you say about scratbuilding. But when the cash is available this seemed at the time to be the easy answer. Yes i have come close to glueing parts of myself to the model...
Many thanks for your input.
Mike.
 

Scratchbuilder

SMF Supporter
Joined
Jul 2, 2022
Messages
2,031
Points
113
Location
Luton
First Name
Mike
Update,
So the fun continues.... I got out the prayer mat and recieved devine instructions, at least the parts of the instructions you will need when doing the major assembly, such as where do the fuel tanks fit???? By looking and looking at the vague instruction photos I spotted the brackets for the fule tanks, they have now been cleaned up and dry fitted, but I need to add the strapping to the tanks from scratch as the resin - well it is resin.....
I then cleaned up the radiator cover and it fitted as it should - but then came the radiator, and as I want to fit it after the chassis is painted did a dry run - it does not fit!
20221203_101022_HDR.jpg
This is what it should do....
20221203_100557_HDR.jpg
And this is what happens when you try to fit it between the front wings - notice the gap of about 2mm. I had already removed a filter fitting from the right side of the radiator and it now looks like I will have to cut away the sloped lower sides to get a fit - more later....
I then looked at the rear fenders and as I plan to paint the chassis and all attached parts at the same time decided to investigate these... So from earlier in the build and in the first two pages you are informed to fit the springs and axles, done that! At no point does it tell you or show you that in fact you cannot fit the reat fender after.....
20221203_100740_HDR.jpg
Above you can see the right side fender attached - but if you look closely you can see that the front support is no actually touching as it should. Because if you do it the way it comes then the fender will take on a distinctly downward slope from the chassis outwards.
20221203_100634_HDR.jpg
Here again is the left fender showing the same problem. Also note that the rear of the two supports is actually missing, because you cannot get this support to fit behind the springs without cutting away the part of it that glues to the chassis.
20221203_100622_HDR.jpg
So the solution is to ignore the instructions and to fit the fenders first, and most importantly make sure they are square and flat across the chassis, then you can fit the springs and axles, and to do this I set up a flat surface of wood block, laid on a good lashing of c/a where the join is on both sides, then carefully attached the fenders and waited untill the c/a was just at the stage where it starts to harden, then turn the whole upside down and lay it on the block and make sure it is square and flat. And as I have said then you can attach the springs etc. Not hard to do if the instructions had pointed out this, but a pain to try to sort it out after. Still they are now on and I can get back to the next problem - assembling the new office chair....
Cheers
Mike.
 

Jim R

SMF Supporter
Joined
Apr 27, 2018
Messages
13,822
Points
113
Location
Shropshire
First Name
Jim
Making good progress Mike. It's only your skill and patience that is keeping this off the shelf of doom. A lot to do to overcome the shortcomings of the kit. I have no doubt, however, that it will be a really fine result. I hope the trailer is less problematic.
 
Top