Doug's 1/48 Airfix Sea King

Waspie

SMF Supporter
Joined
Mar 13, 2023
Messages
2,481
Points
113
Location
Portland - Dorset
First Name
Doug
Starting a blog on this one although it ain't going to be a fast build.
Not doing a sprue show as Rick has covered that one and one kit is the same as the next!!

My end product hopefully will be a facsimile of one of my old squadron cabs. 819 Naval Air Squadron based at Prestwick Airport, Ayrshire, Scotland and the site was named HMS Gannet. They started with Mk1 SK's but that was before I joined, prior to that they were based at Ballykelly, Northern Ireland with the Wessex Mk3. . By the time I arrived in 1981they had moved to Scotland and had been upgraded to Mk2 SK's and then later on upgraded again to the Mk5's and a lot later the Mk6. However 819 wasn't what I would call a main stream SK squadron. 819 had many roles and our operational area was 'different' too. The unit was primarily an ASW asset for the protection of the submarine fleet at Faslane. However, we also conducted SAR duties covering the whole of the West coast of Scotland, Irish Sea. So we did a mix of mountain rescues and sea jobs.
Operating as we did from a land based platform we became adept at shallow water ASW, (as we were the only front line squadron with no warship to deploy to), very different to deep water submarine detection. We were also predominantly active sonar operators, hence my build, albeit the Mk5 variant will not have the LAPADS, (passive sonics), table fitted in the back. It will also have the rescue hoist fitted. I mention it as the plans dictate the hoist NOT fitted to the Mk5 ASW version!! Which I find totally strange!! The paint scheme will be slightly different from those supplied as our SK's were of the RAF blue grey colour.

That was the background, to date all I have done is wash the sprue's and draft a rough plan and scribble notes of what I will try and build. The plans have been copied.

I'm already in the process of acquiring some additional bits. Eduard instrument panel and back seat console upgrades as well as harnesses. (Although trying to get seat harness for the front seats are proving difficult as they appear to have been snapped up. Guess I'll have to wait until they come in stock!!)
The correct transfers are proving to be a PITA too. So I may have to resort to a modified scheme. A Mk5 with white numerals and lettering rather than the late 1982 on wards black tactical lettering that was adopted.

Hopefully I'll be ready to start the actual build in a day or two - until then!! Happy new year folks!
 

Jim R

SMF Supporter
Joined
Apr 27, 2018
Messages
13,735
Points
113
Location
Shropshire
First Name
Jim
I've only ever built one helicopter and that was a challenge to say the least. I'll enjoy seeing how you get on with this.
 

Waspie

SMF Supporter
Joined
Mar 13, 2023
Messages
2,481
Points
113
Location
Portland - Dorset
First Name
Doug
Disaster nearly struck - so early too!!:worried:
Madam, aka the mad b*tch from hell, the house she devil found my paper copy if the instructions and only being 11 months old decided!! Yum Yum, that looks tasty and duly started eating the first few pages!!:rolling: Luckily it's only a matter of printing off the first few pages again.
My fault for leaving them where she could reach.
As a result of her guilt, I am currently receiving the nicest doggy cuddle.:blow-kiss: You can't be angry for too long, in my case nano seconds. Tike!!!
 

Waspie

SMF Supporter
Joined
Mar 13, 2023
Messages
2,481
Points
113
Location
Portland - Dorset
First Name
Doug
I've only ever built one helicopter and that was a challenge to say the least. I'll enjoy seeing how you get on with this.
This is my fourth kit since returning and this is the second helicopter. The last was my first kit, a present from number 1 son which got me back into the hobby. It was the RAF 1/72 Sea King HAR3. ( Link to build ) Hope to improve on that.
 

JR

Member of the Rabble and Pyromania Consultant
SMF Supporter
Joined
May 26, 2015
Messages
17,275
Points
113
Location
lincs
First Name
John
I'm in Doug. Tea and biscuits please.
 

adt70hk

I know its a bit sad but I like quickbuild kits!!!
SMF Supporter
Joined
Sep 4, 2019
Messages
9,501
Points
113
First Name
Andrew
Starting a blog on this one although it ain't going to be a fast build.
Not doing a sprue show as Rick has covered that one and one kit is the same as the next!!

My end product hopefully will be a facsimile of one of my old squadron cabs. 819 Naval Air Squadron based at Prestwick Airport, Ayrshire, Scotland and the site was named HMS Gannet. They started with Mk1 SK's but that was before I joined, prior to that they were based at Ballykelly, Northern Ireland with the Wessex Mk3. . By the time I arrived in 1981they had moved to Scotland and had been upgraded to Mk2 SK's and then later on upgraded again to the Mk5's and a lot later the Mk6. However 819 wasn't what I would call a main stream SK squadron. 819 had many roles and our operational area was 'different' too. The unit was primarily an ASW asset for the protection of the submarine fleet at Faslane. However, we also conducted SAR duties covering the whole of the West coast of Scotland, Irish Sea. So we did a mix of mountain rescues and sea jobs.
Operating as we did from a land based platform we became adept at shallow water ASW, (as we were the only front line squadron with no warship to deploy to), very different to deep water submarine detection. We were also predominantly active sonar operators, hence my build, albeit the Mk5 variant will not have the LAPADS, (passive sonics), table fitted in the back. It will also have the rescue hoist fitted. I mention it as the plans dictate the hoist NOT fitted to the Mk5 ASW version!! Which I find totally strange!! The paint scheme will be slightly different from those supplied as our SK's were of the RAF blue grey colour.

That was the background, to date all I have done is wash the sprue's and draft a rough plan and scribble notes of what I will try and build. The plans have been copied.

I'm already in the process of acquiring some additional bits. Eduard instrument panel and back seat console upgrades as well as harnesses. (Although trying to get seat harness for the front seats are proving difficult as they appear to have been snapped up. Guess I'll have to wait until they come in stock!!)
The correct transfers are proving to be a PITA too. So I may have to resort to a modified scheme. A Mk5 with white numerals and lettering rather than the late 1982 on wards black tactical lettering that was adopted.

Hopefully I'll be ready to start the actual build in a day or two - until then!! Happy new year folks!

Doug

I've just had a thought about the lettering....PM inbound.

Andrew
 

Waspie

SMF Supporter
Joined
Mar 13, 2023
Messages
2,481
Points
113
Location
Portland - Dorset
First Name
Doug
Still in the planning phase. The weekend was nose in the photo albums looking for suitable detailed images.
Spent today delving into colour conversion charts. Then working through the paints I do have. Next, the list of paint colours required to complete and do justice to the machine. Finally was an order to John for the items required. (And Amazon for the colours for the colours 'out of stock').
Don't intend actually building it until I have assembled all the necessary parts and paints.
I have to admit to a long think over the weekend wondering do I build the Mk2 as I have more colour images to work from or stick with the Mk5 as it was the Mk5 I probably spent more time in. (Note to self - check log book to see if that's correct).
Must admit to a certain amount of regret. I wish now I had taken more pics 'of' the aircraft rather than taking pics 'from' the aircraft. Too late now.
Hopefully next post will be the build start!
 
Last edited:

Waspie

SMF Supporter
Joined
Mar 13, 2023
Messages
2,481
Points
113
Location
Portland - Dorset
First Name
Doug
Finally, out of the blocks!
The vast bulk of paint has arrived, (thanks Scale Model Shop/John). As a result I made a start today.
Not a huge start but at least its started.
Holes in the fuselage and deck as well as drilling out the sonar well. Cleaned the sonar well. Then after a bit of doggy maintenance, (grooming and bath), it was back to the SK.
Front bulkhead and broom cupboard installed. Not forgetting the 'P' tube!!!
A busy working week looms so glad I was able to make a start.
IMG_1153.JPG

Bit closer shot!
IMG_1152.JPG
 

Waspie

SMF Supporter
Joined
Mar 13, 2023
Messages
2,481
Points
113
Location
Portland - Dorset
First Name
Doug
Things are on the up, another day, albeit cold, I have been able to do a little bit more to the 'King'!!

Assembled the two front seats, a bit more fiddly than expected but got there! (No pics).
I concentrated on the IP and back seat instrumentation. In that I took a big bravery pill and set to the detail with my Dremel. This in preparation of the Eduard AM bits I have.
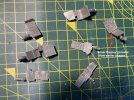
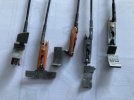
So, and this was the cold bit. Off to the garage, set up my Dremmel, (After numbering the individual parts as they are off the sprue's). I used the long extension cable that fits to the Dremel to give me a bit more control. Then set to the removal of the surface detail Airfix had done. Once the first one was done I was pretty much committed to the process so finished off some 6 pieces that make up the pilots consoles, the radar and sonar displays!! As well as those bits there were a couple of items on the inner fuselage that required removal, pilots window jettison handles. Eduard have supplied a side panel with more detail.
Now they are ready for priming when the weather gets a lot warmer.

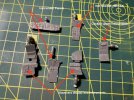
Before pic of the instrument clusters!
IMG_1154.JPG
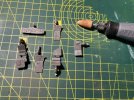
Before pic with removal tool!!!
IMG_1155.JPG


Images immediately after rough removal with Dremel.
IMG_1156.JPG

Tidied up waiting for cleaning and priming.
IMG_1157.JPG

Look very rough to me but I think if I attempted to removal all traces of the previous detail I would leave no plastic to attach the aftermarket detail to! All the raised bits are gone leaving only the sunken detail.

Any comment good bad please as this is another first, never fitted aftermarket pieces so still in learning mode.

That's all for today folks.
 

JR

Member of the Rabble and Pyromania Consultant
SMF Supporter
Joined
May 26, 2015
Messages
17,275
Points
113
Location
lincs
First Name
John
Brave man Doug, have to admire you doing this at that scale. Removal looks fine to me.
 

Waspie

SMF Supporter
Joined
Mar 13, 2023
Messages
2,481
Points
113
Location
Portland - Dorset
First Name
Doug
Scrapped a few minutes today. (I think it's called grovelling!!!!).
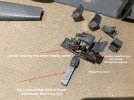
Anyway, found a part that needed detail removed so a cold trip to the garage and put that right. It was the upper sonar console that held the bathythermograph box, HF radio and other odds and sods.

Assembled the remainder of the seats, (a whole two) back seaters!!!. Started on the ancillary equipment that I want to prime first. Only managed to complete the sonar gear. I have deliberately left the actual sonar transducer, that's the bit that actually bangs out the sound and receives the incoming sonar returns. We called it the SU or Submersible Unit as that's the bit that was 'dunked' in the water. Then the returning noise was heterodyned and the result was or should be a submarine or whale or school of fish. One chap even found a crashed Tornado!! Funny what you find under the waves!!!
Anyway, I left the SU out, partly to make painting and aftermarket part fitting and also to modify the base. I plan on drilling a small hole where sat the temperature sensor, you can't see it but that's where it was found.
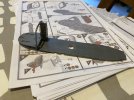
Also, the 'T' handle for raising and lowering the SU was moved and turned through 90 degrees. The position on the kit is incorrect for a sonar in the raised position. (See Image).

Here is todays work.
IMG_1160.JPG
 

Waspie

SMF Supporter
Joined
Mar 13, 2023
Messages
2,481
Points
113
Location
Portland - Dorset
First Name
Doug
Made some progress today after a family day yesterday. Pics later!
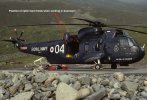
In the mean time, a pic that shows the position of the cabin hand holds that operators in the cabin doorway would use when standing in the doorway working, winching, rapid roping and such. Rick (@rickoshea52 ) and myself were discussing it as the kit shows the position of an external hand rail as used on the HAR and HU versions but not the HAS Marks of the Sea King.It's been bugging me for ages and about four o clock this morning it struck me.
Upper cabin door, fore and aft, sat at 45 degrees in the upper corners.
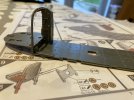
Pic showing their position. Now!! As the kit doesn't supply these handles - I will!!

(Image of 704 at St Kilda, conducting Tigerfish recovery ops for the lads in the long black tubes!! The 'shuttlecock' arrangement in the background is part of the torpedo recovery kit!)
XV664 St Kilda 2nd August 1982 no 2_edited-1.jpg
 

Waspie

SMF Supporter
Joined
Mar 13, 2023
Messages
2,481
Points
113
Location
Portland - Dorset
First Name
Doug
Back to today's progress.
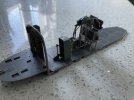
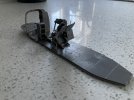
Completed the assembly of the Observers radar console. Also assembled the rack assembly for the ASW box's of magic. Which has created another problem for me. The rack sits just inside the port side forward entrance. The rack is currently empty!! In the real world, there would sit a tower of black box's for the sonar, receivers transmitters, a box for the heterodyning etc etc!! Now!! How will I fill them, I have an idea about the cabling at the back but how to construct tiny black box's will give me something to think about in the mean time!!
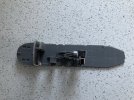
Dry fitted them to ensure they all fit but will leave them separate at the moment until they are primed and painted separately

Dry fitted 1
IMG_1163.JPG

All in the right place!
IMG_1164.JPG

Hopefully the working end will look better once the aftermarket detail is in place on the radar and sonar panels,
IMG_1165.JPG

Going to be having a look at the sea tray next so maybe no more assembly for a few days.
 

Jakko

Way past the mad part
SMF Supporter
Joined
Apr 28, 2018
Messages
10,819
Points
113
First Name
Jakko
Tiny black boxes? Are these all clearly separate boxes, or a big block of boxes stacked tightly together?

If it’s all separate, then you can probably make them from bits of plastic card and/or strip, laminated together if necessary to get the right thickness, then cut and/or filed to the right size.

For one big block, build the basic shape out of plastic card and add details from more bits of card, strip, and what have you, and perhaps by scribing it.

If you’ve got a photo of it, I can probably be more specific about how I would go about making it myself, which may or may not be helpful to your efforts ;)
 
Top