You are using an out of date browser. It may not display this or other websites correctly.
You should upgrade or use an alternative browser.
You should upgrade or use an alternative browser.
Doug's 1/48 Airfix Sea King
- Thread starter Waspie
- Start date
A rattle can of etch primer would probably work better.I took my finger nail to it after reading your reply! Spot on. I’m now wondering if I coat the foil with PVA, allow to fully dry and paint?
Tomorrow job now!
Pete
Scratchbuilder
SMF Supporter
Doug,
This is a great build coming together, and what a temptation to us all to get the kit...
Got to wait untill birthday and hope - letter to self - be a good boy....
Mike
This is a great build coming together, and what a temptation to us all to get the kit...
Got to wait untill birthday and hope - letter to self - be a good boy....
Mike
Waspie
SMF Supporter
So far I'm finding the kit very good. A few niggles but my biggest problem is me.Doug,
This is a great build coming together, and what a temptation to us all to get the kit...
Got to wait untill birthday and hope - letter to self - be a good boy....
Mike
Luckily I have the time to persevere due to the low temperatures to spray in. So my pursuit of the perfect(ish) sea tray will continue. Unlike many I don't have stocks of suitable materials around and don't wish to spend vast quantities of dosh when I'm sure my Blue Peter skills will find something suitable that fits the bill.
Next is lens tissue, (once allowed to dry out). That seems to be a suitable material? I'll get there, tis only time!!
Now! You just carry on being a good boy!! Well not getting caught!!!
Bri62
SMF Supporter
Doug it amazes me the the lengths scratch builders go to for the realism, looking great mate
Waspie
SMF Supporter
Thanks Brian, I'm not really a scratch builder but I do want this to look a decent facsimile of a great naval workhorse.Doug it amazes me the the lengths scratch builders go to for the realism, looking great mate
Jim R
SMF Supporter
Lots of work, lots of learning and lots of fun. Perfect. Coming together very well Doug.
VMS do a special primer for metal parts. Also just roughening the surface slightly hepls the paint to adhere.
VMS do a special primer for metal parts. Also just roughening the surface slightly hepls the paint to adhere.
Waspie
SMF Supporter
Thanks Jim - yeah, mucho learning as I plod along!!Lots of work, lots of learning and lots of fun. Perfect. Coming together very well Doug.
VMS do a special primer for metal parts. Also just roughening the surface slightly hepls the paint to adhere.

I was wondering if a v-light sanding may help!
Waspie
SMF Supporter
Didn't have the inclination to carry on with the experiments today. I say I didn't its more SW(I)MBO found a web site with a huge discount so we now have a ton of new clobber winging its way inbound and I lost nearly the whole day sat on the laptop getting nowhere!!
However! All was not lost. I did do a job I was dreading. Masking up the cockpit greenhouse!! But that was all I managed. Not the nicest of jobs but it had to be done sometime and as the light was in my favour I went for it.
Think I may hide her iPad tomorrow!!!!!
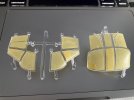
However! All was not lost. I did do a job I was dreading. Masking up the cockpit greenhouse!! But that was all I managed. Not the nicest of jobs but it had to be done sometime and as the light was in my favour I went for it.
Think I may hide her iPad tomorrow!!!!!

Waspie
SMF Supporter
Nothing going on today. It's sub zero here at the moment.
Although I will add, I have ordered some 0.3mm plastic card, (plus a pin vice thingumy), from John with a view to seeing if that will be suitable for my sea tray. I'm determined to have one in the back. Only found one image with no sea tray - that was a GPMG shoot at Otterburn. The gun mount would have precluded having it installed!!
Although I will add, I have ordered some 0.3mm plastic card, (plus a pin vice thingumy), from John with a view to seeing if that will be suitable for my sea tray. I'm determined to have one in the back. Only found one image with no sea tray - that was a GPMG shoot at Otterburn. The gun mount would have precluded having it installed!!
Waspie
SMF Supporter
After the drama of yesterday, (scam), where nothing was achieved.
A short session today where I decided to tackle a job Rick had a wee problem with. The window blanking inserts.
I had decided to tackle it a slightly different way but in the end didn't need to.
To achieve a hopefully successful method after dry fitting them and aligning them. Applied tape to the outside to hold the blanking plate in place. Once happy the blank was aligned to the fuselage I applied TET inside and left to set.
That was it for today as deliveries started rolling in so unpacking, testing and storing packing. SWMBO rules!!! (sadly).
Pic 1
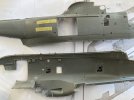
Pic2
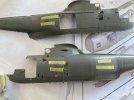
A short session today where I decided to tackle a job Rick had a wee problem with. The window blanking inserts.
I had decided to tackle it a slightly different way but in the end didn't need to.
To achieve a hopefully successful method after dry fitting them and aligning them. Applied tape to the outside to hold the blanking plate in place. Once happy the blank was aligned to the fuselage I applied TET inside and left to set.
That was it for today as deliveries started rolling in so unpacking, testing and storing packing. SWMBO rules!!! (sadly).
Pic 1

Pic2

Waspie
SMF Supporter
Tiny steps today. Didn't do much but what I did I was happy with. (No pics)
First, I grabbed a section of old PE and made myself a small narrow rectangle to place below the sonar console. When the sonar transducer, (SU), is raised into the aircraft it sits on a latch mechanism, BUT. As an added security measure to ensure it doesn't slip and fall below the hull of the Sea King a brake was also applied. The brake was operated by a foot brake. So I cut the PE to size, about 1.5-2mm. Bending the bottom 0.2/0.3mm over. Then it was carefully placed under the sonar console on the deck by the lateral frame.
Once done, I assembled the pilots instrument panel and painted it a matt black and not the gloss black as Airfix state. I cannot remember a glossy surface up front, glare off a shiny surface would be distracting.
I then mixed some sand yellow with a light brown to reproduce the colour of the plastic on the top of the transducer. Once dry it will be suitable 'damaged' to reflect the bouncing off the sea floor, (not intentionally bounced I may add). Also it would be damaged on occasion when bringing it back into the helicopter. A dodgy operation in calm sea states, introduce some wave motion and the SU can swing very violently which has to be arrested before recovering back into the cab.
That was it for today. More paperwork to complete!! (scamming thread).
As I'm still learning the trade. I intend on experimenting with the seats. All the seats have a sheepskin cover over the life raft that sits in the seat recess. The idea being to assist with comfort. I'm going to try and replicate the sheepskin effect by applying some PVA to the seat pan, then applying some cotton wool. Once stuck firmly, I'l tease the cotton wool to the right length and hopefully look. Then touch up with a dirty white appearance!!! Fingers crossed I won't mess that up too much.
Doug
Last edited:
- Joined
- Apr 28, 2018
- Messages
- 10,950
- Points
- 113
- First Name
- Jakko
<aside>As an added security measure to ensure it doesn't slip and fall
That reminds me of a story I once heard about the Canadian air force. Their patrol aircraft had a side-looking camera, which sat on some rails inside the plane. To use it, a hatch was opened and the camera slid out. The camera had changeable lenses, and to perform a lens change in flight, the whole camera had to be pulled back inside, the hatch closed, lens replaced, hatch re-opened, camera slid back out.
Because that was a big hassle, crews soon began to just stick an arm out the open hatch, remove the lens, bring it inside, and then stick out an arm again holding the new lens to screw it in place. That usually went OK, except if somebody dropped a lens and it fell into the sea.
As lenses were strictly accounted for, that meant somebody getting into trouble, of course. The usual solution after this had happened a few times? Jettison the whole camera into the sea.
Because, apparently, those could simply be requisitioned complete, as spares …
</aside>
Waspie
SMF Supporter
Tiny steps!!
Managed a few moments at the bench. Tried a bit of spraying. Deck areas of the SK. Called it off after the first pass as it wasn't as good a day as I thought. Too humid. Stopped before too much damage was caused.
Retired indoors. I filled in some minor gaps from the window inserts. After it set, I smoothed out with some 1200 W&D, making sure to retain the rivet detail.
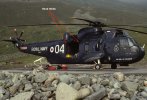
After that I found a suitable piece of plastic from the tracks of my CH2. I used them to install the hand holds as fitted to the Mk1/2 & Mk5 Sea Kings in ASW role. (see attached pics).
Pic1 Windows filled and hand holds fitted. (How Airfix missed that one is odd).
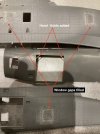
Pic 2. Sea King Mk2 showing actual hand holds.
Doug
Managed a few moments at the bench. Tried a bit of spraying. Deck areas of the SK. Called it off after the first pass as it wasn't as good a day as I thought. Too humid. Stopped before too much damage was caused.
Retired indoors. I filled in some minor gaps from the window inserts. After it set, I smoothed out with some 1200 W&D, making sure to retain the rivet detail.
After that I found a suitable piece of plastic from the tracks of my CH2. I used them to install the hand holds as fitted to the Mk1/2 & Mk5 Sea Kings in ASW role. (see attached pics).
Pic1 Windows filled and hand holds fitted. (How Airfix missed that one is odd).

Pic 2. Sea King Mk2 showing actual hand holds.

Doug
- Joined
- Apr 28, 2018
- Messages
- 10,950
- Points
- 113
- First Name
- Jakko
This shows nicely why it pays to keep every part you have left over from a kitfound a suitable piece of plastic from the tracks of my CH2

rickoshea52
SMF Supporter
rickoshea52
SMF Supporter
Easy fixes though.Yeah, got a plan for them too. I thought they used LIDAR to get the detail!!!
Waspie
SMF Supporter
For you experienced chaps maybe. A five minute fix for you is a nights planning and a days bodging for me!!!Easy fixes though.

rickoshea52
SMF Supporter
For you experienced chaps maybe. A five minute fix for you is a nights planning and a days bodging for me!!!

Drill some holes and some thin plastic rod will do the job.
Another correction to the kit are the pair of door restraining stanchions for the lower personnel door. Cables are attached to the door frame and run over the tops of the stanchions and attach to the door to restrain it in position. Curiously, Airfix included them in the 1/72 kit but not here.
When time comes to fit the upper door a piece of plastic rod will be made for the hold open strut.
View attachment 491769View attachment 491770
