Doug's 1/48 Airfix Sea King

Waspie

SMF Supporter
Joined
Mar 13, 2023
Messages
2,625
Points
113
Location
Portland - Dorset
First Name
Doug
Tiny black boxes? Are these all clearly separate boxes, or a big block of boxes stacked tightly together?

If it’s all separate, then you can probably make them from bits of plastic card and/or strip, laminated together if necessary to get the right thickness, then cut and/or filed to the right size.

For one big block, build the basic shape out of plastic card and add details from more bits of card, strip, and what have you, and perhaps by scribing it.

If you’ve got a photo of it, I can probably be more specific about how I would go about making it myself, which may or may not be helpful to your efforts ;)
Thank you Jacko, no pics of the box's sadly. There was a mish-mash of different size black box's sat on anti-vibration mounts. All connected by cabling to each other on the inner section by the sonar well. I have a plan to make a few from pieces of thicker sprues with some cabling attached to the cack ends. also going to run a section of cables along the sonar cradle spars up to the rear of the displays!
 

rickoshea52

SMF Supporter
Joined
Dec 20, 2011
Messages
3,983
Points
113
Location
North West
First Name
Rick
Dry fitted 1
View attachment 499477

All in the right place!
Do you know Doug, I have seen at least two builds where the troop seats along the starboard have been fitted incorrectly so that they extend into the cargo door aperture! Don’t fancy being on that seat with the door open.
 

Waspie

SMF Supporter
Joined
Mar 13, 2023
Messages
2,625
Points
113
Location
Portland - Dorset
First Name
Doug
Only a little progress today. (SWIMBO - shopping = Me taxi driver and dog walker!)
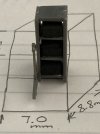
No work on the plastic at all. BUT!! It was out digital calibers and measuring the storage cabinet that stores the avionics boxes. Works out, H 5.4mm, Depth 8.8mm and Width 7.0mm. So looking to source something that size or that I can reduce in size!! That's for another day.
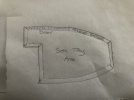
Today was measuring and makings templates for the rear cabin sea tray. The flexible waterproof tray that covers the deck area to avoid the corrosive sea water from coming into contact with the Aluminium and Magnesium alloys of the airframe.
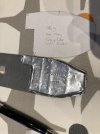
Initially it was measuring the actual area, then tracing out the area and transferring that onto a basic size template. After that it was making a second template that would take into account the additional section that went a few inches over the bulkheads. A long metal plate secured the tray over the cabin door entrance that would allow the sliding door to close. Not finished yet but have reached the stage where I have the basic shape and so the Mk1 sea tray is in prototype mode.
Now I don my apron and become duty chef!!

Progress in pics!
Initial tracing for final template!
IMG_1170.JPG

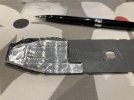
Rough as Moses and in need of refining but I think the material and size are there!! (The actual sea trays was never pretty so not too bothered about aesthetics, I just hope the foil takes paint!! (Cross that bridge later).
IMG_1173.JPG

Edited to add pic from another angle.
IMG_1172.JPG

Comments good bad always welcome, new to this improvising malarky!!!!! I am no Mike or Scottie!!!
 
Last edited:

Waspie

SMF Supporter
Joined
Mar 13, 2023
Messages
2,625
Points
113
Location
Portland - Dorset
First Name
Doug
More experimentation today. Sea tray version 2 or Prototype 2.
(I'm thinking of attempting to place a cover of blue roll over version 1, coating/dabbing PVA and allowing to dry and see how that turns out.)
Still a way away from actually installing the sea tray into the actual build.
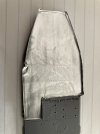
This time, using the templates made yesterday I cut the shape of the cabin deck area onto a firm piece of cardboard. The intention being to place that on top of another section of thick tin foil then bend the edges over to form the upper portion of the sea tray. I achieved a better result than yesterday I think.

A tidier effort with a more realistic lip or vertical bit!! No raised section adjacent tot eh cabin doorway!!
IMG_1175.JPG

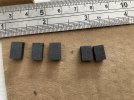
Next were the black boxes. (The electronic boxes for the sonar.) After a rummage in the garage I found some neoprene type material which were deep enough and cutting them down to size may fit the bill. One of the smaller black shapes was cut in half, (width), and glued on top of a larger section to form a stepped effect. Just to change the shape. That was fitted in the centre space on the shelf.
I figured it may be easier to attach a few wires to the inner side to replicate the cabling from the boxes to the sonar display.
What do you think about the size/look etc. (Only fitted in dry at the moment!)

Black boxes pre fitting!
IMG_1176.JPG

Black boxes in situ!!
IMG_1177.JPG

That's it for today, SWMBO's tasks to sort before peace descends one more on Fraggle Rock!
 

Jakko

Way past the mad part
SMF Supporter
Joined
Apr 28, 2018
Messages
10,936
Points
113
First Name
Jakko
If you can’t see much of them anymore later, then these will probably do fine. Though it may not be an easy material to paint, I suspect?
 

Waspie

SMF Supporter
Joined
Mar 13, 2023
Messages
2,625
Points
113
Location
Portland - Dorset
First Name
Doug
If you can’t see much of them anymore later, then these will probably do fine. Though it may not be an easy material to paint, I suspect?
'One' idea I had was to paint the shelving and leave the black boxes as they are. Methinks after your comment That possibly will be the route I go down, still adding the cabling though. Thanks again Jacko.
 

Jakko

Way past the mad part
SMF Supporter
Joined
Apr 28, 2018
Messages
10,936
Points
113
First Name
Jakko
You can always test it on some leftover material, or even the backs of these “boxes”.
 

stillp

SMF Supporter
Joined
Nov 17, 2016
Messages
7,239
Points
113
Location
Rugby
First Name
Pete
I've no idea what the real ones look like, but those blacks of neoprene look believable. were the real black boxes crackle black finish? If so they're just fine as they are.
Pete
 

Waspie

SMF Supporter
Joined
Mar 13, 2023
Messages
2,625
Points
113
Location
Portland - Dorset
First Name
Doug
I've no idea what the real ones look like, but those blacks of neoprene look believable. were the real black boxes crackle black finish? If so they're just fine as they are.
Pete
Hi Pete, from memory!!!! I 'think' they may have been a smooth worn black gloss finish. What I mean is, they would have been a high gloss finish when they left the manufactures but after years of, 'in - out' use they were rather dull to the eye. Our sonars were well used and when they were working the boxes could be in situ for a while, untouched. But once the aircraft developed a snag, the sonar equipment played up and boxes were changed very very frequently!!

I'm going to try and coat them with primer, then try a gloss topcoat to see what occurs. TBH, if that proves unsatisfactory I'll settle for them in their current state. They are so small and in the shadows so to speak. I'll have a chat with a friend up the road who flew in the passive Sea Kings but would have had the same active sonar kit. (Just not used as much as ours!!) He may remember, as he was a radio mech before aircrew.

Thanks muchley for your input very much appreciated. :thumb2: :smiling3:
 

Waspie

SMF Supporter
Joined
Mar 13, 2023
Messages
2,625
Points
113
Location
Portland - Dorset
First Name
Doug
A testing day.
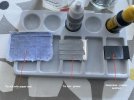
Below,, left, blue paper towel with PVA applied. Centre - tin foil with a coat of acrylic primer. Right - neoprene, (identical to the 'boxes'. Also given a base coat of acrylic primer.
IMG_1178.JPG

Next, after drying out indoors.
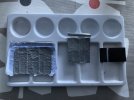
Left, two coats of Vallejo sea grey applied to the paper coated tin foil. Centre, again, two coats of Vallejo sea grey applied. Right, neoprene with two coats of satin black.
IMG_1179.JPG

Don't think I'll be using the paper coated tin foil for the sea tray although I can see possibilities for future uses. The tin foil with no covering other than paint has a better look, not perfect but close enough.
Finally, I can't observe any difference to the overall effect on the neoprene so may, (or may not), use the neoprene 'black boxes' with no paint.
I could also apply another couple of coats of black to see if that changes anything!!!
I'll see what tomorrow brings.

As usual, comments always welcomed.

Doug
 

Jakko

Way past the mad part
SMF Supporter
Joined
Apr 28, 2018
Messages
10,936
Points
113
First Name
Jakko
You’ll also have to ask yourself if scratching it is a problem. Or a risk if you will. This is going to go inside the helicopter, right? If you paint it shortly before closing up the fuselage, the risk of a scratch is probably low, so it probably shouldn’t be much of a problem, I would think.
 

Waspie

SMF Supporter
Joined
Mar 13, 2023
Messages
2,625
Points
113
Location
Portland - Dorset
First Name
Doug
You’ll also have to ask yourself if scratching it is a problem. Or a risk if you will. This is going to go inside the helicopter, right? If you paint it shortly before closing up the fuselage, the risk of a scratch is probably low, so it probably shouldn’t be much of a problem, I would think.
I'm new to the scratchy world so, the only way I'm going to find out what works is by trying different things. Whilst many of you have a few years behind you I'm still in novice mode. It's not been a year yet!!
The plan is to have the SK sat with blades folded, front and cabin doors open. As it would prior to the crew getting in. So much of the insides would be seen.
 
Top