Doug's 1/48 Airfix Sea King

Waspie

SMF Supporter
Joined
Mar 13, 2023
Messages
2,483
Points
113
Location
Portland - Dorset
First Name
Doug
Today progress. Valeted the car. Oooops nope - that's not what you want to hear is it!!!! :rolling: :smiling2:

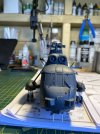
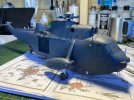
Sea King wise - she's on her own two feet, well her own undercarriage!
Did some touching up of some of the smaller pieces after the undercarriage was installed. A very tight fit which necessitated a slight filing to get it to slot into place smoothly.
Aerials were painted white, exhausts were dirtied and engine intakes and starter motors painted.

Pic 1
Sitting on her own 5 wheels!!
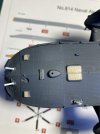
Starboard nav light painted green.
Winch hook changed to chrome rather than the silver of yesterday.
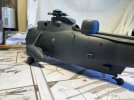
I then mixed a concoction of sand yellow, burnt umber and track black to represent rotor head grease then dry brushed it on and around the head.
IMG_1345.JPG

Pic 2
Head on shot.
IMG_1346.JPG

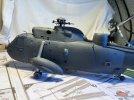
Pic 3
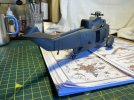
Starboard side, aerials sporting first coat of white. (Only to be dirtied at a later date).
IMG_1347.JPG

Pic 4
IMG_1348.JPG

Pic 5
IMG_1349.JPG

Once I get the decal problem sorted I'll be in a position to varnish and then weather it to a typical oily 819 NAS workhorse.

As usual, and comments/criticisms gratefully received and welcomed.

Thanks all for your support and help to date, it really is appreciated and welcomed.

Doug
 

Waspie

SMF Supporter
Joined
Mar 13, 2023
Messages
2,483
Points
113
Location
Portland - Dorset
First Name
Doug
Just threw myself at my flying log!! The 'King' is going to be side number 705 although only 05 will appear on the fuselage. As well as its RN serial number XV663. The XV is a clue as to its heritage. A converted Mk2. The ZA's and ZD's were the Westland build Mk5's.

Now to sus out font sizes for the decals. See other thread - decal issue! (Decal problem )
 

Waspie

SMF Supporter
Joined
Mar 13, 2023
Messages
2,483
Points
113
Location
Portland - Dorset
First Name
Doug
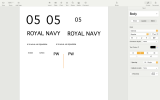
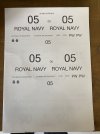
Digital calipers in hand!! I have measured and sized up the fonts for the decals I need. All I require now is the Azon man to deliver the blank decal sheets and I'll be away - almost!! I have to remember to coat the decals in varnish once printed.

I'm using Microsoft Sans Serif font which I am assured is the correct font but wait to be 'corrected'!!!!

This is it, I'm primed and ready to print. Never ever gone to this length for a model kit before. What have you lot done to me??????
SWMBO says, 'bung any number on it - what does the colour matter'??????
It matters to me!!! I'd say 'stupid woman' (Allo - Allo style). I'm just not brave enough!!!

Screenshot 2024-04-13 at 12.05.27.png
 

Scratchbuilder

SMF Supporter
Joined
Jul 2, 2022
Messages
1,943
Points
113
First Name
Mike
Digital calipers in hand!! I have measured and sized up the fonts for the decals I need. All I require now is the Azon man to deliver the blank decal sheets and I'll be away - almost!! I have to remember to coat the decals in varnish once printed.

I'm using Microsoft Sans Serif font which I am assured is the correct font but wait to be 'corrected'!!!!

This is it, I'm primed and ready to print. Never ever gone to this length for a model kit before. What have you lot done to me??????
SWMBO says, 'bung any number on it - what does the colour matter'??????
It matters to me!!! I'd say 'stupid woman' (Allo - Allo style). I'm just not brave enough!!!

View attachment 506483
Once printed I leave at least three hours or overnight to dry and then coat with PlastiKote Hobby & Craft Sealer Matt from Azon. I give three thin coats and leave to dry for 24 hours although the tin says dry in 2 hours.
But so far looking good.
 

Jakko

Way past the mad part
SMF Supporter
Joined
Apr 28, 2018
Messages
10,821
Points
113
First Name
Jakko
I'm using Microsoft Sans Serif font which I am assured is the correct font but wait to be 'corrected'!!!!
No, it isn’t :smiling3: Microsoft-supplied fonts are not correct for anything you see out in the real world except for signs made by people who don’t know any better ;)
The main thing, though, is to see if the typeface looks close enough to what you need. Ideal would be if you can find a font that somebody has made to specifically be for the real-world application, but that can be tricky. USAAF/USAF stencil can be found, for example, but I’m not sure anybody has made RAF or RN lettering into a computer font.
 

Waspie

SMF Supporter
Joined
Mar 13, 2023
Messages
2,483
Points
113
Location
Portland - Dorset
First Name
Doug
No, it isn’t :smiling3: Microsoft-supplied fonts are not correct for anything you see out in the real world except for signs made by people who don’t know any better ;)
The main thing, though, is to see if the typeface looks close enough to what you need. Ideal would be if you can find a font that somebody has made to specifically be for the real-world application, but that can be tricky. USAAF/USAF stencil can be found, for example, but I’m not sure anybody has made RAF or RN lettering into a computer font.
I settled upon MS Sans Serif after checking out what was the closest match. The '5' was the critical part due to the vertical element in the number. MS font was the one that matched.
I had stumbled on a reference on the net somewhere that mentioned Sans Serif as the font for the lettering. Hence why I looked for it. Then comparing the other close fonts, MSSS seemed the best choice. The decals will be partially covered by a dark overspray of an oily/sooty effect to reflect a bit of a dirty workhorse.
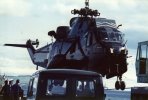
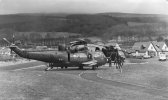
Downbird Fairley Scotland.jpg
My reference image. This was a down-bird at Fairley in Ayrshire, Scotland after Zero-Four struck a small boat during a winching exercise. The aircraft in the background was our taxi home. (I'm the bandy legged individual by the nose of 04!!) As you can see, it's a bit of a well used machine!!
Just for info; 04 lost several inches off each main rotor blade which were of the new composite variety. We suffered horrendous vibrations due to the loss of lift from the missing sections of rotor blades.
 

Steve-the-Duck

SMF Supporter
Joined
Jul 3, 2020
Messages
1,148
Points
113
Location
Medway Towns
First Name
Chris
What printer are you using? We splashed out on a laser printer for decal printing recently, and, blimey!

In a good way!
 

Waspie

SMF Supporter
Joined
Mar 13, 2023
Messages
2,483
Points
113
Location
Portland - Dorset
First Name
Doug
I use an Epsom inkjet. Can’t justify a laser printer right now. Not for the little use it would be for. I already have a Canon Selphy printer for photos!!!
 

Waspie

SMF Supporter
Joined
Mar 13, 2023
Messages
2,483
Points
113
Location
Portland - Dorset
First Name
Doug
Tackled the decal issue this morning. Did my test run and checked measurements. Looking good. As a belt and braces precaution, I duplicated the existing set I made up!! (C&P). If I bodge a decal or one runs etc I now have a fall back.

IMG_1351 copy.JPG

The decals have now been sprayed with at least 3 light coats of varnish and are drying.

Won't be adding the decals until after a varnish coat is applied and I'll need a day just to clean the airbrush!!! It's sticky gungy stuff!!!!! Mind you I have to finish off the 'King' first. A couple of aerials have snapped off but I plan on drilling two small holes and sticking timing a bit stronger in their place. (A couple of 6" nails!!! - Maybe not). But they are very delicate so maybe a cut down needle or the like!

Yesterday I took the opportunity to paint the rotor blade tips yellow. I used the yellow pot I had from my first 1/72 Sea King. I was going to spray the tips but after masking them off, then mixing the paint I found after prolonged mixing it was like my gravy - lumpy!! So sacked that plan and went for the brush. Needs a bit of finishing work as you can seee by the image but at least the colour is right!!
Airfix supply transfers for markings on the blades but have never seen them on the version I am making so am not adding something I haven't seen!!
IMG_1352 copy.JPG

I had some Wash for a pin wash arrive yesterday but will have to read up on its application to avoid messing up.

That's it for now.
 

Waspie

SMF Supporter
Joined
Mar 13, 2023
Messages
2,483
Points
113
Location
Portland - Dorset
First Name
Doug
Another boring update.
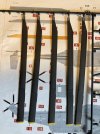
Rotor blades done, tidied up and a dab of paint where needed. No pics.

The small aerial problem sorted. Holes drilled where the old aerials were!
Pic
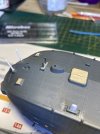
Oh yeah. Also painted the plates for the doppler system. (It's what gives the ASW SK's a stable hover when dipping for submarines). As well as accurate speed over the ground and altitude info.
IMG_1354.JPG

Next was the sourcing, sizing and fitting the new - metal replacement aerials! (Paperclip!!)
Pic
Just need priming and a dab of white paint!! Oh, I have to remember to glue in place first!! They are a tight fit though!!!
IMG_1355.JPG

Rear cabin door was also fitted. Ooo, getting exited now. Won't be long before it will be time for decals and the finishing line. Still many small jobs before we get to that stage. Had a research of XV663, quite interesting. Undercarriage failures and this one during a major ASW exercise!!
2/9/1988.
Airlifted off a Dutch RFA by RAF Chinook after main gearbox transmission chip warning whilst sat in 40 foot hover!!
(Location of pic - Inver Gordon - Scotland)
Untitled3.jpg
 
Last edited:

rickoshea52

SMF Supporter
Joined
Dec 20, 2011
Messages
3,975
Points
113
Location
North West
First Name
Rick
Tackled the decal issue this morning. Did my test run and checked measurements. Looking good. As a belt and braces precaution, I duplicated the existing set I made up!! (C&P). If I bodge a decal or one runs etc I now have a fall back.

View attachment 506641

The decals have now been sprayed with at least 3 light coats of varnish and are drying.

Won't be adding the decals until after a varnish coat is applied and I'll need a day just to clean the airbrush!!! It's sticky gungy stuff!!!!! Mind you I have to finish off the 'King' first. A couple of aerials have snapped off but I plan on drilling two small holes and sticking timing a bit stronger in their place. (A couple of 6" nails!!! - Maybe not). But they are very delicate so maybe a cut down needle or the like!

Yesterday I took the opportunity to paint the rotor blade tips yellow. I used the yellow pot I had from my first 1/72 Sea King. I was going to spray the tips but after masking them off, then mixing the paint I found after prolonged mixing it was like my gravy - lumpy!! So sacked that plan and went for the brush. Needs a bit of finishing work as you can seee by the image but at least the colour is right!!
Airfix supply transfers for markings on the blades but have never seen them on the version I am making so am not adding something I haven't seen!!
View attachment 506644

I had some Wash for a pin wash arrive yesterday but will have to read up on its application to avoid messing up.

That's it for now.
Have you printed on white or clear decal paper?
 

Waspie

SMF Supporter
Joined
Mar 13, 2023
Messages
2,483
Points
113
Location
Portland - Dorset
First Name
Doug
Not a lot going on. SWMBO has managed to bash the ankle of the leg she injured a couple of years back and it has swollen to ridiculous proportions!!! So icky here has assumed double everything duties. I even put the washing out!!! A taboo in normal circumstances.

So, as a result only minor progress has been made at the bench!!

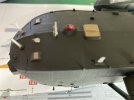
Pic 1
My home made aerials painted white!! Landing light fitted and lower and tail anti - collision lights fitted.
IMG_1357.JPG

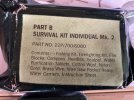
Did some ferreting about in the shed to try and find a suitable item to make the long HF aerial that is on the port side. Cracked open my old survival kit as I knew, (hoped), there was something of use. Found some fishing line, (nylon), and some brass or copper wire for making snares. So may enlist them to assist the 'King' survive!!!! (Oh dear).

Pic 2
IMG_1356.JPG

Had to chuckle at the reference to the water carriers!!! - Two condoms! Evidently they will hold a full litre of water!!! I'll take there word for that!!!

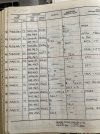
Did a bit of reading my log book and found XV663 featured a fair bit. Just one small extract. Names of other crew members removed for persec. reasons!

Pic 3
IMG_1358.JPG

Well as they say - that's all folks!! (for now)
 

Waspie

SMF Supporter
Joined
Mar 13, 2023
Messages
2,483
Points
113
Location
Portland - Dorset
First Name
Doug
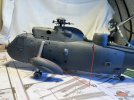
Question relating to attaching both/either, the fishing line aerial or if I use the brass wire.

What glue CA, TET or other would you guys recommend?

It will be from two of the points highlighted plus another near the tail!! Not very big and I imagine quite flimsy!!

Pic
IMG_1349.JPG

Thanks for any guidance chaps.
 
Top