Doug's 1/48 Airfix Sea King

Waspie

SMF Supporter
Joined
Mar 13, 2023
Messages
2,481
Points
113
Location
Portland - Dorset
First Name
Doug
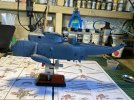
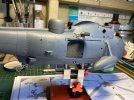
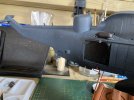
Ho! A very busy day. As it was warm I risked a test with my Light Grey Vallejo primer!! I resprayed the Sea King another coat of primer with the Vallejo!! Risky - but it worked out. I reckon the temperature and humidity were in my corner today. Then another risk. Some 6 hours later I put the first coat of final colour Dark Sea Grey.
However, before I got that far I plugged a few holes, namely the undercarriage wells. Taped off as many aerials as could remember!! Forgot a couple!!!!
In between all this painting, I put the final touches to the rotor head. Last pieces fitted other than the dome on top.
Whilst all this was going on, one pitot tube detached and another simply snapped!!! One easily rectified the second was dodgy with my eyesight trying to align the two pieces in the correct orientation before the TET set!!
Main rotor blades had a first top coat.
Wheels were painted and connected to their struts once dry. (They still remain to be installed into the wheel wells until body shell paining is completed.
Red anti-collision lights were painted with a clear red in ready for the body to be finished.
Rescue hoist frame was attached to hoist assembly and dry fitted to ensure I won't have any snags after the glue sets!!
And I still managed to take the pooch walkies - TWICE!!

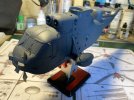
Usual couple of pics. Nothing too spectacular!

Pic 1
Port side
IMG_1337.JPG

Pic 2
From Port quarter!
IMG_1339.JPG
 

Waspie

SMF Supporter
Joined
Mar 13, 2023
Messages
2,481
Points
113
Location
Portland - Dorset
First Name
Doug
Not much today. (SWMBO had plans!)
I did manage to re-prime in grey a few ancillary pieces that had been left off but primed in black. So to retain colour continuity, I returned them to grey primer. I also put a couple of coats of Satin Black on all the rotor blades, (main and tail).
Searched high and low in my limited sheets of decals for some 'Royal Navy' in black. Whilst doing that I was looking back through old photo's in case I had got the colour of the body wrong but I haven't. Even in 1981, my squadron had Mk2 SK's in the same dark sea grey livery as the newer Mk5 replacements.
Whilst looking through my pics, I noticed the rescue hoists were all darker than the fuselage!! A Quick Look at a few more colour images and indeed they were in fact a matt black colour. Glad I haven't as yet painted the hoist. (It sits primed - ready).
Other than that, a dull day, walking the pooch and trying to restore my garden before the next deluge of rain hits!!!! Gore-Tex waits in the wings!
 

Waspie

SMF Supporter
Joined
Mar 13, 2023
Messages
2,481
Points
113
Location
Portland - Dorset
First Name
Doug
Cheers Jakko. If it works a bonus. If it doesn’t - something to think about for next time!!!
I think I can still see the marks through the first coat of final colour. Methinks It may not survive the second coat though!!! So something to think about!!!
 

Jakko

Way past the mad part
SMF Supporter
Joined
Apr 28, 2018
Messages
10,819
Points
113
First Name
Jakko
Spraying thinner layers should do the trick — but don’t ask me, really, as I generally want paint to cover rather than be see-through :smiling3:
 

Waspie

SMF Supporter
Joined
Mar 13, 2023
Messages
2,481
Points
113
Location
Portland - Dorset
First Name
Doug
Spraying thinner layers should do the trick — but don’t ask me, really, as I generally want paint to cover rather than be see-through :smiling3:
Thanks Jakko. I tend to spray thinly but, and here lies my problem!! I do a second sweep if the paint looks dry!!!! So I guess in reality it has two maybe more coats over it already!!!!! (I hate wasting the paint left in the pot!!!!!) :rolling:
 

Waspie

SMF Supporter
Joined
Mar 13, 2023
Messages
2,481
Points
113
Location
Portland - Dorset
First Name
Doug
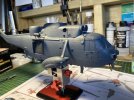
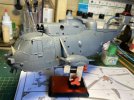
Well regards the stripes, not really the effect I was hoping for. In hindsight, I think maybe replacing the white for perhaps a mid grey would have given a more shadow effect.
Moving on from that. Today I touched up a few bibs and bobs. Pitot tubes painted, refuel, both pressure and gravity points given a dab of red. Orange Crop sensors, black added. Plus a couple of other pieces.

Pic1
Pic shows rescue hoist in place, also tail wheel now installed.
IMG_1341.JPG

Pic 2
Exhaust given first coat of black before sooting it up. (Working on that one!!) Red gravity fuel caps painted as well as port nav light.
IMG_1342.JPG

Pic 3
Pressure refuelling point under cabin door painted. (Just noticed the fuel dump pipe is bare!! Some aircraft had a red band around the end!
IMG_1343.JPG

Pic 4
And finally, winch hook painted silver, think I may repaint it chrome, just not shiny enough for me!!!
Also a dab of red on the transponder under the tail pylon. Some were solid red, some had red bands around it. My painting wasn't up to two or three bands!!!!
IMG_1344.JPG

Hopefully, I'll be able to start on the aerials tomorrow. The HF aerial is going to have to be given some thought - Airfix don't supply any chord or wire so I'l be bodging my own!

As Warner Brothers would say. 'That's all folks'!!
Any comments or criticisms very welcome. Still learning the trade remember!!
 

Steve-the-Duck

SMF Supporter
Joined
Jul 3, 2020
Messages
1,148
Points
113
Location
Medway Towns
First Name
Chris
I can't believe no-one recognised my quote...

In the first pic above the 'stress marks' are even more obvious. I wonder if that's the lighting or the camera?

It MAY have been better to make them more stark white to get them to show through the top coats more obviously. It's an interesting effect to try and capture
 

Waspie

SMF Supporter
Joined
Mar 13, 2023
Messages
2,481
Points
113
Location
Portland - Dorset
First Name
Doug
I can't believe no-one recognised my quote...

In the first pic above the 'stress marks' are even more obvious. I wonder if that's the lighting or the camera?

It MAY have been better to make them more stark white to get them to show through the top coats more obviously. It's an interesting effect to try and capture
I wouldn't recognise a quote or sarcasm if it smacked to in the face!! Sorry. Drives SWMBO crazy!!!
As I said, I'm still learning and experimenting. If you don't try you don't learn!!
 

boatman

SMF Supporter
Joined
Nov 8, 2018
Messages
12,925
Points
113
Location
NORFOLK UK
First Name
christopher
VERY TRUE Doug as im glad to see you try something different on your seaking but really i can see the marks so dont worry about it as you are tryin to show the stress mark an i think its paid off
chrisb
 

yak face

Wossupwidee?
Staff member
Moderator
SMF Supporter
Joined
Jun 13, 2009
Messages
12,405
Points
113
Location
sheffield
First Name
tony
Coming on beautifully now Doug , its all the little details that really lift a build to the next level , cheers tony
 

Waspie

SMF Supporter
Joined
Mar 13, 2023
Messages
2,481
Points
113
Location
Portland - Dorset
First Name
Doug
VERY TRUE Doug as im glad to see you try something different on your seaking but really i can see the marks so dont worry about it as you are tryin to show the stress mark an i think its paid off
chrisb
Thank you Chris. As I said, not exactly the representation of the airframe 'panting' I was looking for - but for a first attempt, I'll accept the result and if I remember, try and improve on next time!!!


Coming on beautifully now Doug , its all the little details that really lift a build to the next level , cheers tony
Thank you Tony. Although I'm making slow progress I'm enjoying this. It's hit me with a few fast balls, induced by myself!! It would have been a done deal if I'd gone for the Mk2. As I've gone for a squadron specific Mk5 I have unintentionally made my life that little bit more difficult.
 
Top