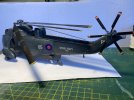
Doug's 1/48 Airfix Sea King

Waspie

SMF Supporter
Joined
Mar 13, 2023
Messages
2,698
Points
113
Location
Portland - Dorset
First Name
Doug
Hi Doug,
I can't really tell the difference in the pictures. But of course I've worked with washes like this often enough that I understand what you mean.
Personally, I wouldn't use acrylic washes for such effects as they are far too difficult to control. I would always either use a glossy varnish layer to seal and work on top with enamel washes - or on a matt or semi-matt surface with oil washes. Both have the advantage that you can simply remove the effect if you don't like something. This is very difficult with acrylic washes.
Thank you Andreas. This was my first attempt with a wash. It was done over a gloss varnish. I find the whole wash thing really complicated. (Only my first year with the hobby and only my fourth kit). Take age into account and I hit overload with all there is on YouTube and online.
If I'm honest, the enamel thing quite scary as I've never used it before.
I guess with a bit more experience and a few more models under my belt I may get adventurous and dabble with enamels. Appreciate your input. :thumb2: :smiling3:
 

Waspie

SMF Supporter
Joined
Mar 13, 2023
Messages
2,698
Points
113
Location
Portland - Dorset
First Name
Doug
Doug that is looking the nuts mate.
Thanks Paul. TBH starting, scared the :poop: out of me. Thinking about all the ways it could go wrong. As it happened, one of the effects I was after occurred. Making it look dirtier!! However, enhancing the rivet lines and such didn't quite work out how I was imagining!!!
 

rickoshea52

SMF Supporter
Joined
Dec 20, 2011
Messages
3,987
Points
113
Location
North West
First Name
Rick
It is hard to tell from photos but it looks just fine to me. Remember though that your weathering should be applied just like the real thing, in layers and over time. Try not to rush and if it looks just about right it probably is; with experience and practice you’ll get to know when enough is enough.
I agree with your sentiment over focussing a little more on bigger gaps and join lines. In my opinion, too many modellers overdo the more subtle panel lines, especially in smaller scale aircraft, than is realistic, I tend to focus on moving parts like flying controls or access doors rather than panel lines.
Get some oil streaks, comp wash staining and exhaust soot and she’ll look even better - but be subtle!
 

Waspie

SMF Supporter
Joined
Mar 13, 2023
Messages
2,698
Points
113
Location
Portland - Dorset
First Name
Doug
It is hard to tell from photos but it looks just fine to me. Remember though that your weathering should be applied just like the real thing, in layers and over time. Try not to rush and if it looks just about right it probably is; with experience and practice you’ll get to know when enough is enough.
I agree with your sentiment over focussing a little more on bigger gaps and join lines. In my opinion, too many modellers overdo the more subtle panel lines, especially in smaller scale aircraft, than is realistic, I tend to focus on moving parts like flying controls or access doors rather than panel lines.
Get some oil streaks, comp wash staining and exhaust soot and she’ll look even better - but be subtle!
Cheers Rick. Certainly won't be rushing. Mrs W has seen the weather forecast and gardening has suddenly become a priority.
Question? Can you layer the wash to get a darker effect or add more depth?
I'm cleaning off as much as I can in the larger areas and leaving more of the wash in places I think that need the definition. Inside of the strake and the tail fold for example. Don't know if you used it in the RAF, but PX24 used to leave a fair bit of streaking on the exterior unlike the good ole days of WD40 which tended to shine the airframe rather than dirty it.
I went out to the garage a short while ago and having left it for a few hours the colour change of the decals having a wash and the decals that haven't, the effect is very close!
Out of interest, what do you do to simulate soot from the exhausts?
Thanks again Rick for your input, most appreciated. :thumb2:
 

Scratchbuilder

SMF Supporter
Joined
Jul 2, 2022
Messages
2,055
Points
113
Location
Luton
First Name
Mike
During my service career I 'bumped' into him on many occasion. Not one 'bump' did him any favours as far as respect goes. Even SWMBO thinks he's a sleaze ball, her words after a visit to the local VHS shop on Fraggle. He was perusing the under the counter bottom shelf Vids!!!

Same squadron, 706, he came into the crew room asking for a back seater to sit on the radar during a check test flight he was to fly. Amazing how quick. crew room can clear!!!! We all have doctors, dental simulator checks to attend.
Being in the Guards, we came into contact with the Royals a lot, and being tasked with providing escort along with the royal security we would be taken on a 'shoot' with them to the country estate of whoever was providing the drinks.... The amount of times we had to politely remove a Holland & Holland from the younger royals before one lost ones future King were numerous.
 

rickoshea52

SMF Supporter
Joined
Dec 20, 2011
Messages
3,987
Points
113
Location
North West
First Name
Rick
We applied PX-24 on the landing gears and bay, around the tail fold break; not much if I recall on SK’s. Post wash lube on a Nimrod was different thought, tons of the stuff. One over enthusiastic liney over did it so much the aircraft tug tyres wheel spun and couldn’t tow the jet off the wash pan.
The most important part of the lube on a SK for us was the rotor heads and being sure to wipe off all excess grease, other wise as soon as the rotors are engaged the cab is filthy again.
For exhaust staining I use Tamiya smoke thinned 50/50 and slowly built up.
 

Waspie

SMF Supporter
Joined
Mar 13, 2023
Messages
2,698
Points
113
Location
Portland - Dorset
First Name
Doug
We applied PX-24 on the landing gears and bay, around the tail fold break; not much if I recall on SK’s. Post wash lube on a Nimrod was different thought, tons of the stuff. One over enthusiastic liney over did it so much the aircraft tug tyres wheel spun and couldn’t tow the jet off the wash pan.
The most important part of the lube on a SK for us was the rotor heads and being sure to wipe off all excess grease, other wise as soon as the rotors are engaged the cab is filthy again.
For exhaust staining I use Tamiya smoke thinned 50/50 and slowly built up.
I never worked on Sea Kings. But a Wessex rotor head if we did a head grease properly, some 56 grease nipples and many - many Kg of XG284. Made my day when a pneumatic grease gun came into common use!! Hated a head grease!!!
Naval aircraft, fresh water every day if used. In days of yor it was a complete cab wipe with WD40 then cost kicked in and the cheaper PX24 replaced it. Sad day for appearances.
 

Waspie

SMF Supporter
Joined
Mar 13, 2023
Messages
2,698
Points
113
Location
Portland - Dorset
First Name
Doug
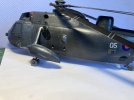
During a very busy day I did manage to finish off the initial wash on the SK5. I also attached, (finally) the tail rotor.
I decided to go into experimental mode and mixed up a concoction of paint to simulate oil streaking/contamination. Left over wash, a dash of Beetle orange, a drop of tyre black, and two drops of Nato Green. A good stir with a brush and ended up with a rusty kinda oil coloured mix!! That'll do I thought. (Casting my mind back to when I was an aircraft mechanic - one of our manuals stated specific oils could be identified by their brown, green, reddish purple black hue!! OK I thinks, that's pretty broad brush - works for me). ;)
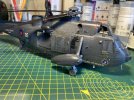
Using a fine brush started applying it tot he places I remembered oil running down. By the rescue hoist, then over the sliding cabin door. Remembering it is now in the open position - but closed in flight!! Then the port side, similar position. Coming down from the vicinity of the main gearbox! Added a light dab to the blade fold mechanism but I think you'll need a spy glass to spot that. Subtle. Unlike my wash!!!!
Added a bit more wash over parts that needed dirtying up a bit more.
Looks ok to the naked eye but the images really do show my heavy handed first attempt, still finding my own way!!

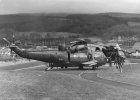
Pic 1
Comparison image of a work horse!
Downbird Fairley Scotland.jpg

Pic 2
My work horse!!
Still have work to do on engine staining/soot etc.
IMG_1397.JPG

Pic 2
Port Side
IMG_1399.JPG

Pic 4
Port side closer image with my version of oil staining!!!
IMG_1400.JPG

Lost a couple of small decals during my heavy handed application of the cotton buds.
Question! Would using the micro set/sol give a firmer/stronger bond between decal and model?

Time permitting, tomorrow I may mix up a exhaust soot mix thanks to Andy's recipe.:thumb2:

Thoughts, comments good or bad very welcome. Not the prettiest Sk in the world but I don't remember them being pretty - just workable!!

Thanks again for all comments and suggestions and of course for looking in.
Doug
 

Jakko

Way past the mad part
SMF Supporter
Joined
Apr 28, 2018
Messages
10,963
Points
113
First Name
Jakko
Micro Set is essentially a glue, intended to make decals stick better. Sol makes them softer so they conform to the surface better, which logically means the glue on the decal (whether the one it came with or the Micro Set) has more area to grip and so should stick the decal down more firmly.
 

Waspie

SMF Supporter
Joined
Mar 13, 2023
Messages
2,698
Points
113
Location
Portland - Dorset
First Name
Doug
Micro Set is essentially a glue, intended to make decals stick better. Sol makes them softer so they conform to the surface better, which logically means the glue on the decal (whether the one it came with or the Micro Set) has more area to grip and so should stick the decal down more firmly.
Thanks Jakko for taking the time to explain. I read people using the pair and in which order but not why. Appreciate your explanation buddy. :thumb2:
 

Neil Merryweather

SMF Supporter
Joined
Dec 29, 2018
Messages
4,467
Points
113
Location
London
First Name
Neil
Doug, you keep saying what a beginner you are but I think the results would say the opposite. This is just looking stunning,mate.
I appreciate that everything IS a new experience but you clearly have a talent and an instinct .
Top work,sir!
 

Jakko

Way past the mad part
SMF Supporter
Joined
Apr 28, 2018
Messages
10,963
Points
113
First Name
Jakko
Thanks Jakko for taking the time to explain. I read people using the pair and in which order but not why. Appreciate your explanation buddy. :thumb2:
According to the manufacturer, either use Set under and over the decal (no Sol), and then possibly use Sol over it only.

Micro Set and Sol.jpg

That said, what I normally do is Set under the decal and Sol over it, without a second coat of Set over the decal first. And, if necessary, more Sol if the decal doesn’t want to conform well enough to the surface yet.
 

Scratchbuilder

SMF Supporter
Joined
Jul 2, 2022
Messages
2,055
Points
113
Location
Luton
First Name
Mike
Keep going Doug, this is becoming an even better model than your previous efforts, loads of explanations, problems that got solved and a really good looking model at the end....
 

HAWKERHUNTER

SMF Supporter
Joined
Feb 29, 2012
Messages
699
Points
93
First Name
Steve
According to the manufacturer, either use Set under and over the decal (no Sol), and then possibly use Sol over it only.

View attachment 508295

That said, what I normally do is Set under the decal and Sol over it, without a second coat of Set over the decal first. And, if necessary, more Sol if the decal doesn’t want to conform well enough to the surface yet.
Same here Doug. The model is looking very nice so far mate.
 

Waspie

SMF Supporter
Joined
Mar 13, 2023
Messages
2,698
Points
113
Location
Portland - Dorset
First Name
Doug
Doug, you keep saying what a beginner you are but I think the results would say the opposite. This is just looking stunning,mate.
I appreciate that everything IS a new experience but you clearly have a talent and an instinct .
Top work,sir!
Haha, thank you Neil but I am 'a beginner'! This is only my fourth kit since I was 20(ish). I'm 72 now now. I'm ok at the moment as I'm sticking to my comfort zone by keeping to models I have knowledge of and that has really helped. I'm really looking forward to the Wasp. I only have about a thousand hours logged on Wasps compared to the 4 thou on 'Kings' but I spent about 5 years working on them. Mind you - the scale scares me!!!!! 1/72!! Oooo - Errrrr. But thanks again for the compliment.


Keep going Doug, this is becoming an even better model than your previous efforts, loads of explanations, problems that got solved and a really good looking model at the end....
Thanks you Mike. It was said when I completed my first model, (strangely a Sea King!! Albeit 1/72), that it's all about improving. I'm glad I appear to making progress. I think one BIG lesson I have learned from you guys is don't rush. (Which I did find difficult) Especially when it gets close to the end. Mind you, SWMBO helps a lot on that front.
Today I thought was a 'free day'. HA - Walked the pooch, then I discover I'm painting 'her' she shed!! "It'll only take about an hour" she says!! Five hours later!!!! Well that put pay to any thoughts I had of any bench time!! Women!!!!!!!!!!


Same here Doug. The model is looking very nice so far mate.
And thank you too Steve. I wouldn't altogether say 'nice'. I'm not a great lover of pristine. I do like the 'used' look. That's just me.

Thank you chaps for your encouraging words. As others have said before me. It does help with motivation, especially when you're starting out. I have only limited tools and paints etc so anything I 'bodge' and works is a bonus for me.
Now if anyone has any advice on getting the Mem Sahib to reduce or even stop my never ending chores I'm open to suggestions!!!
 

Waspie

SMF Supporter
Joined
Mar 13, 2023
Messages
2,698
Points
113
Location
Portland - Dorset
First Name
Doug
Just spent ages layering dark, dull colour over the exhaust areas.
I still think it needs a bit more dark near the exhaust itself!!
What do you think? (Not even going to ask ‘E’, Eileen - SWMBO!!)
IMG_1407.jpeg
Compare it with my photo of an actual King in post #269 if needed!

Thanks guys. Getting there!!
 
Top