Ian M' Mk.IV Mustang. Airfix 1/48.

Ian M

Administrator
Staff member
Administrator
Moderator
SMF Supporter
Joined
Dec 14, 2008
Messages
19,736
Points
113
Location
Falster, Denmark
First Name
Ian
Right then. Have a bit of time this AM so into the cave...
Lets get this out the way: Dear Mr. Airfix, I am soooo sorry for this:
20220904_103147.jpg
Using my new found knowledge about the faffing about drag reducing filling and smoothing of the wing rivets and panels, I set about deleting all the fine crisp detail that Airfix had made such a great job of adding.
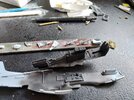
20220904_103135.jpg
Top of left wing.
20220904_103141.jpg
...and the right one.
The ones I have 'missed' are the machinegun panels and other service points. Talking of. Anyone know what the groups of three 'cross like' things are and what their purpose was?

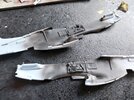
Most of the big parts are sorted already:
20220904_092726.jpg
And now able to start throwing some paint around... When it gets here lol. I ordered some Yellow chromate for some of the areas that will be seen. The Cockpit will be Green though as even the American pilots hated sitting in the bright Yellow.. And not to mention it was rather toxic as well.
Sumising the info gleaned from the article Tim linked to, the zinc chromate was quite translucent. this affected the colour depending what it was painted over. It was, apparently, also photochromatic. The more sunlight it got the greener it got.
The green chromate used in the cockpit was made green by the addition of lamp black. (lol remember that from the 'night-black thread). I though have some cockpit green paint!
20220904_092752.jpg
The two "sink marks" near the end of the corrugated hose are in fact details ! Beware.
The two sink marks in the recessed sides/panels are just that. sink marks. Top point for Airfix once built they are 100% out of sight!
Right now its putting smaller parts together and or cleaning them up.
20220904_112655.jpg
Then getting them ready for primer...
20220904_112702.jpg
Still tons of parts left on the sprues yet.

Comments as alwayz welcome.
 

yak face

Wossupwidee?
Staff member
Moderator
SMF Supporter
Joined
Jun 13, 2009
Messages
12,415
Points
113
Location
sheffield
First Name
tony
Looks a lovely kit Ian , Airfix are really upping their game with their new releases.
 

Ian M

Administrator
Staff member
Administrator
Moderator
SMF Supporter
Joined
Dec 14, 2008
Messages
19,736
Points
113
Location
Falster, Denmark
First Name
Ian
Looks a lovely kit Ian , Airfix are really upping their game with their new releases.
Hand over heart, this builds as well as any Tamiya I have done and the fit is just as good. The plastic is a bit softer but I have never really seen that as an issue.
 

colin m

Moderator
Staff member
Moderator
SMF Supporter
Joined
Dec 26, 2008
Messages
8,604
Points
113
Location
Stafford, UK
First Name
Colin
I set about deleting all the fine crisp detail that Airfix had made such a great job of adding.
Braver than me. My model will depict an aircraft that has been in service for a while and hence lost all its filler. Ok, I'm lazy but look at those lovely wings - I just can't do it, I can't fill them in.
 

Ian M

Administrator
Staff member
Administrator
Moderator
SMF Supporter
Joined
Dec 14, 2008
Messages
19,736
Points
113
Location
Falster, Denmark
First Name
Ian
Right then folks.
Panel lines. Here we are building away and we accidently get a micron of filler in a panel line. Befor you can say Ballcocks, half the panel lines in the kit are full of the stuff and the only way its coming out again is with a panel scriber. Except when that is what you want to do.
As shown on the photo in my last post, the detail to be deleted was given a very carefully applied coat of filler. This was left to cure over night and then sanded back, Then fill all the bits that came out, in again. Wait, sand hmm.... prime. first the panel lines then the whole wing, then the panel lines again. and again..... then once more. Wet sanded back to smooth things off. 90% of the detail is gone.... so that will have to do. The bottom might get done tomorrow
Any how:
20220905_154352.jpg
Almost gone, but can just be made out...Will get another primer coat once glued to the fuselage.
20220905_154421.jpg
I'm quite glad this is getting painted painted and not painted bare metal. lol. More scratches than a flea bitten dog.
20220905_154436.jpg
He is what the underside looks like after sanding. The two buff dots are fillers for the holes for the tank mounts... I sort of ran one over with the chair.... ops.
20220905_154245.jpg
I guess I dont need to paint the tanks now lol. This lot is mostly waiting for a coat of gloss black base...the rest will be getting ordinary silver paint or white Alu Alclad II
Some of the last bits in need of primer...
20220905_154215.jpg
then its mask the canopies.... yeah!
To be continued....
 

Attachments

  • 20220905_154233.jpg
    20220905_154233.jpg
    294.6 KB · Views: 2
  • 20220905_154157.jpg
    20220905_154157.jpg
    219.3 KB · Views: 2

Tim Marlow

Little blokes aficionado
SMF Supporter
Joined
Apr 27, 2018
Messages
16,797
Points
113
Location
Somerset
First Name
Tim
Going along very well Ian. Brave of you to delete all that great detail. But it will make your build stand out amongst the crowd….
 

Ian M

Administrator
Staff member
Administrator
Moderator
SMF Supporter
Joined
Dec 14, 2008
Messages
19,736
Points
113
Location
Falster, Denmark
First Name
Ian
Cheers chaps. It did hurt a bit. lol.
I find that this "simple" build is throwing all kinds of curve balls at me!
Latest snippet gleaned off the interweb. direct from a pilot that fly's a 'stang in response to the laminar flow thing with the panels and rivets all being flat and filled, then painted...
"Toward the end of the war, they where so busy getting them off the assembly line and to the front, the wings often just had the rivets smoothed over and that was it"..... NOOOOOOOooooooooooo.

NEVER research a build. just do it. lol.
 

Ian M

Administrator
Staff member
Administrator
Moderator
SMF Supporter
Joined
Dec 14, 2008
Messages
19,736
Points
113
Location
Falster, Denmark
First Name
Ian
That’s a bit of a bugger Ian. Did you get it sorted out?
I took a ruddy big hammer.... na just kidding, it was a saw.
I took one of those Tamiya saws for cutting panels open and cut the joint apart down to where the flap thing is, then placed the part in the opening and pushed it down with a bent nose plier until it popped into place. Had to use a bit of clamping to hold the joint while the glue dries though.
 

Ian M

Administrator
Staff member
Administrator
Moderator
SMF Supporter
Joined
Dec 14, 2008
Messages
19,736
Points
113
Location
Falster, Denmark
First Name
Ian
I was going to say leave it, just close the flap thing a bit, who would know ?
The back end can be seen from outside the fuselage behind the s all flap.
Otherwise I would have.
 

Allen Dewire

Proud Rabble Member
SMF Supporter
Joined
Apr 27, 2018
Messages
4,105
Points
113
Location
Bamberg
First Name
Allen
Evening Ian,

To me, a non-wing thingy builder, you are doing a great job, even with all the setbacks. With this build, I'm sure you will sort all the probs out and get a good, finished Mustang. Sadly, the more wing thingy builds I see here, the happier I am building armor and ground vehicle kits, where mud is your best friend..................

Prost
Allen
 

adt70hk

I know its a bit sad but I like quickbuild kits!!!
SMF Supporter
Joined
Sep 4, 2019
Messages
9,506
Points
113
First Name
Andrew
Coming on nicely Ian!
 

Ian M

Administrator
Staff member
Administrator
Moderator
SMF Supporter
Joined
Dec 14, 2008
Messages
19,736
Points
113
Location
Falster, Denmark
First Name
Ian
Oh! Shiny! My precious....
So I got the small flappy bits painted t'other day along with the drop tanks... Even though I might go with the wonderfly British Paper petrol tanks.... More about those in a bit.
20220908_113940.jpg
IRL it is as smooth as a new-borns bum. X10 on the PC it looks quite nasty.
20220908_114057.jpg
Flaps. quite a nice shine but not to mad...
Alerions have also gotten a bit of the shiny stuff.
20220908_113814.jpg

Brush painted the Fabric covered rudder with Model air Aluminium to try give it a fabric look..... meh. I will be spraying the painted portions of the wings with this as well.
20220908_113901(0).jpg

And after correcting the missing part drama of yesterday I got the canopy and screen fitted and have now given the Fuselage a nice shiny black base. This will be left to cure until tomorrow, when I will also start throwing Alclad at it. I only hope I have enough left!
20220908_113641.jpg
 

adt70hk

I know its a bit sad but I like quickbuild kits!!!
SMF Supporter
Joined
Sep 4, 2019
Messages
9,506
Points
113
First Name
Andrew
That's VERY shiny!!!
 
Top