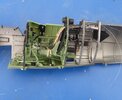
Just seen this one Steve, a very nice looking/detailed kit, and a cracking start. The black armour plate does make a striking difference.
You are using an out of date browser. It may not display this or other websites correctly.
You should upgrade or use an alternative browser.
You should upgrade or use an alternative browser.
Kotare Spitfire Mk.Ia (1/32)
- Thread starter stona
- Start date
stona
SMF Supporter
- Joined
- Jul 22, 2008
- Messages
- 11,472
- Points
- 113
- First Name
- Steve
So after a bit of a delay I was able to have a pretty much full morning on this.
The decal sheet, unlike most kits even at this scale, comes with a complete set of stencils and placards for the cockpit. It's probably about 30 decals, almost all of which I have used. That took a while!
For me an aftermarket Sutton harness is required. Given the excellent cockpit that Kotare have provided it would seem almost churlish not to honour it with something a bit better than the one molded as one of the seat options. This is an HGW harness and it took a while too I'll probably have to make some subtle adjustments to make it line up with the frames which will fit behind the one with the seat/armour attached.
Most of this is just dry fitted, the seat frame will pop out, so I can disassemble it and 'weather' the interior a little bit, maybe do a bit of dry-brushing and whatnot.
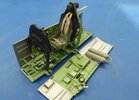
The decal sheet, unlike most kits even at this scale, comes with a complete set of stencils and placards for the cockpit. It's probably about 30 decals, almost all of which I have used. That took a while!
For me an aftermarket Sutton harness is required. Given the excellent cockpit that Kotare have provided it would seem almost churlish not to honour it with something a bit better than the one molded as one of the seat options. This is an HGW harness and it took a while too
 I'll probably have to make some subtle adjustments to make it line up with the frames which will fit behind the one with the seat/armour attached.
Most of this is just dry fitted, the seat frame will pop out, so I can disassemble it and 'weather' the interior a little bit, maybe do a bit of dry-brushing and whatnot.

Neil Merryweather
SMF Supporter
Wow Steve, that's a model in its own right!
Absolutely agree with the decision about the Sutton harness-top job sir!
Absolutely agree with the decision about the Sutton harness-top job sir!
A cracking looking pit Steve.
Really nice Steve, superb detail in there .
stona
SMF Supporter
- Joined
- Jul 22, 2008
- Messages
- 11,472
- Points
- 113
- First Name
- Steve
Very Nice Steve. I look forward to building mine. And I agree, an HGW harness is a must. I’m also going with Eduard exhausts, possible aftermarket IP and wheels, but to be fair it does look good OOB.
Cheers, P
Cheers, P
Last edited:
stona
SMF Supporter
- Joined
- Jul 22, 2008
- Messages
- 11,472
- Points
- 113
- First Name
- Steve
I reckon the I.P. is fine.
I've had a look at the exhausts and, yes, they could be improved. Those in the kit are by no means bad and can easily be improved with a bit of work.
The wheels are not bad and are 'weighted' (a bit too much in my opinion). I assume that they are the correct wheels for these aircraft, I've not looked into that, but would be surprised if Kotare had got them wrong, their research is pretty rigorous.
I totally 'get' why they did the molded harness option but I suspect most people who invest in a kit like this will fit an aftermarket version.
Absolutely lovely. That looks as good as anything I’ve seen…..
Airborne01
SMF Supporter
A great pity much of this excellent work won't be seen 
Steve

Steve
stona
SMF Supporter
- Joined
- Jul 22, 2008
- Messages
- 11,472
- Points
- 113
- First Name
- Steve
It's weird isn't it? Much of most aircrafts' cockpits will be barely visible once the model is completed and yet it's an area that we love to produce in great detail, the more the better. The best manufacturers produce very detailed cockpits and if that's not enough, there are aftermarket 'improvements' available too.A great pity much of this excellent work won't be seen
Steve
I do like a nice cockpit and I suppose I can console myself knowing that it's in there even if it is hidden away.
This Kotare kit even suggests rigging the various controls, something that I have not done precisely because the 'wires' would be barely visible, even if someone takes a torch and shines it into the cockpit. I suppose if you like to enter competitions such a detail might impress the judges. This model will eventually sit on a shelf somewhere in my house with no one to judge it...if I can find some space!
Ain't that the truth. A guilty pleasure I too indulge in. Not every time but once in a while I go all in and add all the detail that can be found. I think its the challenge of actually doing it more than looking at it after.It's weird isn't it? Much of most aircrafts' cockpits will be barely visible once the model is completed and yet it's an area that we love to produce in great detail, the more the better. The best manufacturers produce very detailed cockpits and if that's not enough, there are aftermarket 'improvements' available too.
- Joined
- Apr 28, 2018
- Messages
- 10,793
- Points
- 113
- First Name
- Jakko
The Spitfire at least has the advantage that you can leave the door open. OTOH, it has the disadvantage that the canopy is relatively small compared to many of its contemporaries … But it’s been my experience with models of tanks that you can see a lot more of the interior than you would think through those tiny hatches, so I suppose it’s not that different with aircraft.Much of most aircrafts' cockpits will be barely visible once the model is completed
stona
SMF Supporter
- Joined
- Jul 22, 2008
- Messages
- 11,472
- Points
- 113
- First Name
- Steve
I know I'll have no time over the next few days, so I've made just enough time to get the cockpit in and the fuselage halves joined.
It's just dry fitted here because I want to make sure the next stage, engine covers etc., fit before I glue it. The fit looks good, tight but good so hopefully there will be no issues. It's always worth checking!
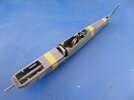
As you can see, there is no engine. That's fine with me as I rarely display them anyway, just building enough to hang a propeller on. It's a choice I suppose, by Kotare, to make the outside dimensions accurate and not supply an inevitably under scale Merlin.
It's just dry fitted here because I want to make sure the next stage, engine covers etc., fit before I glue it. The fit looks good, tight but good so hopefully there will be no issues. It's always worth checking!

As you can see, there is no engine. That's fine with me as I rarely display them anyway, just building enough to hang a propeller on. It's a choice I suppose, by Kotare, to make the outside dimensions accurate and not supply an inevitably under scale Merlin.
stona
SMF Supporter
- Joined
- Jul 22, 2008
- Messages
- 11,472
- Points
- 113
- First Name
- Steve
This will be it until after the week-end. I've managed to squeeze in a little time.
The fuselage is essentially finished. It's an excellent fit and the way it is engineered, so that details like the rivets on the spine are preserved is very clever.
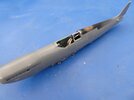
You can see I've primed and sprayed an area around the lens of the upwards facing identification lamp. This is because the clear part is fitted from the inside and I didn't fancy trying to mask just the lens. By doing this I can mask a slightly larger area and not worry about mucking up what is a lovely clear part.
You can see a sort of slot at the rear of the fuselage into which the tail plane will fit. It simply pushes in. Here it is, not glued, just pushed into place.
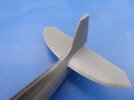
The whole model has fitted like this...so far.
You can also see the raised rivet detail in this image. Very nice.
The fuselage is essentially finished. It's an excellent fit and the way it is engineered, so that details like the rivets on the spine are preserved is very clever.

You can see I've primed and sprayed an area around the lens of the upwards facing identification lamp. This is because the clear part is fitted from the inside and I didn't fancy trying to mask just the lens. By doing this I can mask a slightly larger area and not worry about mucking up what is a lovely clear part.
You can see a sort of slot at the rear of the fuselage into which the tail plane will fit. It simply pushes in. Here it is, not glued, just pushed into place.

The whole model has fitted like this...so far.
You can also see the raised rivet detail in this image. Very nice.
Coming along very nicely Steve.
Nice.
I like the way that they are following the panel lines for the top of the fuselage, there are a few companies that could learn a thing or two there!
I like the way that they are following the panel lines for the top of the fuselage, there are a few companies that could learn a thing or two there!
Waspie
SMF Supporter
Question if I may for the general Wingy thing experts.
Harness’s! WW2 aircraft in general.
Were the harness a four piece or five!! The fifth being an anti-submarining fit to stop the pilot sliding under the lap straps. 5th fits between the pilots legs, the other harnesses generally fit into the fifth!!
Harness’s! WW2 aircraft in general.
Were the harness a four piece or five!! The fifth being an anti-submarining fit to stop the pilot sliding under the lap straps. 5th fits between the pilots legs, the other harnesses generally fit into the fifth!!
stona
SMF Supporter
- Joined
- Jul 22, 2008
- Messages
- 11,472
- Points
- 113
- First Name
- Steve
Generally four piece.
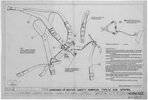
The Sutton, as in this and most British aircraft had an extra part that passed over the pilot's shoulders and through a slot in the head armour to an attachment in the rear fuselage (2 in the image below) The other part of the shoulder restraint (1 in the image below) passed behind the seat, or, later, behind the pilot and through a slot in the seat, to an attachment lower than his posterior.
The shoulder straps combined with the two lap belts still meant that there were just four belts pinned together with a quick release pin, at the waist.
This is the best drawing I have of a Sutton harness.
Here's an explanation from the late Edgar Brooks:
The standard fit was for two straps, joined into a "Y" shape, to come over the backrest. These were joined by another pair, coming through a slot in the fixed armour/headrest. Two friction adjusters, shaped like a "0," held the two sets together, roughly on the pilot's shoulders. The ends of the "Y" straps had the (5) holes for the retaining pin, while the two, which came through the bulkhead, each ended in small brass crosspiece, so the pilot could grasp them, and pull the whole lot tight. Two lapstraps, with only two holes, were fixed underneath the seat, so that they came up about halfway along the pilot's thighs. The righthand strap fed through the slot in the side of the seat bucket (presumably to ensure that it didn't foul the seat raising/lowering mechanism, while the lefthand strap tended to disappear, and had to be "fished" for (at least it could be seen through the open door.) Initially, the "Y" strap bolted straight onto a crossbar at the bottom of the seat's bulkhead, but, in April, 1941, the bottom few inches were replaced by a short length of cable, to give more freedom of movement.
The straps were numbered; no.1 was the left shoulder strap, and there was a narrow strip of webbing, running underneath the holes, along which a "T"-shaped pin slid, so the the stalk of the T popped through (any) one of the holes. The pin was tapered, rather like a drawing pin (thumb-tack, in some quarters, I believe,) and had a hole drilled through it. No.2 was the right thighstrap, 3 the left thighstrap, and 4 was the right shoulderstrap. To no. 4, a triangular pin was attached by a short length of cord. The two ends of the triangle were splayed out, after they touched, and a third length of rod was fitted between them, attached to a crossbar just inside the triangle. Each successive strap was laid over the tapered pin, and the central rod, of the triangle was pushed through the hole, to hold the whole lot together; the sides of the triangle acted as a spring to stop the rod from sliding out. All the pilot had to do, in an emergency, was pull the triangle out, the straps fell away, and out he went.
The Sutton, as in this and most British aircraft had an extra part that passed over the pilot's shoulders and through a slot in the head armour to an attachment in the rear fuselage (2 in the image below) The other part of the shoulder restraint (1 in the image below) passed behind the seat, or, later, behind the pilot and through a slot in the seat, to an attachment lower than his posterior.
The shoulder straps combined with the two lap belts still meant that there were just four belts pinned together with a quick release pin, at the waist.
This is the best drawing I have of a Sutton harness.

Here's an explanation from the late Edgar Brooks:
The standard fit was for two straps, joined into a "Y" shape, to come over the backrest. These were joined by another pair, coming through a slot in the fixed armour/headrest. Two friction adjusters, shaped like a "0," held the two sets together, roughly on the pilot's shoulders. The ends of the "Y" straps had the (5) holes for the retaining pin, while the two, which came through the bulkhead, each ended in small brass crosspiece, so the pilot could grasp them, and pull the whole lot tight. Two lapstraps, with only two holes, were fixed underneath the seat, so that they came up about halfway along the pilot's thighs. The righthand strap fed through the slot in the side of the seat bucket (presumably to ensure that it didn't foul the seat raising/lowering mechanism, while the lefthand strap tended to disappear, and had to be "fished" for (at least it could be seen through the open door.) Initially, the "Y" strap bolted straight onto a crossbar at the bottom of the seat's bulkhead, but, in April, 1941, the bottom few inches were replaced by a short length of cable, to give more freedom of movement.
The straps were numbered; no.1 was the left shoulder strap, and there was a narrow strip of webbing, running underneath the holes, along which a "T"-shaped pin slid, so the the stalk of the T popped through (any) one of the holes. The pin was tapered, rather like a drawing pin (thumb-tack, in some quarters, I believe,) and had a hole drilled through it. No.2 was the right thighstrap, 3 the left thighstrap, and 4 was the right shoulderstrap. To no. 4, a triangular pin was attached by a short length of cord. The two ends of the triangle were splayed out, after they touched, and a third length of rod was fitted between them, attached to a crossbar just inside the triangle. Each successive strap was laid over the tapered pin, and the central rod, of the triangle was pushed through the hole, to hold the whole lot together; the sides of the triangle acted as a spring to stop the rod from sliding out. All the pilot had to do, in an emergency, was pull the triangle out, the straps fell away, and out he went.

