S model 1/72 3.7 cm PaK 36 Auf Renault UE build (Simon T tribute group build)

D

Deleted member 6559

Guest
Watching this stage with very great interest Tim. Keen to pinch as many ideas as possible.
 

Tim Marlow

Little blokes aficionado
SMF Supporter
Joined
Apr 27, 2018
Messages
16,814
Points
113
Location
Somerset
First Name
Tim
Nout wrong with cheating if it makes painting figures easier!
True, but I do it to make a decent finish faster to achieve Andrew, not necessarily to make easier to do ;) .Sometimes the two coincide though, like in face painting........
 

adt70hk

I know its a bit sad but I like quickbuild kits!!!
SMF Supporter
Joined
Sep 4, 2019
Messages
9,511
Points
113
First Name
Andrew
True, but I do it to make a decent finish faster to achieve Andrew, not necessarily to make easier to do ;) .Sometimes the two coincide though, like in face painting........
Thanks Tim. I really am looking forward to seeing these done. That flesh awash you suggested was such a have changer for me I can't wait to see what you do.

ATB

Andrew
 
D

Deleted member 7181

Guest
Well I've already learned an important lesson thanks Tim, so I'm looking forward to more hints & tips.

I've tried using Vallejo model wash, but found it too "strong". Watering it down did exactly what you describe - it didn't flow at all well, and dried with blotches and stains. I have some AK glaze medium so will experiment to see if they're compatible.
 

adt70hk

I know its a bit sad but I like quickbuild kits!!!
SMF Supporter
Joined
Sep 4, 2019
Messages
9,511
Points
113
First Name
Andrew
Well I've already learned an important lesson thanks Tim, so I'm looking forward to more hints & tips.

I've tried using Vallejo model wash, but found it too "strong". Watering it down did exactly what you describe - it didn't flow at all well, and dried with blotches and stains. I have some AK glaze medium so will experiment to see if they're compatible.
Andy

I did wondered the same when i first used it but as it was the first commercial wash if used I knew no better. Looked like I'm be investing in some medium......

ATB

Andrew
 

Tim Marlow

Little blokes aficionado
SMF Supporter
Joined
Apr 27, 2018
Messages
16,814
Points
113
Location
Somerset
First Name
Tim
Glad I could help Andy. All of the other game washes (model wash is different by the way) are fine at full strength, as is the black for some applications. I just don’t like it for this one because it darkens the primer surface too much, making it closer to black primer.
 

adt70hk

I know its a bit sad but I like quickbuild kits!!!
SMF Supporter
Joined
Sep 4, 2019
Messages
9,511
Points
113
First Name
Andrew
Glad I could help Andy. All of the other game washes (model wash is different by the way) are fine at full strength, as is the black for some applications. I just don’t like it for this one because it darkens the primer surface too much, making it closer to black primer.
Useful to know Tim. Thx as always.
 

JR

Member of the Rabble and Pyromania Consultant
SMF Supporter
Joined
May 26, 2015
Messages
17,303
Points
113
Location
lincs
First Name
John
I love the Game Colour Wash 73.204 you recommended for flesh Tim, its been a game changer for me. :thumb2::thumb2::thumb2:
 

stillp

SMF Supporter
Joined
Nov 17, 2016
Messages
7,232
Points
113
Location
Rugby
First Name
Pete
Don’t think I’ve come across that Pete. Is it like Army Painter dip?
I don't know Tim, I've not seen the Army Painter one. The reason I was asking is that I tried the Vallejo one and it left a thick coating on the figure I dipped, almost like a toffee apple. I cleaned most of it off with a damp brush and it looked OK afterwards, but I was wondering if it was just me or if others have the same trouble.
Pete
 

Tim Marlow

Little blokes aficionado
SMF Supporter
Joined
Apr 27, 2018
Messages
16,814
Points
113
Location
Somerset
First Name
Tim
Sounds very like army painter dip to me Peter. If it is, then it’s a dip/varnish, used last on a paint job...gives rudimentary shading and a gloss finish....designed for fast painting of large armies. I’ve got a small bottle but don’t get on with it. The finish always seems a bit muddy. I prefer the control of separate washes and varnishes.
 

Tim Marlow

Little blokes aficionado
SMF Supporter
Joined
Apr 27, 2018
Messages
16,814
Points
113
Location
Somerset
First Name
Tim
Hi all, face painting 101 starts here........

536EC214-E5E8-4CA5-89A3-23C29CF15F4E.jpeg

Unless I’m batch painting figures (usually twelve at a time) I use a wet palette. This is made from an airtight sandwich clip top box fitted with a wet palette base sheet and top sheet. You can buy the wet palette base from an art supplier, but they are pretty large. This one is about six inches square and doesn’t overwhelm my work space.
0AF85303-FC3E-4972-8C3A-D66E742F108E.jpeg
I know you can use blotting paper as a base and baking parchment as a top sheet, but I’ve found the purpose made stuff is better in use, giving more control on paint mixes. However, if you just want to dip your toe into this technique and see how you get on, use the following.
  • Fold up a J cloth and place it at the bottom of a suitable container.
  • Make it wet, then pour off any surplus water.
  • Cut a piece of baking parchment to size and press it on the top of the J cloth, eliminating any air bubbles. There should be no visible water on the surface of the parchment.
The wet palett is the. Ready for use.

My paint of choice is these...
00643FB7-0913-409C-B567-5DAD398C6003.jpeg
The flat flesh will be used for the base coat and the light flesh for highlights....

01BAE1FB-9617-4A29-9315-BBBFC9CBEAEC.jpeg
I’ve put a drop of each on the wet palette. These will stay workable for days....
2890E8D0-1598-486F-A21E-EF842A6A4265.jpeg
This is my weapon of choice, a number one brush with a good point.

A35A6818-C4E6-46A3-A3DE-BDA1EC57DEE8.jpeg
And here I’ve mixed up my intermediate shade on the wet palette.....

Next up, the figures.....
If you have any questions please ask and I’ll try to explain......
 

Tim Marlow

Little blokes aficionado
SMF Supporter
Joined
Apr 27, 2018
Messages
16,814
Points
113
Location
Somerset
First Name
Tim
OK, on with the motley.....

66B00E55-26CC-462B-A018-9DB8D083E6F5.jpeg
Two coats of flat flesh, to get a decent base colour. Vallejo flesh colours are a little yellow to my eye, but that helps here.

8B9ACDB2-5ABB-4041-8C93-C0C5E5C21C78.jpeg
Highlights have been added, first the intermediate shade on the nose, chin, cheekbones, fingers, top of the hands, etc. Basically anything that sticks out or gets light from above. This is followed by a second highlight using light flesh. This is added to the same sort of areas but only on the highest points.
Doesnt look much, but it’s a pretty small area to get clear pictures of!

F4B4BECD-4D19-43DA-B2E0-14E419B6EC66.jpeg

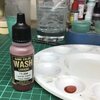
This is the secret ingredient. It’s a red brown colour, so offsets the yellow flesh paint, and it’s formulated to flow properly into recesses. A couple of drops in a dry palette used at full strength. Like the old brute advert said, just splash it all over.....

95E09FB1-BC9D-4107-87B4-256342CFB8BE.jpeg
You can see it settles into the recesses giving shade and definition to the features and hands. Don’t worry about the over painting, that can be sorted later. It’s the reason I paint the figure from inside to outside. As you add subsequent layers you can tidy up and define the previous one.

A couple of tips I missed.....dampen your brush first before putting it in the paint, it helps the paint flow properly and maintains the brush point.

I only clean the brush properly at the end of the painting session. In between I just rinse it in water and repoint the tip before using the next colour.

The proper clean is carried out at the end of the painting session. Rinse the brush. Lather up the brush properly using Masters brush soap, then rinse it out under the tap. Repoint the brush and place it back in its plastic sleeve for storage. Lastly the one that improved my brush life considerably, place it in the brush storage point downwards with the brush sleeve resting on the bottom of the rack. This allows residual moisture, and any minute paint fragments that may be left, to migrate to the brush tip before they dry. If you store brushes the other way up these can migrate to the ferrule to dry, eventually splaying the brush fibres and ruining the point.

As always, all questions welcome....
 

adt70hk

I know its a bit sad but I like quickbuild kits!!!
SMF Supporter
Joined
Sep 4, 2019
Messages
9,511
Points
113
First Name
Andrew
Tim

It's amazing but I just happen to have those exact three flesh colours in my collection..... Now who was it that recommended them to me???? ;)

In all all seriousness, really looking forward to seeing this come together so I can steal all your ideas!

I note to do the wash last, after the highlighting. is this because otherwise the highlights would look a bits
too stark after the wash?

ATB

Andrew
 

Tim Marlow

Little blokes aficionado
SMF Supporter
Joined
Apr 27, 2018
Messages
16,814
Points
113
Location
Somerset
First Name
Tim
Hi Andrew. Yes it is, I find the wash smooths out the transitions. You won’t get away with this at Peter Day scale, but it works OK up to about 1/35. To be honest, at 15mm I wouldn’t use highlights either. I would simply use the mid tone as a base because the figures are too small....
 

adt70hk

I know its a bit sad but I like quickbuild kits!!!
SMF Supporter
Joined
Sep 4, 2019
Messages
9,511
Points
113
First Name
Andrew
Hi Andrew. Yes it is, I find the wash smooths out the transitions. You won’t get away with this at Peter Day scale, but it works OK up to about 1/35. To be honest, at 15mm I wouldn’t use highlights either. I would simply use the mid tone as a base because the figures are too small....
Thanks for the confirmation Tim.

Much appreciated.

ATB.

Andrew
 
Top