Tamiya 1/350 KGV plus extras

BattleshipBob

Bob, bob, bobing along!
SMF Supporter
Joined
Apr 28, 2018
Messages
6,212
Points
113
First Name
Bob
There's another PE set by the way, railings and cranes!!

Will not use it all, my sanity would not allow it:face-with-head-bandage: but the Tamiya kit is rather basic in many areas, the secondary battery turrets for example, so will add when I think it will improve. Ideal chance to improve my below average PE skills!
 

boatman

SMF Supporter
Joined
Nov 8, 2018
Messages
12,932
Points
113
Location
NORFOLK UK
First Name
christopher
There's another PE set by the way, railings and cranes!!

Will not use it all, my sanity would not allow it:face-with-head-bandage: but the Tamiya kit is rather basic in many areas, the secondary battery turrets for example, so will add when I think it will improve. Ideal chance to improve my below average PE skills!
Bob m8ty i keep telling you dont keep putting your self down you are a good modderler now say that a 1000 times an it should stick in your memory
chris b
 

BattleshipBob

Bob, bob, bobing along!
SMF Supporter
Joined
Apr 28, 2018
Messages
6,212
Points
113
First Name
Bob
Its underway!

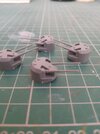
Started with the secondary battery, the partial base fitment is not good, a large gap is left, so added filler. Not ready yet.
20220224_124535.jpg
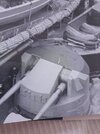
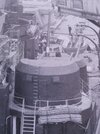
The turrets are not detailed so will try to improve with PE, these photos show the turrets on Duke of York.

On the front are 3 vision ports, 2 ladders and 2 plates. On the rear is a large door and ladder.
20220224_160339.jpg20220224_160407.jpg

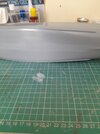
Sanded the seam on its bum, next remove the boot topping scribed lines.
20220224_124612.jpg

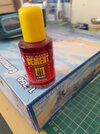
Been using this glue for the first time, like a lot of new glues its red so you can see it. Working ok but my god its so thin lol
20220224_124755.jpg
Then do I drill or leave the portholes????
 

boatman

SMF Supporter
Joined
Nov 8, 2018
Messages
12,932
Points
113
Location
NORFOLK UK
First Name
christopher
Its underway!

Started with the secondary battery, the partial base fitment is not good, a large gap is left, so added filler. Not ready yet.
View attachment 446807
The turrets are not detailed so will try to improve with PE, these photos show the turrets on Duke of York.

On the front are 3 vision ports, 2 ladders and 2 plates. On the rear is a large door and ladder.
View attachment 446808View attachment 446809

Sanded the seam on its bum, next remove the boot topping scribed lines.
View attachment 446810

Been using this glue for the first time, like a lot of new glues its red so you can see it. Working ok but my god its so thin lol
View attachment 446811
Then do I drill or leave the portholes????
WELL Bob mate i think drill them out as they can be difficult to paint black an lets face it its not goin on the water is it as tigers port hole are a bit bigger an have glass fitted in them an looks great when the light is reflected off them
chris b
 

JR

Member of the Rabble and Pyromania Consultant
SMF Supporter
Joined
May 26, 2015
Messages
17,275
Points
113
Location
lincs
First Name
John
Bob I think choosing the pe as and when you think its worth doing . You want to enjoy the build not be put off . Your gaining in experience as you complete these ships .
Never seen that red glue, I've got some Mr Hobby Black , certainly shows where you've been in my case ! ;) Good luck with the build .
Will sit somewhere warm and dry .
 

BattleshipBob

Bob, bob, bobing along!
SMF Supporter
Joined
Apr 28, 2018
Messages
6,212
Points
113
First Name
Bob
Bob.

Rather you than me on that PE...... :sad: :tired: :dizzy:

Andrew
Thanks lol
Hi Bob
All the best with the pe. Some of the very tiny bits are probably not worth it.
Jim
Hi Jim, I agree some bits are hard to see with a magnifier, the secondary turrets certainly require a attempt at improving but a can see a lot not being used!
Bob I think choosing the pe as and when you think its worth doing . You want to enjoy the build not be put off . Your gaining in experience as you complete these ships .
Never seen that red glue, I've got some Mr Hobby Black , certainly shows where you've been in my case ! ;) Good luck with the build .
Will sit somewhere warm and dry .
Evening John, sound and sane advice, the glue is good to be fair, just touch a join and its in like a ferret up a trouser leg!!
 

JR

Member of the Rabble and Pyromania Consultant
SMF Supporter
Joined
May 26, 2015
Messages
17,275
Points
113
Location
lincs
First Name
John
Thanks lol

Hi Jim, I agree some bits are hard to see with a magnifier, the secondary turrets certainly require a attempt at improving but a can see a lot not being used!

Evening John, sound and sane advice, the glue is good to be fair, just touch a join and its in like a ferret up a trouser leg!!
Having been luckily enough not to experience a ferret up the trouser leg I'll take your word for that Bob .:smiling3:
 

BattleshipBob

Bob, bob, bobing along!
SMF Supporter
Joined
Apr 28, 2018
Messages
6,212
Points
113
First Name
Bob
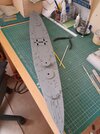
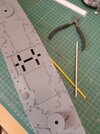
Right, progress!

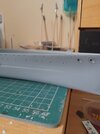
Spent ages sanding down the raised boot topping lines, and yes measured the lines first! Drilled out the portholes. That brought a return of my carpel tunnel syndrome, very painful pins & needles in my hands, had to stop a few times but ideal for coffee break! Sanded down the whole Hull.

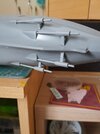
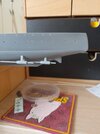
Added the propeller shafts and brackets, the shafts are not fixed yet

Very impressed with the Ammo 'red' glue, very thin and although it smells a bit in the bottle, did not notice anything in the room nor a headache!
20220228_125549.jpg20220228_125559.jpg
20220228_125532.jpg
Trial fitted the three deck parts, big gap but thankfully the wooden deck kit has one join by A turret barrette, so all hidden, phew:thumb2:

20220228_114729.jpg20220228_114738.jpg
That's it for now!
 

Airborne01

SMF Supporter
Joined
Mar 30, 2021
Messages
3,173
Points
113
Location
Essex
First Name
Steve
I'm intrigued as to the benefits of coloured adhesives - I understand the uses of (eg) coloured Milliput, but extra-thin cement with colours -mmm! I can already see the evidence of 'excess adhesive' when using TET so why pay more for what is, effectively, the same product?
(Cynical) Steve
 

BattleshipBob

Bob, bob, bobing along!
SMF Supporter
Joined
Apr 28, 2018
Messages
6,212
Points
113
First Name
Bob
Dear cynical of the UK!!

In my case I like Tamiya extra thin but it gives me banging headaches and smells a fair bit, I also tend to not use enough glue in a effect to not mark the kit

So for being able to clearly see where the glue is, is ideal however still getting use to it, but happy so far. The brush in the lid holds a lot of glue, so first attempts flooded the join lol
 

SteveH

SMF Supporter
Joined
Apr 28, 2018
Messages
1,293
Points
113
First Name
Stephen
Looking good Bob, the build than is;)
Photo etch is certainly a Marmite item for builders, but it does add some serious detail in 1/350 and 1/700 ships.
There are several videos on You Tube which could be of some help when you have the off days and want to keep the focus on the KGV
Having watched Plasmo and Andy's Hobby HQ build some ships, I have a ship on my bucket list for my "real" retirement:upside:
I even have enough PE to almost build a full 1/35 Pz I when I retire too.
I did enjoy the micro soldering but its been a few years since I have done a serious PE work.
It all figure painting at the moment.
Have fun and enjoy the KGV, its coming on nicely
Regards
Steve H
 
Top