What's on the Bench 2024

Jakko

Way past the mad part
SMF Supporter
Joined
Apr 28, 2018
Messages
10,824
Points
113
First Name
Jakko
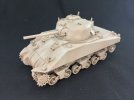
The Sherman I was given is now just about finished.
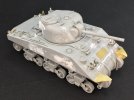
IMG_0955.jpegIMG_0953.jpeg

The tow cable came with it, but I needed to shorten it a bit to bring it to the correct length. I did replace the D-clasps that secure it to the towing lugs at the front by ones from Asuka, and that brand also supplied a much finer clamp for the machine gun on the commander’s hatch.

On the bow, I did take the plunge and cut, scraped, filed, and puttied away the ridge and bolts at the top. Once the putty was dry, I punched out a bunch of bolt heads from 0.5 mm plastic card and added them along the top edge:

IMG_0954.jpeg

Not that easy to see because they’re white against the white putty, but if you look carefully you’ll see them :smiling3: The painted patch is because on the real tank, there was a prominent casting number on the plate there, so I thought I’d add that from Archer transfers (which are printed with resin so they’re 3D, forming letters, numbers, foundry marks, etc.). Because those adhere poorly to bare plastic, I painted the area first. Unfortunately, it then turned out that the set doesn’t include much of anything that’s useful to create the marking that needs to go here :sad:

And I’ve started on the tracks:

IMG_0956.jpeg

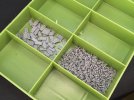
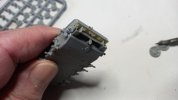
This is a MiniArt set of T41 tracks, which were fitted to early Shermans. I separated and cleaned up all of the end connectors (lower right) and two sprues of block parts (upper left). Only eight sprues more to go …
 

David Lovell

SMF Supporter
Joined
Apr 27, 2018
Messages
1,498
Points
113
Location
Poole Dorset
First Name
David
Got a hankering for some panzer gray so a break from all things russian I've built this one ready for primer
20240330_120543.jpg
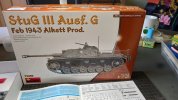
And have made a start on this
20240415_153502.jpg
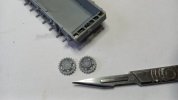
So have gone with the same drive sprocket as the box top looks more stugie in my little world
20240416_171658.jpg
The one on the right
20240416_171823.jpg
All good fun so far after the grief with the BM-8-24(see under construction) im keeping pics etc will start a proper build thingy once up to primer on both. Dave
 
Last edited:

Jakko

Way past the mad part
SMF Supporter
Joined
Apr 28, 2018
Messages
10,824
Points
113
First Name
Jakko
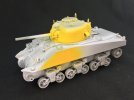
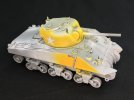
Rather than Panzer grey like David, I felt more like yellow:

IMG_0993.jpeg

This because I did some research, and Shermans of this type were used in Tunisia in early 1943, with a stripe, cryptic unit markings and US star on the turret and a big number on the hull sides, all in yellow. That’s why I first primed those in white, and have now airbrushed Tamiya matt yellow over that. Next step will be to design the markings in Adobe Illustrator, then print them out and stick them to the model with PVA before spraying the tank olive drab.
 

Jakko

Way past the mad part
SMF Supporter
Joined
Apr 28, 2018
Messages
10,824
Points
113
First Name
Jakko
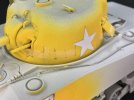
Now with the actual markings:

IMG_0994.jpegIMG_0995.jpeg

I first applied the line around the turret, which is 3 mm wide masking tape (made by cutting a 6 mm strip in half), and then cut parts out of it to make room for the other markings. The stars and 7s were made by drawing them in Adobe Illustrator, printing them (my toner cartridge smudges something terrible :sad: ) and then cutting them out, so I could paste them to the model with a bit of PVA. The tactical markings, which consist of a vertical bar with a dot next to it, are masking tape: 2 mm strips of the 6 mm tape plus a 2 mm disc I made with my punch and die set. Those symbols indicate E Company, 1st Armored Regiment, 1st Armored Division, US Army in Tunisia, early 1943 — which is to say, around the time of the Battle of Kasserine Pass. I’m not trying to replicate any specific real tank, but this seems plausible based on photographs taken after that battle.
 

adt70hk

I know its a bit sad but I like quickbuild kits!!!
SMF Supporter
Joined
Sep 4, 2019
Messages
9,506
Points
113
First Name
Andrew
Hi all

I need to paint the pilots for the FW 190s and had a few more things lurking that need the hairy stick treatment, so took the spray booth off the table, worked out what paints I'd need for everything and started working it all last night.

ATB

Andrew


Jakko

Way past the mad part
SMF Supporter
Joined
Apr 28, 2018
Messages
10,824
Points
113
First Name
Jakko
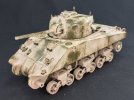
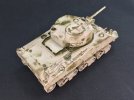
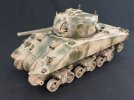
A bit less yellow now:

IMG_0996.jpeg

I sprayed the whole model with Tamiya Deck Tan with some Flat Earth in it, followed immediately by random patches in a lighter version of that mixture, and then by pure Deck Tan. This is an attempt to replicate the kind of soil colours I saw in photos of the part of Tunisia where the Kasserine Pass battle raged, because these tanks wore mud camouflage over the normal olive drab. It’ll be easier for me to paint OD over this to replicate worn camouflage, than to first paint the model OD and then add mud camouflage over almost all of that.
 

vizenz

SMF Supporter
Joined
Apr 19, 2024
Messages
50
Points
33
Location
Bavaria
First Name
Andreas
Nooo, I was just trying to make a few smartass points, but now I see that it's too late for that. :smiling5:

Interesting to see that you painted the yellow first and then applied the mud camouflage before the OD. I've never seen that before. I'm excited to see what that looks like after finishing. :thumb2:

My smartass point when I saw your masked yellow would have been to move the point further down.
Why? You wrote that you don't want to build a specific vehicle, but that's difficult with these markings that were intended to identify each individual vehicle. Now your tank has the markings of the 1st Armored Regiment, E-Company. What I remember from my own research on the topic is that the E-Company did not have any yellow stripes on the turret or any yellow numbers. However, if the dot of the tactical symbol is not painted in the middle of the line but at the bottom, it becomes the F Company - and that Company carried both. So yellow band on the turrets and big yellow numbers on the hulls. However, I don't know by heart whether there was a "7", I would have to look it up.
Best regards,
Andi
 

Jakko

Way past the mad part
SMF Supporter
Joined
Apr 28, 2018
Messages
10,824
Points
113
First Name
Jakko
Interesting to see that you painted the yellow first and then applied the mud camouflage before the OD. I've never seen that before. I'm excited to see what that looks like after finishing. :thumb2:
It’s a very good method to use for things like this, much easier than masking the line, because you would have to put on two pieces of tape (above and below the line) as well as probably more tape to prevent overspray. For the numbers, stars etc. you’ve got much the same advantage, and especially if you need to do things like A, B, 6, 8, 9 etc. that would be hard to spray through a mask.

My smartass point when I saw your masked yellow would have been to move the point further down.
I deliberately didn’t, because I did find pictures of F-company No. 7, and it doesn’t fit the details of this model. It’s the one on the right in this photo:

kasserine-25.jpg
(source)

… and it clearly has bogies with the return roller on top instead of behind, as well as a single-piece nose.

You wrote that you don't want to build a specific vehicle, but that's difficult with these markings
What I meant with that was: I’m not trying to build a vehicle from a picture of the real thing, but a generic one that could have been there.

What I remember from my own research on the topic is that the E-Company did not have any yellow stripes on the turret or any yellow numbers.
Oh, OK, if you say so :smiling3: I didn’t do enough research to dig up that information, but instead figured that all of the battalion or even regiment would have had the yellow stripe, and as I didn’t find any photos of E company, thought that shifting the dot to the middle would be a good idea to avoid people claiming “F7 didn’t look like that!” (BTW, my only reason to go for tank 7 was because that number is easy to cut out of a sheet of paper, unlike any number with a rounded part to it.)
 

vizenz

SMF Supporter
Joined
Apr 19, 2024
Messages
50
Points
33
Location
Bavaria
First Name
Andreas
… and it clearly has bogies with the return roller on top instead of behind, as well as a single-piece nose.
This is why I hate Shermans! I'm already overwhelmed with "my" German tanks. Every few weeks someone changed something during production.
BUT: I could build a PzKpfw II with completely wrong details and only a handful of people on the planet would notice. Things are different with Shermans. There seems to be an alarm center for Sherman models somewhere where a red light always lights up when someone builds a detail incorrectly.
I tried several times to find the right variant based on a photo... No chance! :tears-of-joy:

Oh, OK, if you say so :smiling3: I didn’t do enough research to dig up that information, but instead figured that all of the battalion or even regiment would have had the yellow stripe, and as I didn’t find any photos of E company, thought that shifting the dot to the middle would be a good idea to avoid people claiming “F7 didn’t look like that!” (BTW, my only reason to go for tank 7 was because that number is easy to cut out of a sheet of paper, unlike any number with a rounded part to it.)
I can completely understand that. I probably would have done the same.
And don't worry, I won't tell anyone that you painted a dot wrong! :smiling6:;)
 

Jakko

Way past the mad part
SMF Supporter
Joined
Apr 28, 2018
Messages
10,824
Points
113
First Name
Jakko
This is why I hate Shermans! (…) Every few weeks someone changed something during production.
Oh, it’s nowhere near that simple ;) Every manufacturer had its own little details, which changed over the course of production. But TBH, this is just like with German tanks, where experts can also tell the factory and approximate date of production from the details. I just happen to know a fair bit more about Sherman details than, say, Panther details :smiling3:

BUT: I could build a PzKpfw II with completely wrong details and only a handful of people on the planet would notice.
I think that depends on where you post pictures of it. Here, there would be very few. Go over to Missing Lynx and there will be rather more of them :smiling3: I like both kinds of forums, but sometimes I forget which one I’m at …
 

Richard48

SMF Supporter
Joined
Apr 27, 2018
Messages
1,406
Points
113
Location
Clacton on sea
First Name
Richard
The Sherman I was given is now just about finished.
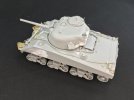
View attachment 506695View attachment 506693

The tow cable came with it, but I needed to shorten it a bit to bring it to the correct length. I did replace the D-clasps that secure it to the towing lugs at the front by ones from Asuka, and that brand also supplied a much finer clamp for the machine gun on the commander’s hatch.

On the bow, I did take the plunge and cut, scraped, filed, and puttied away the ridge and bolts at the top. Once the putty was dry, I punched out a bunch of bolt heads from 0.5 mm plastic card and added them along the top edge:
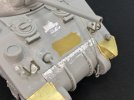
View attachment 506694

Not that easy to see because they’re white against the white putty, but if you look carefully you’ll see them :smiling3: The painted patch is because on the real tank, there was a prominent casting number on the plate there, so I thought I’d add that from Archer transfers (which are printed with resin so they’re 3D, forming letters, numbers, foundry marks, etc.). Because those adhere poorly to bare plastic, I painted the area first. Unfortunately, it then turned out that the set doesn’t include much of anything that’s useful to create the marking that needs to go here :sad:

And I’ve started on the tracks:

View attachment 506696

This is a MiniArt set of T41 tracks, which were fitted to early Shermans. I separated and cleaned up all of the end connectors (lower right) and two sprues of block parts (upper left). Only eight sprues more to go …
Doing a great job Jakko.I won the kit you are making on E.bay yesterday Saturday 20th.I paid £55..Hoping Dragon reissues them sometime.I think i might make mine as a British D.V Baldwin Firefly 1C.Ive got the Dragon Sherman 1C welded hull so i shall swap turrets and the Firefly 1C welded can become a ALCO british M4 in Normandy with some tweaking.
Richard
 

Tim Marlow

Little blokes aficionado
SMF Supporter
Joined
Apr 27, 2018
Messages
16,785
Points
113
Location
Somerset
First Name
Tim
Just off the production line…..
IMG_1998.jpeg
Gurt big arrow thrower….28mm little blokes as always.
More pictures here….
 

Jakko

Way past the mad part
SMF Supporter
Joined
Apr 28, 2018
Messages
10,824
Points
113
First Name
Jakko
Doing a great job Jakko.
Thanks :smiling3: I’ve started painting olive drab bits where the mud is supposed to have worn off (no picture yet), but it still needs a lot more work to look convincing …

I think i might make mine as a British D.V Baldwin Firefly 1C.Ive got the Dragon Sherman 1C welded hull so i shall swap turrets and the Firefly 1C welded can become a ALCO british M4 in Normandy with some tweaking.
Sounds like a plan to me :smiling3: Though the M4 kit is definitely a PSC M4, if you ask me, not a Baldwin tank.
 

Richard48

SMF Supporter
Joined
Apr 27, 2018
Messages
1,406
Points
113
Location
Clacton on sea
First Name
Richard
Thanks :smiling3: I’ve started painting olive drab bits where the mud is supposed to have worn off (no picture yet), but it still needs a lot more work to look convincing …


Sounds like a plan to me :smiling3: Though the M4 kit is definitely a PSC M4, if you ask me, not a Baldwin tank.
Hi Jakko.
Do you mean the kit you have is PSC?.I seem to recall when it came out Jim Carswell did some scratchbuilding to make a British Baldwin DV.I can never retain info on all the changes of the types.I know U.K M4 welded were Alco but i believe the M4 Normandy needs some TLC.Think i will seek out my Son of Sherman when i get round to mine.I seem to recall somebody telling me that one of the Dragon Sherman 3 kits makes a great U.K M4 welded.Obviously engine deck changes.I think we sound like Shermanholics.But its a nice addiction.
Richard
 

Jakko

Way past the mad part
SMF Supporter
Joined
Apr 28, 2018
Messages
10,824
Points
113
First Name
Jakko
OK, aside from the welded hull, it’s a PSC tank ;) The reason I say that is because it has the flat deck inside the turret splash guard, rather than its rear corners being angled down to match the sloping sides of the engine deck. To make a Baldwin one, you would have to correct that. IMHO it’s rather easier to stick a bunch of rivets to the hull sides, though :smiling3:
 

Jakko

Way past the mad part
SMF Supporter
Joined
Apr 28, 2018
Messages
10,824
Points
113
First Name
Jakko
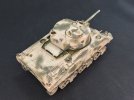
Step 1 to go from mud all-over, to mud that’s wearing off the olive drab paint:

IMG_1003.jpegIMG_1004.jpeg

This is Mr. Aqueous H78 olive drab (2) that I applied with a bit of foam rubber and a few different sizes of brush.
 
Top