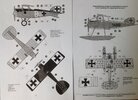
Wingnut Wings 1/32 Halberstadt Cl.II (late)

Allen Dewire

Proud Rabble Member
SMF Supporter
Joined
Apr 27, 2018
Messages
4,105
Points
113
Location
Bamberg
First Name
Allen
Evening Folks,

That's made a huge difference to the prop. Looks the business now :thumb2:
Thank you Sir! It amazed me after I shot the coat on her too!!! Luckily Andy, I didn't get any splinters handling it either...

The prop is not a lot different in colour and grain from a small one I have in the loft from a old target aircraft.
Well Doug, I really can't imagine why you have a prop in the loft.......Shouldn't you be bending etch and working on that Chally, instead of playing with your propeller???...Just wondering...

Top work Allen.....prop is the bomb!!
Thanks Buddy!!! It was the last worry and I'm glad it went so well...Ok, not the last worry as the figs are next...

Wow Allen that's something else! Almost there ('Stay on target...')
Yes Sir, Neil!!! I'm on target (so far) and the figs are next up in the morn. Have you painted up your Lon Chaney 'Werewolf' fuselage figure yet???...

What a difference that made to the prop, looking forward to the little dio with it
So true Mick and thanks! It will have to be a small base as I have a small flat. Hope to have it finished before month's end. I see you have gone all 'Spacey' on us my friend!!! I gotta ketchup with it and "May The Force Keep You Awake At The Bench"...

Superb work allen , the prop ( and everything else) looks excellent . Great idea scratching the fuel cart , cheers tony
Thanks Tony! And thanks to your post (and Mark and Tim), it worked most excellently. I have also seen that folks mix the clear orange and clear yellow to spray too. The fuel cart was another wild hair in the butt idea and not as hard as I thought...

My word Dude 1 this is brilliant. Love the poses along with that fuel drum.:thumb2::thumb2::thumb2:
Most appreciated Dude 2! I think you know me pretty well and that I can't leave well enough alone without some scratchy to keep me awake interested at the table...PM in the morn...

Youngerthanme,
Love the whole build, all the way through we have seen you reach a point and then work through it. The prop being the latest example - well done!
Olderthanyou.
Dang Olderthanme, thank you and it has been a long journey! I figure the whole build, with the ups and downs, has left me with about 47 active brain cells in the wind mills of my mind. After painting the figs, that will leave me around 7 cells to plant the grass on the base for the finish. It has been fun though!!! Hope you are feeling better after the furniture moving escapades Mike...

No real update tonight (forgot to take pics, as usual). I have been playing in wine bottle foil and reading my new reference book. I have also played with my new purchases, done some measurements, studied some pics and done a few mathematical equations. I can only say that my math sucks and even barefoot, I still can't get past 20.....................

Thanks one and all, again, for the great support and comments. So much appreciated!!! More to follow........

Prost
Allen
 

Lee Drennen

Box Stock Builder with a Twist/ Rabble Member
SMF Supporter
Joined
Apr 29, 2018
Messages
5,649
Points
113
Location
Wortham Mo
First Name
Lee
Allen nice updates and the rigging. Prop looks great and everything is blending very nice build.
 

Allen Dewire

Proud Rabble Member
SMF Supporter
Joined
Apr 27, 2018
Messages
4,105
Points
113
Location
Bamberg
First Name
Allen
Evening everyone in plastic land,

Allen nice updates and the rigging. Prop looks great and everything is blending very nice build.
Thanks so much Lee! I do think it is finally all coming together barring anymore hiccups. It's great to see you keeping me on my toes, my friend!!!...

So, it has been a while since I posted an update, so today is your lucky day people...I have not been sitting on my butt and this post will be pretty long with lots of pics (to bore you) too.......
I finally got the arms CA'd on the figs in the right positions and removed the limp stick grenade from the loader. I still have to fill the joints with putty, do the cleanup on them, breath deep, break out the wet palette and do the paint nasty thang,
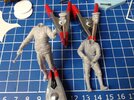
IMG_3787.JPG
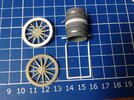
While building up the courage to do all this with the figs and then the hairy stick work, I drove on with the Esso gas station. Looking at what I had for the resin wheels, I thought they were a bit thin and needed to be fattened up a bit. Broke out the Olga from the Volga Olfa cutter and made some rings from 0.20mm sheet plastic,
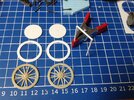
IMG_3775.JPG
I also made the cart handle too (more on that later on). The rings were very close to fitting, but the inside diameter needed to be made larger. Sanding and/or trimming with a knife wasn't the answer, so I broke out a very important tool in the modeling arsenal to do it,
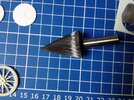
IMG_3777.JPG
It worked and I still have all the skin on my fingers. Hit the wheels with some CA and set them aside. I had made 2mm strips of wine foil for the support bands and CA'd them on the bottom half of the barrel,
IMG_3786.JPG
Next up was making the axles for the wheels to mount on the barrel frame. I carefully shaved off the bolts on the wheels and put them aside. They will be needed later on in the build. I then started with various tubing and with a whole lot of slicing and dicing, came up with this mess,
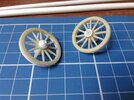
IMG_3788.JPG
Ok, now they look like 1917 wagon wheels! I sanded, scraped and trimmed the outside diameter of the plastic rings to get an even surface between the resin and plastic. I cut 2 strips of 0.10mm sheet @ 2.3mm wide to represent the metal ring around the rim,
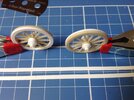
IMG_3789.JPG
It was time to add the frame to the barrel being very careful to make sure it sat straight. I also had a brain fart to use a piece of brass tubing for strength in the axles. It is the same as the inside diameter of the plastic tubing. I gently drilled through the barrel with a 1.4mm drill bit and in the end, we had this,
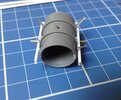
IMG_3790.JPG
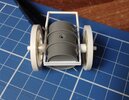
After this, it was gluing the strip around the face of the wheels. I had a choice of using CA or TET for the job. I decided to use CA, knowing I had to work quickly before it set and it would hold better on both resin and plastic. After it dried, I did a test fit with the wheels and the handle,
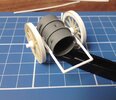
IMG_3795.JPG
Another shot.
IMG_3797.JPG
Yea, the joints on the frame corners need some work and a dab of putty...No biggie. That damn handle kept bugging me to no end...It was way too thick and looked terrible. What to do??? Just make a new one,
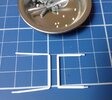
IMG_3800.JPG
Don't worry, the bends are flexible and it will fit ok. It was finally time to add the top straps to the barrel and the strap holders on the frame. I made some caps for the holders. On these, I will add 4 of the shaved small bolts later, one on each cap,


e
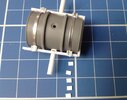
IMG_3802.JPG
I made 5 just in case I screwed one up while adding them. As to the other leftover bolts, they were used here,
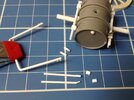
IMG_3801.JPG
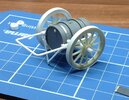
4 used on the cart handle and the larger 2 were CA'd on the rod pieces to slide into the axle ends. The other pieces are for the kick-stand to support the cart. I let the whole nonsense dry for a while and in the end..........Before you all start snoring loudly!!!...Progress,
IMG_3803.JPG
The kick-stand legs are flexible and move outwards to their correct positions on the foot (to be made). It looks like they are too long and may have to be trimmed up a bit, as the cart has to sit forwards and not backwards.

Still have to drill 4 holes in the framing for the support wires for the pump and build the pump assembly itself. I'm lovin' it and I haven't gone blind yet! Have a great night and thanks for looking in......Oh, and the GGFGS* has been working better than expected. About 75% at the time and I'm happy with it......

Prost
Allen

* Gus Go Fast Guesstimation System (Gus was my nickname in The military)
 

Jim R

SMF Supporter
Joined
Apr 27, 2018
Messages
13,729
Points
113
Location
Shropshire
First Name
Jim
Every step along this build you have excelled yourself. It is looking mighty fine. Each update seems to be another problem solved.
 

Allen Dewire

Proud Rabble Member
SMF Supporter
Joined
Apr 27, 2018
Messages
4,105
Points
113
Location
Bamberg
First Name
Allen
Greetings from the Aerodrome,

Sorry I haven't replied sooner as a bit of life and play have gotten in the way of progress. Also trying to ketchup with all the fines things going on here as well. I'm still way behind though....

Very nice Allen. I really like the wine foil bands.

Nick
Thank you Nick!!! It's fun stuff to work with, but very delicate. Care is needed when working with it and getting CA to stick to it too...
Every step along this build you have excelled yourself. It is looking mighty fine. Each update seems to be another problem solved.
Thanks for the kind words Jim!!! I just try to do my best and jump each hurdle as it comes. Yea, sometimes I land on my face, but I get up and start again. It makes this hobby so much fun...

A little update on the cart will follow. I want to say I got off the track here as it has nothing to do with the Halberstadt build itself. It was a hair up the butt sort of thing. The Halberstadt itself is finished and the dio is going to go on hold for now. I want to paint the figs along with other figs that I need. I really don't want to fire up the wet palette for just 2 figs, when I have 5 or more to do. I have until July to finish this and maybe get a good start on another project that's on my drawing board. I would like to take the Halberstadt to a show in the middle of July...

I finally worked out the details for the pump unit and went about doing the scratchy. I found the resin parts from Blast Models weren't going to work for the plumbing, so I made my own out of other tidbits,

IMG_3805.JPG
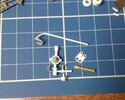
The top and bottom pipes aren't glued yet. The two flat pieces with the holes are the supports for the rod with the hook to hang the hose on. The tan piece will be the wooden pump handle and the plug looking thang goes on the barrel top and is where the pump unit will sit. After a lot of fiddling around and careful applications of TET, we had this,

IMG_3808.JPG
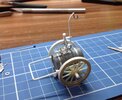
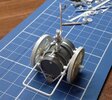
A test fit to see if it looked Ok in place and hopefully in scale with the rest of the cart. Another pic,

IMG_3809.JPG
I can live with it. There is still a few things to add, finish assembling the wheels, measuring out some hose and then shoot a coat of paint on it. With having only a couple of pics to go by, patience and the GGFGS, it should be good enough and look the part too. It will (hopefully) be used in another wing thingy build later...

Finally, as you may have noticed by my recent purchases, I have become fascinated with floaty things (calm down Chris) that were stationed at Zeebrugge in Belgium, from 1915-18 and have wings on them. I still have my love for 1/35 armor and play with those too. My scratchy mojo has been really high in retirement and I want to take advantage of it while I can and/or before I get too old and shaky to do it....

I want to take the Halberstadt outside, if the wind would die down a bit, to take some decent pics and post them in the completed section this weekend. Then maybe start playing with my next (semi) scratchy project,

IMG_3815.JPG
Turning an Albatros D.1, (L) into an Albatros W.4 late (R)...Scratch building floats, struts, radiator in the top wing, re-making the wing ribbing, shortening the rear wing, etc. etc. and so on!!!...........Sounds like heaven!!!................

Prost
Allen

PS, can some one please post a simple (for dummies like me) way/formula to convert real dimensions into 1/32 dimensions. TIA...
 

Allen Dewire

Proud Rabble Member
SMF Supporter
Joined
Apr 27, 2018
Messages
4,105
Points
113
Location
Bamberg
First Name
Allen
DOH!!!...To be honest Neil, I did think of that, but thought it was too easy. All these gazinta and multyplykation thangs threw me off. Thank you Sir!!!

Thanks Jim! If it does flies any higher, I'll run out of oxygen Buddy...

Glad you like it Nick!!! Thanks so much my friend...

Prost
Allen
 

Mini Me

SMF Supporter
Joined
Jun 1, 2018
Messages
10,160
Points
113
First Name
Rick
Yo Allen, just had a catch up on your latest little side project. The fuel truck came out the bomb Sir....looking forward to the outdoor piccys. Will the current Mrs. Ron (570) be doing her famous bird toss or will these be static shots? ;)
 

Andy T

SMF Supporter
Joined
Apr 26, 2021
Messages
1,958
Points
113
Location
Sheffield
First Name
Andy
Well now, isn't that a piece of excellent scratcheryfying!

Looks the absolute business Allen.
 

scottie3158

SMF Supporter
Joined
Apr 27, 2018
Messages
12,704
Points
113
Location
Spalding
First Name
Paul
Mr Dewire, Outstanding matey. That trolly is awesome and adds a great feature to an already great build.
 

yak face

Wossupwidee?
Staff member
Moderator
SMF Supporter
Joined
Jun 13, 2009
Messages
12,400
Points
113
Location
sheffield
First Name
tony
Fuel cart is a dogs doodah build in itself allen , superb scratching and attention to detail , its going to look amazing on the dio with the halberstadt , cant wait to see the outdoor pics , hopefully its not too windy , we dont want it taking off on an unpiloted mission , cheers tony
 

colin m

Moderator
Staff member
Moderator
SMF Supporter
Joined
Dec 26, 2008
Messages
8,604
Points
113
Location
Stafford, UK
First Name
Colin
I'm not sure which you have the most of, skill or patience? Either way, you have huge dollops of both. Amazing work.
 

BattleshipBob

Bob, bob, bobing along!
SMF Supporter
Joined
Apr 28, 2018
Messages
6,212
Points
113
First Name
Bob
Fantastic Allen, I have no idea how you do that, way past my skills. Super job
 

Allen Dewire

Proud Rabble Member
SMF Supporter
Joined
Apr 27, 2018
Messages
4,105
Points
113
Location
Bamberg
First Name
Allen
Morning all,

The sun is shining and the wind has finally died down. I just did a recon in my backyard for a spot to shoot some pics. Not impressed at all, I'm afraid. The little bit of grass we have is dried out and brown. Grass in front of the house is green, but looks like a jungle for a 1/32 wing thingy. I'll figure something out before the end of the day.............

Yo Allen, just had a catch up on your latest little side project. The fuel truck came out the bomb Sir....looking forward to the outdoor piccys. Will the current Mrs. Ron (570) be doing her famous bird toss or will these be static shots? ;)
Sorry Rick, but the good Mrs. Ron won't be doing her magic. Static pics will have to do and be carefully done too. The weak point of the kit is the landing gear. Thanks for the kind words Buddy!!!

Well now, isn't that a piece of excellent scratcheryfying!

Looks the absolute business Allen.
Why thank you Sir!!! I'm glad you like it Andy, and it was a change of pace from the everyday play at the table...

Mr Dewire, Outstanding matey. That trolly is awesome and adds a great feature to an already great build.
Thanks so much Bro!!! Unfortunately, it won't be used for the halberstadt dio. It might get used in my next build or when I build the AEG G.IV Night bomber from WnW...

More great work Allen
Much appreciated Mick!!! It's great to have you looking in too. How's the X-Wing doing???

Fuel cart is a dogs doodah build in itself allen , superb scratching and attention to detail , its going to look amazing on the dio with the halberstadt , cant wait to see the outdoor pics , hopefully its not too windy , we dont want it taking off on an unpiloted mission , cheers tony
You are much too kind Tony!!! I'm afraid it won't be used in the dio though, like I said to Paul. I'll wait for the sun to come over the house and then maybe I can get some pics from the green grass in front. Wind is minimal today, so an unpiloted flight is unlikely (he says with crossed fingers and toes)...

Great work Allen, that fuel cart is a thing of beauty itself.
Thank you Garry! It will look even better when it has a coat of paint on it. I hope you are doing well in the 'Land Down Under' Sir...

I'm not sure which you have the most of, skill or patience? Either way, you have huge dollops of both. Amazing work.
Sorry Colin, but I have neither of them! Mostly I have brain farts and this is the result of one of them. To be nice, I call them the 'wild hair up my butt' builds instead...Thank you for the kinds words and the help too, Sir!!!...

Fantastic Allen, I have no idea how you do that, way past my skills. Super job
Ahoy 'Admiral' Bob!!! Thanks Sir, but I'm really not sure how I do it either (see above). Sometimes I see a pic and it just slaps me about the head and shoulders and I have to try and build it. I hope you and Julie are well and sorry to hear you are still having a crap year. You guys deserve so much better times...


As it stands right now, I will have to paint the figs next week and make the base for this build sooner. July is coming faster than I realized. I will post that in dio section when built. The fuel cart will be posted in the proper section when it's painted too. The pics of this wing thingy will be in the completed section, today or tomorrow at the latest...

I can only thank you all from the bottom of my heart, for all the help, support, tips, banter and most wonderful comments during this build. You folks are fantastic and this forum is the best!!! It's on to the new project and maybe finish a few dust collectors too.......

Prost auf Euch
Allen
 
Top