PaulinKendal
SMF Supporter
Blogging a massive, challenging build - that's bold! And it deserves attention - I'll be watching.
Wings of War — the card image is a link to the Boardgamegeek page abut itWhat’s the game? I’m thinking wings of glory, but I haven’t played it in ages so might be wrong…..
 Very fun, quick to play and simple to learn, but that doesn’t mean it’s easy. I’d definitely recommend it.
Yep, got it! It’s a travel version of wings of glory….played it at a number of conventions….got shot down every timeWings of War — the card image is a link to the Boardgamegeek page abut itVery fun, quick to play and simple to learn, but that doesn’t mean it’s easy. I’d definitely recommend it.
Not a prob Boss. My apartment is small and every seat is a good one. I'll keep a handle on the rabble too. The instructions are very good, but one has to pay attention to them...Well you got my attention. Front center for me please. (i know it is often the worse place to sit but this I want to see.
Those have to be some of the best instructions I've ever seen
Great to have you along Andrew. But please take care of your homework and your school first my friend...Joining the party early for once Allen!
Good luck with the build!!
Andrew
It is Jim and that's why I got so interested in these kitsets. You know I'm really not a wing thingy builder, but I had to give them a go...I'm in for sure. Looking at the sprues, the choices and the instructions it's clear it's a quality kit.
You're so right Tim. The decals do give a scare and I hope I don't screw them up too bad. The flaw in the tail wing is actually a spot of discoloration in the plastic and not a defect. You had me scared for a moment there, but I checked and it's smooth without any flaw...Looking forward to this. Agree with Ian ref instructions as well. One minor point Allen, is that a small moulding flaw on the tail part? Oh, and your on your own with those decals…..they are a little scary, but necessary for the fabric effect.
I can't say either who designed the kit Wabble. WnW also made an early version of this kit and I really don't know the difference between the two. I'll have to have a look into it...I smelled wood, fabric and dopping varnish so squeezing in the front for this Allen. I think I saw a Halberstadt displayed at the AWM and watched a video made by Peter Jackson for the WW1 display. Could the design team at WN have studied this particular display to model it? Who knows.
Cheers,
Wabble
Great to hear Neil, but please, let's not get too excited yet! When I finally start making progress, then you can let loose Sir...OOOH Allen I am so IN!
Grab a seat Mick and join the party. I've never seen one of these built either. I guess I'm the guinea pig here...Never seen one of these kits built so definitely in, good luck
Sorry Tony, but I couldn't resist that. No need to hide as mostWhats this ! A wingy thing , no even better - a stringy wingy thing !! I’ll be on the front row allen , possibly wearing a false beard and glasses , the Cosford museum are still looking for me after crashing their halberstadt.!
Looks a very comprehensive package , im sure this will give you no problems allen , if you can tackle those tiny resin bits on the reihenwerfer this should be as easy as blowing the froth off a cold one , - gotta go , just seen one of the curators from the museum sniffing around - you aint seen me right !
They look rather daunting Dave, but I will just take my time and try not to muck them up. No, you don't get any rigging material in the kit, but I bought some to use. It's too thin though, so I'm looking out for something thicker. Infini or EZ line would do the trick, but hard to get here in the correct size...
Great to have you Bro! I'm afraid if you are looking for any tips for your build, you won't learn anything here. Other than what not to do with a wing thingy...Allen,
Count me in my friend. Looks like a nice kit with clear instructions. My next build is a biplane a commission build. Not a wingy person and never done a biplane.
You are so right there Jakko. There are 5 different schemes to choose from and they all have loads of decals for them. None from the Shlasta 23b though...That looks like a properly impressive kit … especially with those decals.
Oh, and if it doesn’t work out, you can always try this one instead:
View attachment 473082

Thanks Dude 2 and I have read them 5 times already and still get confused too. Oh, and don't take any crap from the rabble either. I've stocked the fridge and there is plenty of tea and coffee to around along with snacks. Please remember to give Jimbo and Neil a sandwich every couple of hours as they don't get enough to eat at home... Thanks Brother...Well my friend I shall serve refreshments , most impressive instructions, with enough variations to confuse the like's of me.
Hope this goes well, and the Rabble behave.
Nice to have you here too Jack. I've had this kit in the stash since July 2020 and have only looked in the box 2 times myself. The time is right for building it in 2023...Short of the surrounding hype, never seen anything other than a WNW box. Not the plastic, paper, finished product…so will follow this with interest.
No need to hide in the back Buddy. The worst that can happen is I'll make a complete mess of it. Then it will become a crash scene with total destruction included...Hiding at the back, basking in the reflected glory...... Good luck Allen!
Nick
No Cohan, I'm doing this out of respect for your great builds in 1/48 and the fine finishes you have achieved. Mr. Smiff really just sits back, watches you work and then takes a few pics to post along with some descriptions of your fine builds. Not hypocritical at all........ what's this?....
.... Mr.Dewire doing a Wingy thing,after all the grief he gave Mr.Smythe?...
SURELY NOT...... I mean,that just be hypocritical ..... wouldn't it?!!
Thanks Paul and I only hope It doesn't go south. Definitely new waters for me Sir!...Blogging a massive, challenging build - that's bold! And it deserves attention - I'll be watching.
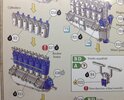
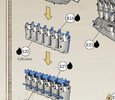
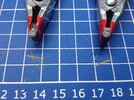
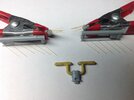 I also started wrapping the intake manifold in 1mm AV masking tape for the insulation used against vapor lock from the motor heat. It still needs a second wrapping to fill it out a bit more. Earlier tonight, I punched out a bunch of 0.7m hex pieces to be used for the base of the spark plugs on the cylinder heads. The plugs themselves will be 0.3 or 0.4 plastic rod and around 3mm long glued to them. More on this in the next update...
IIRC, it was a card game first, the model planes coming later.Yep, got it! It’s a travel version of wings of glory….
But quick to learn and quick to play. You can teach it in minutes to people who never played games like this. My only real complaint is the secret damage system: too easy to cheat, IMHO.Clever moving system, but the fire system is a bit simplistic….
I’ve only ever seen the model version, but then I go to figure gaming expos, not board game expos, so it’s not surprisingIIRC, it was a card game first, the model planes coming later.
But quick to learn and quick to play. You can teach it in minutes to people who never played games like this. My only real complaint is the secret damage system: too easy to cheat, IMHO.
Well yours will be at least number 2.it appears no one has ever blogged a build here on the forum,
Welcome aboardCount me in on this one.
Thanks Tim and there are a few things you can improve over the stock kit. Not a lot really...Great stuff, already on the improvements!
Thank you John and glad to have you looking in. I need all the luck I can get here...I will definitely be watching this build. Best of luck to you.
John.
Ok Colin, was there another WnWs kit built on here earlier or am I missing something?...Well yours will be at least number 2.
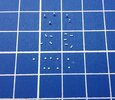
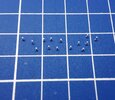
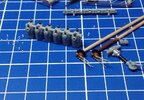
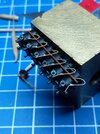
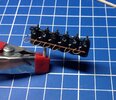
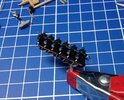
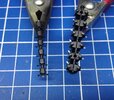 12 (chunky) spark plugs on the cylinders. Only one actually pinged off into oblivion and one got drowned in CA. I actually tried to shape the plugs to make the top sides thinner, but even with a small sanding stick, it was impossible to hold them in the tweezers. After I add the wires, the 3 meter rule will be in effect anyway. I need to make a paint order as I need some Vallejo metal color aluminum or some flat aluminum from MIG to finish up the motor. There are 4 (or more) decals that have to be added to it too...
Yes, I built a WnW Bristol F.2B fighter back in 2018. It was part of the WW1 group build.Ok Colin, was there another WnWs kit built on here earlier or am I missing something?...
Worth looking up, it was a bit of a masterclass!Yes, I built a WnW Bristol F.2B fighter back in 2018. It was part of the WW1 group build.
Wow Colin, that was before I took the dive into wing thingy's in 2019. I went back and read through your build and finished item posts. Absolutely fantastic work Sir!!! As Tim said, it was masterclass. I can only hope I can do mine half as good as yours. Might I ask, if you remember, what size rigging line you used? I'm lucky as my plane has less rigging than yours did...Yes, I built a WnW Bristol F.2B fighter back in 2018. It was part of the WW1 group build.
Lovely stuff. The icing on the cake that is! I remember playing red baron as well……..i always turned too tightly and pulled the top wing off the airplane.
Top tip….if you do that in a triplane it can still fly…..not very well, but it stays up there
My best memory of Red Baron was when you pulled out of a dive, all the parts would creak and squeak before the wing broke off!!! The sound effects were great. For it's time, the game was so cool and I knew I could never be a good WWI pilot playing it. Taking off was a huge problem as the thick manual had nothing written in it about how to do it. I can't remember how many times I pushed the wrong button on my joystick, released a bomb, and blew myself up sitting on the runway...Worth looking up, it was a bit of a masterclass!
Thanks Jim! It is a test of nerves and my skills to do the mods, but fun, all the same. The fair was great, but small compared to the last time I went. maybe next year it will be bigger...Excellent stuff there Allen. For a kit of this quality it's worth going the extra miles. Spark plugs look the part, time well spent. Have fun at the fair.
You are never late Andrea and it's always a pleasure to have you joining the party...A bit late but I'm not going to miss a WnW kit build.
True Andrew, but even for the price, a kit really can't include everything. Trying to mold them would have been a nightmare I think...Outstanding work.... Although for what they cost you think they would be supplied!
Thanks Tony and I am going to give it my best (never went to) college try. If I mess up, I still have a few in the stash to attempt a better result. Colin set a pretty high bar with his build though...Superb scratchery allen , its little things like this that will lift an already superb kit to another level , cheers tony

For FULL Forum access you can upgrade your account here UPGRADE
