Scotties Krupp Protze Kfz 69

Allen Dewire

Proud Rabble Member
SMF Supporter
Joined
Apr 27, 2018
Messages
4,122
Points
113
Location
Bamberg
First Name
Allen
Evening Buddy,

Back in da house, playing ketchup and pushing my way to the front. Lovin' what I've seen so far and your bling work is fantastic as always as well as your scratchy Paul. I have this kit and built the PaK 36/37 as a break from something else. The only thing I can say is don't use the kits barrel as it sucks. I took a piece of tubing, drilled it out, and filed down the other end to fit into the breach front. Looked 100% better. You could also go with one from RB or Aber, but making your own is more to your style Bro...........Keep on truckin' (and PaKin') Sir!!!......

Prost
Allen
 

scottie3158

SMF Supporter
Joined
Apr 27, 2018
Messages
12,792
Points
113
Location
Spalding
First Name
Paul
Evening Buddy,

Back in da house, playing ketchup and pushing my way to the front. Lovin' what I've seen so far and your bling work is fantastic as always as well as your scratchy Paul. I have this kit and built the PaK 36/37 as a break from something else. The only thing I can say is don't use the kits barrel as it sucks. I took a piece of tubing, drilled it out, and filed down the other end to fit into the breach front. Looked 100% better. You could also go with one from RB or Aber, but making your own is more to your style Bro...........Keep on truckin' (and PaKin') Sir!!!......

Prost
Allen
Cheers Allen, glad your looking in keeping an eye on me. I haven't looked at the barrel yet but I can imagine it's not going to be good.
 

scottie3158

SMF Supporter
Joined
Apr 27, 2018
Messages
12,792
Points
113
Location
Spalding
First Name
Paul
Looking at some reference pics that I have I decided to add the cleaning rods and the box for the bore brushes. The rods were made from tooth picks that were filled down to size, one was then drilled out on the end the other had a length of copper wire for the screw. I tried to show the thread on it. Then finally a pewter collar was added to both. A strap was made and a pocket for the to sit in. The cleaning box was just laminated evergreen sheet cut to size. A length of rod was added to simulate the hinge and a clip added to hold it shut. Not perfect but It gives the idea. Finally for this side of the shield some rivet detail was added.

DSCF3493.JPG

Next the other side to do.


cheers
Scottie
 

Jim R

SMF Supporter
Joined
Apr 27, 2018
Messages
13,887
Points
113
Location
Shropshire
First Name
Jim
Not just going the extra mile but this is going the extra ten miles. The more of this insane detailing you do the better at it you get.
 

JR

Member of the Rabble and Pyromania Consultant
SMF Supporter
Joined
May 26, 2015
Messages
17,397
Points
113
Location
lincs
First Name
John
I've arrived, with a very sore arm, met Matron on the way in and she jabbed me, feeling quite relaxed now. Great build Paul as always, loving the scratchery , so much to see and marvel at.
 

scottie3158

SMF Supporter
Joined
Apr 27, 2018
Messages
12,792
Points
113
Location
Spalding
First Name
Paul
Not just going the extra mile but this is going the extra ten miles. The more of this insane detailing you do the better at it you get.
Jim, Thank you mate. There are lots of things I would like to add but beyond my skills. I look at the details that people like Aytom can achieve for inspiration.

Not much if the kit left in that gun shield Scottie, just top drawer modelling as always. ;) Real skill on show here throughout the build. Lovely.
Tim, very kind of you.

I've arrived, with a very sore arm, met Matron on the way in and she jabbed me, feeling quite relaxed now. Great build Paul as always, loving the scratchery , so much to see and marvel at.
I could do with a nice relaxing shot can you send her my way. Thanks for the kind words.
 
  • Like
Reactions: JR

Graeme C.

SMF Supporter
Joined
Apr 29, 2018
Messages
1,487
Points
113
First Name
Graeme
The gun shield looks really good Paul, nice additions with the cleaning rods & box.
 

Jakko

Way past the mad part
SMF Supporter
Joined
Apr 28, 2018
Messages
10,986
Points
113
First Name
Jakko
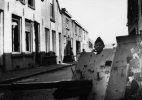
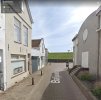
I came across it when researching my book, it must have been taken in 1945 because it seems to be nice weather, and the fighting around here was in November 1944, when it decidedly wasn’t. Here’s what that street looks like today:

Baljuwstraat Vlissingen.jpeg

The gun must have been approximately where the steps on the right are now. The white house you can see in the modern photo and the one to the right of it are in the 1945 photo too, everything beyond and on the right has been demolished and/or rebuilt.
 
Last edited:

grumpa

SMF Supporter
Joined
Jan 14, 2015
Messages
4,691
Points
113
First Name
Jim
At it again aye? Wonderful work as always.

Jim.
 

scottie3158

SMF Supporter
Joined
Apr 27, 2018
Messages
12,792
Points
113
Location
Spalding
First Name
Paul
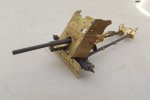
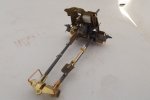
The work on the PAK 36 is nearly done.

DSCF3495.JPG

It looks like I have a bit of droop on the barrel I need to rectify.

DSCF3496.JPG

The poles and shovel are held on with masking tape straps and etch buckles. I need to add some more detail to the spades on the back.

DSCF3497.JPG

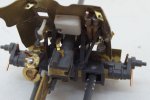
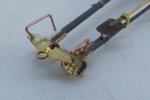
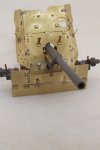
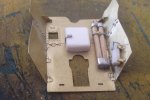
The handwheel has had the firing button added the silver dome there is a cable that has been added from the white box to down near the breech.

DSCF3498.JPG

Another view of the spades that still need some detailing.

DSCF3499.JPG

Front shield and lower blast shield.

So some detail to add to the spades and the tyre valves to add to the wheels then it will be ready for paint.


cheers
Scottie
 
Top