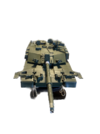
Another First - 1/35 CH2 TES.

Scratchbuilder

SMF Supporter
Joined
Jul 2, 2022
Messages
2,020
Points
113
Location
Luton
First Name
Mike
Well, thank you guys for your comments and positive remarks.
SWIMBO keeps asking when It'll be finished. I reply, 'when it is' usually. Which really ummm - annoys her!! It's a hobby I keep saying not a project with a completion target. The times I have rushed have been the times I have messed up so 'steady as she goes' as they say.

Mike, I think I may well wear a face mask if it comes to grounding my own pigments. I had visions of a multi coloured workshop/bench/wherever!!!!!! You always want to sneeze at the most inconvenient time!!:sick::smiling5:
Believe me, the times I have done it with the rivets on my bridge, or wafted away the errant fly :tired:....
 

Waspie

SMF Supporter
Joined
Mar 13, 2023
Messages
2,619
Points
113
Location
Portland - Dorset
First Name
Doug
OK, managed a wee bit today but I'm not overly happy with the result! 2nd coat of Vallejo Nato Green (90%) + Vallejo white (10%) added 3 drops of distilled water yet it still looks 'brushy'. Although the barrel which I did apply a 3rd coat does look better.

Any of you paint guys have any clues as to if I'm doing anything wrong? I'm using a wide, angled brush, to assist in getting behind the cages on the turret.

All comments and criticisms gratefully received.

Pics below.

Turret, would have liked a more even coat at this 2nd coat stage!! Or am I expecting too much?
IMG_0875.JPG

Stopped on the wheel well as I ran out of paint at that point and food was beckoning!!! (Also, this part will be mostly hidden by the wheels and armoured sides!)
IMG_0874.JPG
 

Tim Marlow

Little blokes aficionado
SMF Supporter
Joined
Apr 27, 2018
Messages
16,854
Points
113
Location
Somerset
First Name
Tim
Not really my field either, but I would suggest a flat, rather than a round brush as a starter. The brush maestro on here is young spanner…..
 

Waspie

SMF Supporter
Joined
Mar 13, 2023
Messages
2,619
Points
113
Location
Portland - Dorset
First Name
Doug
Not really my field either, but I would suggest a flat, rather than a round brush as a starter. The brush maestro on here is young spanner…..
It is flat Tim, about a half inch wide. It also has a 40(ish) degree angle, specifically chosen to get behind the cage protection as a standard flat brush was kinda awkward painting the same area.
 

Tim Marlow

Little blokes aficionado
SMF Supporter
Joined
Apr 27, 2018
Messages
16,854
Points
113
Location
Somerset
First Name
Tim
It is flat Tim, about a half inch wide. It also has a 40(ish) degree angle, specifically chosen to get behind the cage protection as a standard flat brush was kinda awkward painting the same area.
Bit surprised in that case. Looks like another couple of coats are needed. Only other thing I can suggest is to add a drop of flow aid so the paint film evens out more before it dries.
I like those brushes as well, by the way. They are called angled shaders I think. I use similar brushes, called cutting in brushes, for home decorating for exactly the same reason ;)
 

Waspie

SMF Supporter
Joined
Mar 13, 2023
Messages
2,619
Points
113
Location
Portland - Dorset
First Name
Doug
Bit surprised in that case. Looks like another couple of coats are needed. Only other thing I can suggest is to add a drop of flow aid so the paint film evens out more before it dries.
I like those brushes as well, by the way. They are called angled shaders I think. I use similar brushes, called cutting in brushes, for home decorating for exactly the same reason ;)
Snap, I just wish I was as good walloping paint on a tank as well as I am a wall in the house!!!! :thumb2: :smiling5: Have a set from way back, (Dulux), cost a packet at the time but over the past 30 odd years and 3 house moves they have proved very economic.
 

Tim Marlow

Little blokes aficionado
SMF Supporter
Joined
Apr 27, 2018
Messages
16,854
Points
113
Location
Somerset
First Name
Tim
Snap, I just wish I was as good walloping paint on a tank as well as I am a wall in the house!!!! :thumb2: :smiling5: Have a set from way back, (Dulux), cost a packet at the time but over the past 30 odd years and 3 house moves they have proved very economic.
Actually, I use Harris tradesmen brushes from Screwfix. They are only a few quid each, but are excellent quality.
 

minitnkr

Rabble & escape committee member
SMF Supporter
Joined
Apr 27, 2018
Messages
6,740
Points
113
Location
Dayton, OH
First Name
Paul
Why the white? Looks like it didn't mix well.
 

Scratchbuilder

SMF Supporter
Joined
Jul 2, 2022
Messages
2,020
Points
113
Location
Luton
First Name
Mike
Who's paint are you using? I have used some of the 'model air' and others with a brush and to be frank my p.... was stronger and would have covered better.
I can only suggest a change of paint manufacturer or give the whole model a coat of thinned paint with the airbrush, allow to dry for a half hour and then if need be re coat untill you are happy. Let this dry for 24 hours. Then a coat of satin or gloss, and then a wash of thin oil paint either black or Burnt Umber (brown). This will tone down the top coat and once dry then you can go to work with the pigments.
Do not lose patience with this problem, it can be cured. I have as I said had this problem in the past and got over it.
Cheers
Mike.
 

Waspie

SMF Supporter
Joined
Mar 13, 2023
Messages
2,619
Points
113
Location
Portland - Dorset
First Name
Doug
Who's paint are you using? I have used some of the 'model air' and others with a brush and to be frank my p.... was stronger and would have covered better.
I can only suggest a change of paint manufacturer or give the whole model a coat of thinned paint with the airbrush, allow to dry for a half hour and then if need be re coat untill you are happy. Let this dry for 24 hours. Then a coat of satin or gloss, and then a wash of thin oil paint either black or Burnt Umber (brown). This will tone down the top coat and once dry then you can go to work with the pigments.
Do not lose patience with this problem, it can be cured. I have as I said had this problem in the past and got over it.
Cheers
Mike.
Thanks for replying Mike. I initially thought I was using Vallejo but after checking today I find it is in fact Mig paint. (Brain isn't what it used to be - surprised I remember my name!!! Well - most of the time!!)

I did finish the second coat on the remainder of the vehicle and a third coat on the turret. (Pic below). Getting there but I still see brush marks on the pics although not with the naked eye!!

Hopefully tomorrow I will finish the 3rd coat on the whole thing then I will reassess and decide if a 4th coat brushed on or an airbrushed 4th coat!!! My choice right now is a brushed 4th coat, simply as an experiment as to how it turns out!!! We'll see!

IMG_0876.JPG
 

Waspie

SMF Supporter
Joined
Mar 13, 2023
Messages
2,619
Points
113
Location
Portland - Dorset
First Name
Doug
Hope you've all had a good Sunday. I feel I did as I managed two - yes two sessions with the CH2 today.

First was to complete the 3rd coat on the remainder of the tank!! Yippeee.

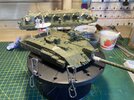
Next - decision time! To brush or not to brush, (a fourth coat). I chose - NOT to brush. Out airbrush. Mixed up my paint and added a couple of drops extra of water. Was pleased with the test spread so continued to spray the whole tank. It did exactly what Mike said it would. Covered up all the brush marks and weak areas. Paint went on really well, nice spread covered really better than expected. I was quite pleased with the result. (Especially as by airbrush is at the bottom end of the market). I'll you all be the judges on that!!

Pics below. (Plus a couple I played around with)!!
Side armour still to be fitted.

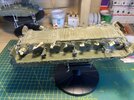
Image I was messing with. Rear end of hull.


IMG_0881 copy.png

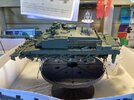
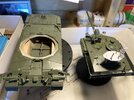
Hull and Turret without side armour (yet!)
IMG_0878.JPG


IMG_0879.JPG

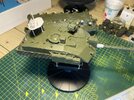
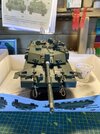
Turret and hull together at last!!
IMG_0877.JPG
Playing around again!! - Sorry!!
IMG_0877 copy.png

Getting closer to fitting the road wheels and side armour - then all the fiddly painting.
I did mess around with the 2 x 5 gallon containers. (Not that anyone will see it). Put some markings on both the water and fuel cans. Most people individually mark their own vehicles bits and pieces, I figured squaddies and their tanks wouldn't be any different. Nice to have a fine paint brush to attempt paint a few Regt/troop marking on the cans. (Truth is I had a few minutes to kill as the spraying went so well).
 

Waspie

SMF Supporter
Joined
Mar 13, 2023
Messages
2,619
Points
113
Location
Portland - Dorset
First Name
Doug
Interesting day today. Started off pondering on what to do.
First, was fit the road wheels, easy peasy thanks to poly whatsit things!! Popped on a treat. Next was disappear and rob one of SWIMBO's cotton reels. Nato Green naturally!
Then! Place the tracks around the road wheels, ably assisted by a few pieces of tape, a pair of tweezers and some fiddling!
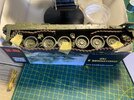
IMG_0882.JPG
With the tracks in kinda the right place, SWIMBO's cotton reel came into play. With help from the tweezers, the tracks ends were pulled gently together to tighten things up a wee bit.
Next came the side armour, bit fiddly to be honest, they came away from the hull more than a few times. So out clamps. (I removed the ends as they only made the clamps jump into the air. Finally got them in place though with only a small amount of touching up needed!
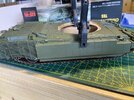
IMG_0883.JPG
Next was placing the two jerry cans in their stowage. Still need to fit the retaining bar!!I I also kept one sand coloured and the water can the usual black.
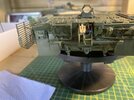
IMG_0886.JPG
I also took time out to touch up the tracks, now the links were in position I noticed some paint missing in-between the individual links so remedied that. Whilst I was tinkering with paint I added black to the end of the barrel, well, both ends!!
The smoke dispenser caps were also painted.
Changed the needle in the airbrush to a 0.2 and played around with touching up a few places I missed and also the couple of places I messed up fitting the side armour.
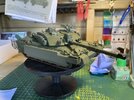
By midday it looked like this;IMG_0885.JPG
Still a bit to do - then I'll start on reading up an weathering.
 

Mini Me

SMF Supporter
Joined
Jun 1, 2018
Messages
10,162
Points
113
First Name
Rick
Yup, 'ats a tank alright! Fine looking beast Doug. :thumb2:
 

Jakko

Way past the mad part
SMF Supporter
Joined
Apr 28, 2018
Messages
10,925
Points
113
First Name
Jakko
also took time out to touch up the tracks, now the links were in position I noticed some paint missing in-between the individual links
That’s always one of the downsides of workable track … Even when you know you need to pay attention to this, you think you got paint all the way between them, and still you’ll notice unpainted bits when you put the track around the wheels :sad: A paint bath for them would be nice to have, but I can’t think of a way to do that both without obliterating all of the detail and wasting a ton of paint.
 

Scratchbuilder

SMF Supporter
Joined
Jul 2, 2022
Messages
2,020
Points
113
Location
Luton
First Name
Mike
Well done on the paint finish.
And do not worry about the low end airbrush, I now use a cheapie (NEDECO) with the top end ones in their boxes and in the drawer. Plus an old Badger for other work.
Now you have it all together it looks like any other model displayed by all of us, no different, in the finish or the workmanship and before we get to work with the weathering which is your next step. Take it steady and do not go overboard is the best rule.
 

Scratchbuilder

SMF Supporter
Joined
Jul 2, 2022
Messages
2,020
Points
113
Location
Luton
First Name
Mike
That’s always one of the downsides of workable track … Even when you know you need to pay attention to this, you think you got paint all the way between them, and still you’ll notice unpainted bits when you put the track around the wheels :sad: A paint bath for them would be nice to have, but I can’t think of a way to do that both without obliterating all of the detail and wasting a ton of paint.
We could do a track bath, but I think the length would be a problem. Good idea.
 

David Lovell

SMF Supporter
Joined
Apr 27, 2018
Messages
1,510
Points
113
Location
Poole Dorset
First Name
David
Great job so far Doug, dont know why you didn't use the airbrush in thr first place ,nothing wrong with what you've got ,you can have the most expensive set of golf clubs but it won't make you play any better ,once you get your head around thinning your paint and correct air pressure you've cracked it ,then the confidence factor kicks in. I use all my cheapo's more than my expensive one. Enjoy using it even when it goes wrong we've all been there and I still go there sometimes. Dave
 

David Lovell

SMF Supporter
Joined
Apr 27, 2018
Messages
1,510
Points
113
Location
Poole Dorset
First Name
David
Well done on the paint finish.
And do not worry about the low end airbrush, I now use a cheapie (NEDECO) with the top end ones in their boxes and in the drawer. Plus an old Badger for other work.
Now you have it all together it looks like any other model displayed by all of us, no different, in the finish or the workmanship and before we get to work with the weathering which is your next step. Take it steady and do not go overboard is the best rule.
Well said that man I enjoy using my cheepos they all work the same ,would have said love using but I suppose that might be considered a bit strange.
 
Top