Ahoy shipmates. This is my first real boat build so I'm starting with something easy.
As usual for me it'll be built out of the box but I may add a few tweaks. I hope you'll allow me artistic license as I know very little about the subject and I'm happy to keep it that way")

I'll keep the sprue shots as thumbnails, but at least they're here if you want to look


The first few steps were super quick and we have a boat-shaped thing already. I found the included stand handy for building on:

Next up was the cockpit / helmsman area. Pretty nicely detailed but I've left a couple of bits off for ease of painting:

These are the walls around that area. They were covered in large ejector marks that needed dealing with (this becomes a theme with this kit) I've left a couple of small one that will be hidden by later parts:

Then we come to this front area. It had some really visible moulding lines so these were removed and the corners rounded a bit to better represent the real thing.
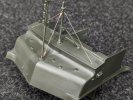
I also added the two masts. The instructions suggest rigging them with stretched sprue but knowing how clumsy I am I've used copper wire, adding a few twirly bits at the ends. Not sure how accurate they are but I saw them in the build video I watched and thought it added a bit of interest:

Next up was the bow turret. Again plenty of injector marks and I was unsure which would be visible, so dealt with them all:

I've also been knocking up some of the smaller sub assemblies to give them time to dry before clean up:

And this is the armour shield for the aft MG showing more ejector pin marks. I've removed the ones on the left with lots of sanding. It thins the part a bit and softens the edges but I find it much quicker than waiting for filler to dry and should be unnoticeable once painted:

As usual for me it'll be built out of the box but I may add a few tweaks. I hope you'll allow me artistic license as I know very little about the subject and I'm happy to keep it that way
I'll keep the sprue shots as thumbnails, but at least they're here if you want to look
The first few steps were super quick and we have a boat-shaped thing already. I found the included stand handy for building on:
Next up was the cockpit / helmsman area. Pretty nicely detailed but I've left a couple of bits off for ease of painting:
These are the walls around that area. They were covered in large ejector marks that needed dealing with (this becomes a theme with this kit) I've left a couple of small one that will be hidden by later parts:
Then we come to this front area. It had some really visible moulding lines so these were removed and the corners rounded a bit to better represent the real thing.
I also added the two masts. The instructions suggest rigging them with stretched sprue but knowing how clumsy I am I've used copper wire, adding a few twirly bits at the ends. Not sure how accurate they are but I saw them in the build video I watched and thought it added a bit of interest:
Next up was the bow turret. Again plenty of injector marks and I was unsure which would be visible, so dealt with them all:
I've also been knocking up some of the smaller sub assemblies to give them time to dry before clean up:
And this is the armour shield for the aft MG showing more ejector pin marks. I've removed the ones on the left with lots of sanding. It thins the part a bit and softens the edges but I find it much quicker than waiting for filler to dry and should be unnoticeable once painted:
 Looks a decent kit apart from all those ejector pin marks. Sanding them away on the armour shield probably had the added benefit of thinning the shield to a more scale thickness
 ,
,


