Centurion AVLB (slow build)

Scratchbuilder

SMF Supporter
Joined
Jul 2, 2022
Messages
2,031
Points
113
Location
Luton
First Name
Mike
One question I forgot to ask is what phone camera setting do you use for images. I see I am getting the thumbnail images. At the moment 4160x2340. Should it be smaller i.e 2048x1536. It will save a lot of people having to squint. Thanks in advance.
 

Jakko

Way past the mad part
SMF Supporter
Joined
Apr 28, 2018
Messages
10,928
Points
113
First Name
Jakko
The forum will resize photos you upload to 1200 pixels (off the top of my head) along the long edge. To ease bandwidth usage and upload photos faster, I normally tell my iPad to upload the “large” size, which is 1280 × 960, rather than the full size of 4032 × 3024.
 

adt70hk

I know its a bit sad but I like quickbuild kits!!!
SMF Supporter
Joined
Sep 4, 2019
Messages
9,526
Points
113
First Name
Andrew
I'm in the same ballpark as Jakko, unless it's a large item like a book on 'latest acquisitions', in which case I go for something a bit smaller as you don't need a massive picture to see what it is.
 

JR

Member of the Rabble and Pyromania Consultant
SMF Supporter
Joined
May 26, 2015
Messages
17,362
Points
113
Location
lincs
First Name
John
I'm confused !
 

Scratchbuilder

SMF Supporter
Joined
Jul 2, 2022
Messages
2,031
Points
113
Location
Luton
First Name
Mike
Jakko, Andrew, many thanks for the help.
JR Wobble, appointment booked for your analist....
 
  • Haha
Reactions: JR

Scratchbuilder

SMF Supporter
Joined
Jul 2, 2022
Messages
2,031
Points
113
Location
Luton
First Name
Mike
Update,
So today I rebuilt the two uprights on the rear of the hull - I failed to deduct the thickness of the plastic and assumed I had done so, so now they are the size they should be.
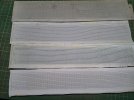
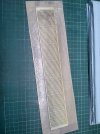
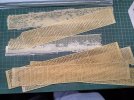
Have been doing some work on the treadway for the bridge and did not fancy doing the flat sheet so opted for the perforated version...
After some experiments and then building a master and a few trials with getting the thickness to where I wanted it, I arrived at the final item. The ones in the last photo are for the model and will have to be finally cleaned up and trimmed to fit the main part of the bridge.
20220730_151915_HDR.jpg20220730_152008_HDR.jpg20220730_152237_HDR.jpg
Mike.
 
Last edited by a moderator:

Jakko

Way past the mad part
SMF Supporter
Joined
Apr 28, 2018
Messages
10,928
Points
113
First Name
Jakko
Nice work :smiling3: How did you build the masters for the treadway castings? Vast numbers of bits of plastic strip?
 

Scratchbuilder

SMF Supporter
Joined
Jul 2, 2022
Messages
2,031
Points
113
Location
Luton
First Name
Mike
Jakko & Mark, Many thanks for you kind comments.
The master was made from strips of plastic care of EMA Supples, The cross joining bits also the same but cut to length with a 'Chopper' which at the end gave up and died (not really). I first made one length, then cast a rubber mould from that. I then cast two of the same from resin and joined them to make one strip/length and cast another mould. Then I went to the illustrations and drawings and realised my mistake I had made the gaps to wide across. So out came the saw and it was just a case of cutting each length down to the width I required (see to of photo) and re-gluing each length onto some thick card to preserve the shape and give the whole some strength as can be seen from the tattered end of one length. Then a final mould was cast and once happy I went ahead and cast the tradways from that in resin. This has taken place over a matter of weeks swapping from the hull build to the treadway, giving me a break and time to think out the problem. And once the hull is complete then it will be onto the bridge and I will show one side and then vanish to complete the others then the final assembly will be posted.
Mark, I wish they could have come 'of the shelf' but then I would not have had the fun of all that cutting and sticking.....:tired:
Cheers, Mike
 

Jakko

Way past the mad part
SMF Supporter
Joined
Apr 28, 2018
Messages
10,928
Points
113
First Name
Jakko
Ah, I understand now why there are two widths in the photos — I was wondering about that. Glad to read you didn’t have to make a complete treadway from bits of plastic strip, as I feared at first :smiling3:

Though to be honest, I would have looked for someone who owns a laser cutter for this: draw the pattern on a computer (which would be largely copy-and-paste-work) and just have the device cut all those little holes in a bit of plastic card of the right thickness.
 
  • Wow
Reactions: JR

Jim R

SMF Supporter
Joined
Apr 27, 2018
Messages
13,817
Points
113
Location
Shropshire
First Name
Jim
Hi Mike
Just had a proper look at your earlier photos on the big screen. Brilliant work. Very neat and I can imagine the time taken. Wonderful work on the treadway. The building of the master must have tested your patience although the actual casting is fairly straightforward. You look to have nice, bubble free castings.
Jim
 

JR

Member of the Rabble and Pyromania Consultant
SMF Supporter
Joined
May 26, 2015
Messages
17,362
Points
113
Location
lincs
First Name
John
Ah, I understand now why there are two widths in the photos — I was wondering about that. Glad to read you didn’t have to make a complete treadway from bits of plastic strip, as I feared at first :smiling3:

Though to be honest, I would have looked for someone who owns a laser cutter for this: draw the pattern on a computer (which would be largely copy-and-paste-work) and just have the device cut all those little holes in a bit of plastic card of the right thickness.
Unfortunately he doesn't have any friends with such things:smiling3:;) I had one of those sketch things thought:upside:
 

stillp

SMF Supporter
Joined
Nov 17, 2016
Messages
7,234
Points
113
Location
Rugby
First Name
Pete
Do laser cutters work on plasticard?
Pete
 

Scratchbuilder

SMF Supporter
Joined
Jul 2, 2022
Messages
2,031
Points
113
Location
Luton
First Name
Mike
Ah, I understand now why there are two widths in the photos — I was wondering about that. Glad to read you didn’t have to make a complete treadway from bits of plastic strip, as I feared at first :smiling3:

Though to be honest, I would have looked for someone who owns a laser cutter for this: draw the pattern on a computer (which would be largely copy-and-paste-work) and just have the device cut all those little holes in a bit of plastic card of the right thickness.
There are also studs that were added to all junctions (not visible in the pics). And you cannot use a laser cutter on plastic, it will melt it, plus why do it that way when the enjoyment is working out the problem youself and realising you have achieved something.
 

Scratchbuilder

SMF Supporter
Joined
Jul 2, 2022
Messages
2,031
Points
113
Location
Luton
First Name
Mike
Hi Mike
Just had a proper look at your earlier photos on the big screen. Brilliant work. Very neat and I can imagine the time taken. Wonderful work on the treadway. The building of the master must have tested your patience although the actual casting is fairly straightforward. You look to have nice, bubble free castings.
Jim
Jack Daniels helped a lot to ease the pain....:tongue-out3:
 

Jakko

Way past the mad part
SMF Supporter
Joined
Apr 28, 2018
Messages
10,928
Points
113
First Name
Jakko
There are also studs that were added to all junctions (not visible in the pics).
That makes it a whole different game, yes. By casting it in sections you avoid adding a lot of pieces that you would have to laboriously add when cutting the plate as a whole.

you cannot use a laser cutter on plastic, it will melt it
The site I linked to (mainly because it was the first one I found) sells laser cutters suitable for plastic sheet that avoid this problem. Here’s an example from that site:

Polystyrene_Benefits_filigree_details_eurolaser.png


OK, these are industrial machines, but with a bit of luck, there are hobbyist-scale ones to be found with similar capabilities.

That is polystyrene and not plastic sheet.
I think you’re confusing polystyrene in general with expanded polystyrene foam. Nearly all model kits are made of hard polystyrene, as is the kind of (usually white) plastic sheet/card most commonly used for scratchbuilding.

plus why do it that way when the enjoyment is working out the problem youself and realising you have achieved something.
I also get that feeling after drawing something intricate :smiling3: But that’s the beauty of modelling and scratchbuilding, IMHO: you can build it the way you think works best, and I can get much the same result via another technique. Does that make either better than the other?
 
  • Like
Reactions: JR
Top