My thoughts on the last part of your post. Many times we have made items for builds, then time passes and you see a ready made item you have struggled to make . Then you think what should I do buy it or still make it . I think two things, how much does it cost against making one, and have I the time. This applies to me mainly when making buildings and trees .That makes it a whole different game, yes. By casting it in sections you avoid adding a lot of pieces that you would have to laboriously add when cutting the plate as a whole.
The site I linked to (mainly because it was the first one I found) sells laser cutters suitable for plastic sheet that avoid this problem. Here’s an example from that site:

OK, these are industrial machines, but with a bit of luck, there are hobbyist-scale ones to be found with similar capabilities.
I think you’re confusing polystyrene in general with expanded polystyrene foam. Nearly all model kits are made of hard polystyrene, as is the kind of (usually white) plastic sheet/card most commonly used for scratchbuilding.
I also get that feeling after drawing something intricateBut that’s the beauty of modelling and scratchbuilding, IMHO: you can build it the way you think works best, and I can get much the same result via another technique. Does that make either better than the other?
- Home
- Forums
- Military Vehicles
- Military Vehicles Under Construction
- Armoured Vehicles Under Constuction
You are using an out of date browser. It may not display this or other websites correctly.
You should upgrade or use an alternative browser.
You should upgrade or use an alternative browser.
Centurion AVLB (slow build)
- Thread starter Scratchbuilder
- Start date
Scratchbuilder
SMF Supporter
Update.
So debate over tea drained and back to work..... Thanks Jakko for the information.
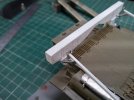
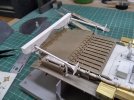
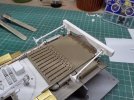
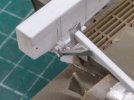
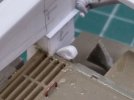
The rear support for the bridge is next on the agenda. First was the uprights and then the crossmember that will support the bridge during transport as seen in the earlier pics. Attached to this are the support legs used during servicing of the vehicle if the bridge is loaded. Also added was the new lifting eye just ahead of the support upright on both sides.


Last edited by a moderator:
Scratchbuilder
SMF Supporter
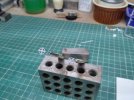
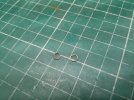
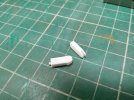
Next on the order of build are the two clamps at the rear of the cross members. I started with the locking wheel handles - these were made from copper wire wound around a suitable rod and then the resulting 'spring' was cut to to give me four rings (two replacements) into these was added the cross and the centre disc. Once complete they were given a blend of thin putty to try to give the impression of a cast item. The Clamp blocks are made from plastic card and are shown almost complete. I should add that the 'cross' is centered in the ring and the studs on the outside were added after.
More later....
More later....


Last edited by a moderator:
Scratchbuilder
SMF Supporter
Cheers Andrew.As always Mike, such great scratchery in such a small space.
Jim R
SMF Supporter
Scratching work is excellent. I wouldn't know where to start. The scratch building itself I just might cope with but it's being able to look at reference photos and decide what is needed that would finish me. I remember commenting to Jakko that some of you have a true ability to interpret old, fuzzy, black and white photos.
Carry on Sir, you're doing a grand job.
Carry on Sir, you're doing a grand job.
Neil Merryweather
SMF Supporter
ooh delicious!
- Joined
- Apr 28, 2018
- Messages
- 10,927
- Points
- 113
- First Name
- Jakko
The advantage with something like a Centurion AVLB is that there are real ones around to photograph and, if you’re allowed to, measure up, which takes away a lot of the interpretation side of thingsit's being able to look at reference photos and decide what is needed that would finish me. I remember commenting to Jakko that some of you have a true ability to interpret old, fuzzy, black and white photos.
 I don’t know if Mike had access to one to do either of these, of course, but in general the work is easier with good references, preferably ones you took yourself as looking at the real thing usually makes it much more obvious how everything fits together than looking at someone else’s photos.
Scratchbuilder
SMF Supporter
Being old and fuzzy myself helps...Scratching work is excellent. I wouldn't know where to start. The scratch building itself I just might cope with but it's being able to look at reference photos and decide what is needed that would finish me. I remember commenting to Jakko that some of you have a true ability to interpret old, fuzzy, black and white photos.
Carry on Sir, you're doing a grand job.
Scratchbuilder
SMF Supporter
Unfortunately I was just gearing myself up to take a trip to do just that when covid struck, so that put paid to that idea, so it has been work from 1/76 approx drawings, then enlarging them to 1/35 using the AFV Club Centurion as the guide for length, height and width. Going through Photoshop untill I reached the dimensions I was happy with. Then of course came the photos obtained from various sources, and finally drawings from the operators manual, and the Tank Museum staff were a great help. I also enlarged a side view photo to the same scale 1/35 and that will help later with the centre treadway sections. Hope this helps anyone interested in scratchbuilding - also earlier editions of Photoshop are available very cheap on evilbay, they will come as a download but you can then transfer it to a blank disk.The advantage with something like a Centurion AVLB is that there are real ones around to photograph and, if you’re allowed to, measure up, which takes away a lot of the interpretation side of thingsI don’t know if Mike had access to one to do either of these, of course, but in general the work is easier with good references, preferably ones you took yourself as looking at the real thing usually makes it much more obvious how everything fits together than looking at someone else’s photos.
Mike.
Scratchbuilder
SMF Supporter
Sorry no updates for the forseeable future. An old back injury I recieved in the army in the late 1960's has suddenly decided to rear its ugly head. I have had it examined, scanned, and probed, and the agreement is that I fractured my lower spine and it was ignored, grew together and now arthritis has appeared. So at the moment I can only sit at the bench for about 10 minutes before I have to move. I have tried one of those old ice cream tryas the ladies in the cinemas used to walk backward with but the bits keep falling off.... So normal service will be resumed asap when the medicals have decided what pain killers I need or whatever.
Anyway here is a picture to remind you, although I do not look as good as the model posing with the tray.
Mike.
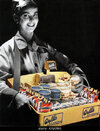
Anyway here is a picture to remind you, although I do not look as good as the model posing with the tray.
Mike.

Mark1
SMF Supporter
Oh dear! Hopefully with the right medication sorted youll be back at the bench in no time.
scottie3158
SMF Supporter
Michael,
I hope they get you sorted out soon mate as the work you had done on the build was excellent. If the medicos can't sort you I am sure we can get matron round to sort you out.
I hope they get you sorted out soon mate as the work you had done on the build was excellent. If the medicos can't sort you I am sure we can get matron round to sort you out.
Jim R
SMF Supporter
All the best Mike. I hope the pain medication gets sorted.
Scratchbuilder
SMF Supporter
First many thanks for all the words of sympathy, the qwack has put me on pain killers,very good as wheels for a model, no good for pain.
Have managed a little on the build, but have had plenty of time for cleaning up the room.
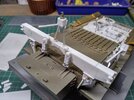
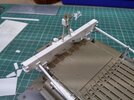
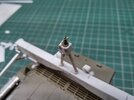
So onward, the clamps have been added as has the rear antennae box and mount, the last pic hopefully shows the 'butterfly' nut for tightening the antennae in place.
Now working on the hinges and extension supports/arms.
More later.
Mike.


Scratchbuilder
SMF Supporter
Update,
First, many thanks for the support and sympathy for my back problem, still sorting out the meds but will get there.
Now to the important stuff.....
The rear support frame is now finished (pics to follow) apart from the rubber pads which will be added once the bridge is in position, but they should be as per the drawings as I tried a length of the tread plate and it worked.....
And so onto the front frame.... The supports for the bridging gear and arm are first on the agenda. These have been made up from 'Plastruct' strip and rod obtained from EMA supplies who are my go to suppliers.
So using the drawings as a guide the frames were built...
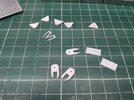
Here are some of the parts after being cut out and before final cleaning up...
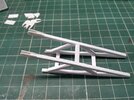
This shows the frame during construction and the hinge/anchor plates being added....
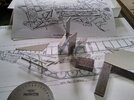
Lining everything up to make sure they match - still a way to go yet....
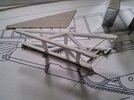
As you can see there is some filling to do as I cut away extra just in case of fit problems. At the top can be seen one of the templates to make dure I get the angle correct when fitting to the glacis plate.
And that is it for this time, I will add more as I get further into the build.
Cheers
Mike.
First, many thanks for the support and sympathy for my back problem, still sorting out the meds but will get there.
Now to the important stuff.....
The rear support frame is now finished (pics to follow) apart from the rubber pads which will be added once the bridge is in position, but they should be as per the drawings as I tried a length of the tread plate and it worked.....
And so onto the front frame.... The supports for the bridging gear and arm are first on the agenda. These have been made up from 'Plastruct' strip and rod obtained from EMA supplies who are my go to suppliers.
So using the drawings as a guide the frames were built...

Here are some of the parts after being cut out and before final cleaning up...

This shows the frame during construction and the hinge/anchor plates being added....

Lining everything up to make sure they match - still a way to go yet....

As you can see there is some filling to do as I cut away extra just in case of fit problems. At the top can be seen one of the templates to make dure I get the angle correct when fitting to the glacis plate.
And that is it for this time, I will add more as I get further into the build.
Cheers
Mike.
