Unless you were on duty recovery, then the Red Caps would be very nice to you !Of course, a few decades of storing one who-knows-where, definitely not washing it, and the blandness is gone:
View attachment 484175
This is a real one (produced post-war) that’s in the collection of a museum near where I live. Not sure you’d get away with having your overall look like that in service, though, especially in peacetime
You are using an out of date browser. It may not display this or other websites correctly.
You should upgrade or use an alternative browser.
You should upgrade or use an alternative browser.
Comet-ed
- Thread starter Andy T
- Start date
That's looking excellent Andy,really good start on the bridgeOK, so after a brief distraction I'm back on with this.
I knocked the bridge together today. It's a little bit short but blame Starbucks for thatI've no idea what I'm doing but tried to make it look like a bridge whilst keeping it weak enough that I could smash it to pieces. I'm sure it would have more cross bracing in real life but I have plenty of extra
stirring stickstimber to add for effect if it needs it.
View attachment 484702
I gave it a few light washes in grey, brown, green & black to give it a bit of colour and also brush painted the base in some "muddy" colours as a foundation.
View attachment 484703
Next job is to smash it to pieces, and thankfully I have the perfect tool for that, my wife! My son & I have banned her from touching any models as she has a knack for breaking anything, so perfect for the job in hand I think.

...... Far too hot for gardening mate, modelling is the perfectly paced activity for this weather....
.... well, that's what I'm telling Rach anyway. !!
Andy T
SMF Supporter
I'd agree but the stars are in alignment today lol
Trying to organise a day whem I'm not working, mum isn't away on holiday, and my brother isn't flying around the country jumping out of a helicopter to rescue people has been a nightmare, so it's now or never
And thanks. Plenty more to do but it's taking shape.
Trying to organise a day whem I'm not working, mum isn't away on holiday, and my brother isn't flying around the country jumping out of a helicopter to rescue people has been a nightmare, so it's now or never

And thanks. Plenty more to do but it's taking shape.
Andy T
SMF Supporter
Well the bridge destruction didn't quite go to plan lol. I knocked it onto the floor, which, given the deliberately weak construction didn't end well! 
I think I managed to salvage something out of it though
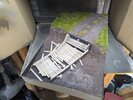
And with the Comet in place
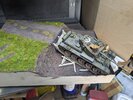
It clearly needs some more paintwork once the glue has dried but it could have been worse. Thankfully some will be hidden under murky water too. I need to reposition the guy in the turret as he's leaning at an awkward angle. I took a guess and didn't quite get it right.
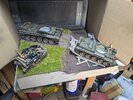
And then a bit of a sneak peek with the main elements in place. Again, much more paint & weathering effects needed to tie the vehicles in with the base but I think I'm starting to see light at the end of the tunnel

I think I managed to salvage something out of it though

And with the Comet in place

It clearly needs some more paintwork once the glue has dried but it could have been worse. Thankfully some will be hidden under murky water too. I need to reposition the guy in the turret as he's leaning at an awkward angle. I took a guess and didn't quite get it right.
And then a bit of a sneak peek with the main elements in place. Again, much more paint & weathering effects needed to tie the vehicles in with the base but I think I'm starting to see light at the end of the tunnel

Andy T
SMF Supporter
Thanks guys, it certainly looks a whole load better than the bundle of sticks I started with 
Getting it to sit right with the tracks and river bed took some manipulation but I think I've made it work somewhat

Getting it to sit right with the tracks and river bed took some manipulation but I think I've made it work somewhat

I don't want to sound critical Andy but looking at the picture again I think you should attack the posts and end parts of the bridge as it looks like they have been sawed off as opposed to being broken when it collapsed.
Andy.
Andy.
Andy T
SMF Supporter
Thanks for that Andy and I know exactly what you mean, a by product of its unplanned crash landing really. If you look a few posts back at how it was constructed, the rail sat on top of the posts. After the fall there were lumps of CA glue on top of each post that I had to sand off so it does look far too clean of a break at the minute rather than like a joint that's failed as I wanted.
I was hoping paint effects and a few nail holes would disguise it but now that you mention it, maybe adding some thin wire pins to emulate nails/screws that have been ripped out would help the illusion even more?
I was hoping paint effects and a few nail holes would disguise it but now that you mention it, maybe adding some thin wire pins to emulate nails/screws that have been ripped out would help the illusion even more?
rtfoe
SMF Supporter
Hi Andy, great progress. Love it so far...the accident works.
Have been lurking and decided to put my 2 cents in. As mentioned by the other Andy and your suggestion of protruding nails is good perhaps two beams in between the post against the stone wall with more nails and heavy damage may help.
Always liked your neat approach and the ply surround that many seem to forget to apply to their bases. I can already picture the vegetation on the banks and the water effects.
Cheers,
Wabble.
Jim R
SMF Supporter
All looking very good to me Andy. Damage of any sort, whether to buildings, vehicles or even bridges, is hard to make look convincing. You're certainly headed in the right direction.
Andy the Sheep
SMF Supporter
Great progress Andy and a very realistic scene. Looking forward to the next steps.
Andy T
SMF Supporter
Thanks Jim & Andrea, great to see that you're still with me 
If I'm honest this stopped being fun some time ago and slogging away at a chore doesn't help the creative juices very much, but I'll keep battling on and hopefully the mojo will return. It'll definitely be a long time before I tackle anything this complex again
This afternoon I've been drilling the nail holes in each plank and I've added some mangled copper wire pieces to the tops of the posts to look like failed fixings (breaking a pair of nippers in the process)

If I'm honest this stopped being fun some time ago and slogging away at a chore doesn't help the creative juices very much, but I'll keep battling on and hopefully the mojo will return. It'll definitely be a long time before I tackle anything this complex again

This afternoon I've been drilling the nail holes in each plank and I've added some mangled copper wire pieces to the tops of the posts to look like failed fixings (breaking a pair of nippers in the process)
Andy T
SMF Supporter
Okay, hands up, I now realise why I was having such a hard time manipulating the wire I was using for my fixings, and why they've chipped the blades on my nippers. It appears I'd forgotten about having 2 types of 0.8mm wire. One is nice soft copper, the other is copper clad steel MIG welding wire! Guess which one I was using 
After giving myself a good talking to I dug out some thinner 0.4 lead wire to use for the smaller plank fixings, and also chewed the post ends with a pair of pliers, as much as I could without ripping them from the base anyway.
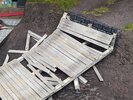
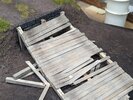
I've not done the ones that'll be hidden by the tank or underwater but I think it's an improvement.
I'm still undecided about where to go with the paint on this. I like the effect of the newly uncovered wood looking fresh compared the the faded, exposed sections, but it still doesn't look quite right to me yet. However, bearing in mind most of it will be covered up I may be over thinking it!

After giving myself a good talking to I dug out some thinner 0.4 lead wire to use for the smaller plank fixings, and also chewed the post ends with a pair of pliers, as much as I could without ripping them from the base anyway.


I've not done the ones that'll be hidden by the tank or underwater but I think it's an improvement.
I'm still undecided about where to go with the paint on this. I like the effect of the newly uncovered wood looking fresh compared the the faded, exposed sections, but it still doesn't look quite right to me yet. However, bearing in mind most of it will be covered up I may be over thinking it!
- Joined
- Apr 28, 2018
- Messages
- 10,798
- Points
- 113
- First Name
- Jakko
I like the look of that bridge, IMHO it’s convincing already. Though you may want to paint damaged wood where the tank’s tracks rode over it, as I doubt the steel would have been kind to simple wooden planks.
scottie3158
SMF Supporter
Andy Looking good buddy.

