You are using an out of date browser. It may not display this or other websites correctly.
You should upgrade or use an alternative browser.
You should upgrade or use an alternative browser.
Comet-ed
- Thread starter Andy T
- Start date
Andy T
SMF Supporter
I bet that was "character building!"Well it's interesting to me Andy.
The last time I saw one of these in the flesh was at Borden on a recovery training course. It was sunk in a lake well over the towing eyes. Guess who had to go in and fit the winch rope ?
Oh, don't get me wrong Neil, I wasn't fishing for comments. Sorry if it came across that way.Me too Andy.
Don't judge by the number of replies, just check the views.
To be honest I think it was mentioning my wife's baking that had 'em running for the exits

Thanks Andrew.Andy
That's coming on vey nicely. Love the adjusted stowage box. A vast improvement!!
Very well done.
ATB
Andrew
As JR inferred earlier, with it being part of a scene rather than a stand alone model I won't be changing much, but a little bit here & there never hurts

Andy T
SMF Supporter
Assembly is finished as far as I can until I've decided exactly where the figures are going.
A tiny bit of filler was needed on the turret stowage boxes and I've added a few bits of spare etch to represent clamps where the missing tools are. Apart from that a very straightforward build.
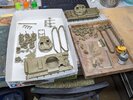
Now onto the messy stuff!
I've done a quick mock up to give myself an idea of the space it will need but nothing is set in stone (or foam) yet.
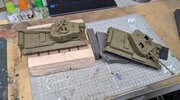
I figured it made sense to have the towing vehicles turret pointing backwards so the commander could call the shots. Looks like I can pose the other guy looking back to keep an eye on what's going off.
Fingers crossed John gets my preferred primer back in stock soon so I can get cracking on the wet stuff too
A tiny bit of filler was needed on the turret stowage boxes and I've added a few bits of spare etch to represent clamps where the missing tools are. Apart from that a very straightforward build.

Now onto the messy stuff!
I've done a quick mock up to give myself an idea of the space it will need but nothing is set in stone (or foam) yet.

I figured it made sense to have the towing vehicles turret pointing backwards so the commander could call the shots. Looks like I can pose the other guy looking back to keep an eye on what's going off.
Fingers crossed John gets my preferred primer back in stock soon so I can get cracking on the wet stuff too
Last edited:
Andy T
SMF Supporter
Managed to scrape together enough primer to get the main bits done.
I've also splashed a bit of white inside just in case any of it is visible.
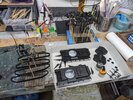
Used almost all of my clippy things on the wheels! I have some more paint on order but probably have enough left to get the wheels done and free up some of the holders for all of the other bits.
I've also splashed a bit of white inside just in case any of it is visible.

Used almost all of my clippy things on the wheels! I have some more paint on order but probably have enough left to get the wheels done and free up some of the holders for all of the other bits.
Wow Andy, some really fine work going on with this Sir!!! I am a bit late to the party and looks like you have a good plan for the dio. You sure don't mess around at the bench with the progress you're making here!!!...
Prost
Allen
Prost
Allen
Waspie
SMF Supporter
Guess who that 'one person' will be?Cheers Paul, it came in handy for this bit too.
This afternoon was wheels & tracks. It's a job I despise and I'd probably build more tanks if it wasn't for this stage, but there we go. I was really pleased to get it out of the way but then realised I've got it all to do again on the other oneI don't know how others approach link & length tracks, but since I took pictures I might as well share how I do them.
After the wheels & rollers were built I cemented them to the suspension with the merest dab of TET, just enough to hold them in place. Note how one of the return rollers has an alignment pin to make it impossible to get the tracks in the wrong place & direction.
View attachment 480842
Tamiya provide a template for laying the track pieces out but in the past I found it hard to build them on their sides like that, and it left room for user error, so instead I put the pieces in order on a strip of masking tape and lightly cemented the joints. 19 pieces here.
View attachment 480843
After a few minutes, once the glue had started to take effect but was still pliable, I wrapped the lot around the wheels, adding the lower section too. Once it was all in place I went round the outer edges of each joint with more cement, taking care not to stick the links to any wheels.
View attachment 480844
I left this for half an hour while I went and had something to eat (chicken fajita wraps washed down with a fruity little red. Yummy )
The tracks had hardened up by this time so I carefully removed them. The minimal cement on the wheels meant I could just rotate them to crack 'em free, and everything slid off nicely. I then went around the track joints once again with TET and will leave the tape on overnight.
I'll then be left with everything in separate pieces which should help with the painting. I'll no doubt add a bit of damage to the rubber tyres before I get to that stage.
View attachment 480846
I'm probably teaching many of you to suck eggs, but if my method helps just one person out it'll be worth the typing.
My next build is armour with diy track links so any help is a bonus!!!!!!
Andy T
SMF Supporter
Thanks Allen. I'm sure things will slow down quite a lot now that I'm on to the more fiddly stuff but I always like reaching the primer stage as it means my favourite bits are not far awayWow Andy, some really fine work going on with this Sir!!! I am a bit late to the party and looks like you have a good plan for the dio. You sure don't mess around at the bench with the progress you're making here!!!...
Prost
Allen

I'm far from an authority Doug but I hope it helps in some small way.Guess who that 'one person' will be?
My next build is armour with diy track links so any help is a bonus!!!!!!
Andy T
SMF Supporter
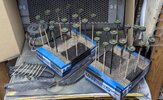
I started splashing some base colours down this afternoon.
Mr Color Burnt Iron on the tracks, their OD(2) on the wheels and Model Air Tire Black on all those tyres. With around 80 I'm hoping one coat will be enough but I'll see what they look like tomorrow.
I've never been particularly keen on the tyre colour, it usually looks a bit green for my liking, but it sits fine against the OD.

Wow Andy!!! Painted tank road wheels and tracks in stereo...Ya gotta love it!!! I do........
Prost
Allen
Prost
Allen
I'm all eyes Buddy!!!...
Mark1
SMF Supporter
Good progress,tank wheels are always great fun. I have been using vallejo nato black for the tyres ,slightly greyer looking,looks a bit more realistic compared to the tyre black i think.
Blimey, that's coming really well !!
Superb stuff Andy..... This is all promising something a bit special.
Nice one!!
Superb stuff Andy..... This is all promising something a bit special.
Nice one!!
Andy T
SMF Supporter
Cheers Mark. It's been a few years since I used it and I remember why now lol.Good progress,tank wheels are always great fun. I have been using vallejo nato black for the tyres ,slightly greyer looking,looks a bit more realistic compared to the tyre black i think.
Thanks Andy. Don't get your hopes up too high but I'll give it a good crack.Blimey, that's coming really well !!
Superb stuff Andy..... This is all promising something a bit special.
Nice one!!
Andy T
SMF Supporter
Not much to show for today but it's a couple of hours work.
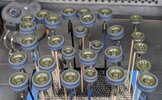
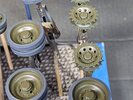
After a few tests I ended up repainting the tyres in VMA German grey. All the images & videos I've seen of the real thing show the tyres to be quite a light grey so I'm happier now. To break up the block of colour I gave the tyres a glaze in thinned down sky grey which I dabbed off randomly with paper towel. Subtle, but it's there.
I also picked out every bolt head in a highlight colour. If I spend this much time on everything else in the diorama it'll keep me happy for months
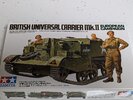
I also made a start on a Universal Carrier that I'm going to add to the scene.
I already have one that I could repurpose but thought the figures in this version would fit the scene well as they watch the action.
After a few tests I ended up repainting the tyres in VMA German grey. All the images & videos I've seen of the real thing show the tyres to be quite a light grey so I'm happier now. To break up the block of colour I gave the tyres a glaze in thinned down sky grey which I dabbed off randomly with paper towel. Subtle, but it's there.
I also picked out every bolt head in a highlight colour. If I spend this much time on everything else in the diorama it'll keep me happy for months


I also made a start on a Universal Carrier that I'm going to add to the scene.
I already have one that I could repurpose but thought the figures in this version would fit the scene well as they watch the action.

Andy T
SMF Supporter
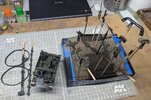
I fancied a little win to keep motivated so the UC was built up and painted. It's still in sub assemblies so that I can paint the interior, and the figures need more filling and clean up after adjusting their poses, but it's a step forward.
It looks a bit wierd in gloss varnish but once it's weathered & matted down it should be good enough for an addition to the scene
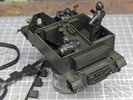
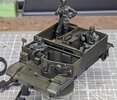
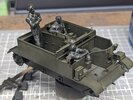
It looks a bit wierd in gloss varnish but once it's weathered & matted down it should be good enough for an addition to the scene


Andy T
SMF Supporter

