We're off. RAF Sea King HAR

rickoshea52

SMF Supporter
Joined
Dec 20, 2011
Messages
3,981
Points
113
Location
North West
First Name
Rick
While I remember, don’t follow the Airfix instructions when you come to add the HF aerial masts on the cab side - they’re wrong. Airfix have used a mix of HAR3 & HAR3A aerial mast layouts. I have reference sketch from my Sea King course notes to share when I find it.
 

Waspie

SMF Supporter
Joined
Mar 13, 2023
Messages
2,601
Points
113
Location
Portland - Dorset
First Name
Doug
@rickoshea52 Thanks for the link. Our Kings on 819 were fairly hammered. Standard joke in the RN was if you see oil at least you know it has oil in the gearbox's. I did an emergency landing at Dundee, (Pan-Pan), after the CWP illuminated and a quick look outside the cab at 5000 feet discovered the reason - the Main rotor gearbox had dumped the oil down the sides of the aircraft. Totally obscuring the Observers and sliding cabin door. Also had a similar failing climbing vertical up the side of Fortes B in the North Sea!!!!
I spent over 10 years flying in them, they all leaked from one component or another. Five hydraulic fires form the sonar kit! The list goes on.
Sadly only having six aircraft and a massive operational commitment the aircraft were well used!
 

Geoffers

SMF Supporter
Joined
Jan 26, 2017
Messages
1,048
Points
113
Location
Shropshire
First Name
Geoff
Sounds like a good recovery with the model Doug :thumb2:

As regards weathering, as Rick said Mig do some ready made oil stain washes as do a few other brands.

You could also consider investing in a couple of tubes of oil paint and thinner which you can use for a few different weathering techniques including oil streaks/stains.

I’ve linked a clip for you which may be helpful.


I use Abteilung 502 oils which John sells and are specific for modelling but most reasonable quality oils will do.

Either way looking forward to seeing your build progress :thumb2:

Geoff.
 

Waspie

SMF Supporter
Joined
Mar 13, 2023
Messages
2,601
Points
113
Location
Portland - Dorset
First Name
Doug
I have been meaning to ask about this a week ago but the new arrival has distracted me every time I think about it. (She's sleeping now)

There are two parts that obviously fit together but I cannot see where or how. Also no mention of the two parts in the destructions. Circled parts below!

image.jpeg
 

Andy T

SMF Supporter
Joined
Apr 26, 2021
Messages
2,039
Points
113
Location
Sheffield
First Name
Andy
They are mounts for a separately available motor.

I'm sure it was mentioned in the instructions on the one I built. You have to leave part of the interior out to fit them.
 

Waspie

SMF Supporter
Joined
Mar 13, 2023
Messages
2,601
Points
113
Location
Portland - Dorset
First Name
Doug
They are mounts for a separately available motor.

I'm sure it was mentioned in the instructions on the one I built. You have to leave part of the interior out to fit them.
Mmmm, that would figure as the top, (in the image), is the exact diameter of the circle where the rotor head sits! I'll have another check of my plans but I have read them over a few times and it never jumped out at me!!
 

Jakko

Way past the mad part
SMF Supporter
Joined
Apr 28, 2018
Messages
10,918
Points
113
First Name
Jakko
Also no mention of the two parts in the destructions.
Many kits’ instructions include drawings of the sprues and indicate which parts are not for use with the kit you have. It would help a lot if every manufacturer did this, as sometimes it can have you quite puzzled even if you have a lot of experience with these things.

Of course, some manufacturers, such as Dragon, occasionally make mistakes in marking these parts, which really helps …
 

Waspie

SMF Supporter
Joined
Mar 13, 2023
Messages
2,601
Points
113
Location
Portland - Dorset
First Name
Doug
Thanks Andy for the link. That bit isn't on my set of instructions!! Weird!! I do wish SWIMBO would let me play indoors. Got soaked going to the garage!!!!!:crying:
By the way. Is Scalemates a good source of information re plans etc?
 

Andy T

SMF Supporter
Joined
Apr 26, 2021
Messages
2,039
Points
113
Location
Sheffield
First Name
Andy
By the way. Is Scalemates a good source of information re plans etc?
Many would say so, yes. Definitely bookmark material.

Pretty invaluable when looking for kits, especially the history part. It can show you if the "new" kit you're looking at was actually first made 40+ years ago by someone else for example and they've just reboxed it!
 

Waspie

SMF Supporter
Joined
Mar 13, 2023
Messages
2,601
Points
113
Location
Portland - Dorset
First Name
Doug
As far as I know they were 78 sqn. During the conflict 202 sqn provided SAR at Ascension Island and may have gone to the FI in the immediate aftermath but I can be certain.
If you have the kit with the grey Sea King on the box with a yellow and black stripe along the fuselage side then you have the 78 sqn decal included. It’s a yellow lion rampant on a black disc.
If you don’t have this kit I’ll see if I have a spare to give you, I have at least two of these kits.
Hi Rick, (@rickoshea52 ) I have managed to source the squadron badge. It was a good exercise in procurement!!!!
 

JR

Member of the Rabble and Pyromania Consultant
SMF Supporter
Joined
May 26, 2015
Messages
17,361
Points
113
Location
lincs
First Name
John
I'll grab a seat please . Think I'll sit with Andy then he can explain the finer points as you proceed .

I remember when I was a mere youngster on the beach at Frinton waving to the winch man as they flew along the beach in their yellow SeaKing. He would stand at the open door and wave to people on the beach .
 

rickoshea52

SMF Supporter
Joined
Dec 20, 2011
Messages
3,981
Points
113
Location
North West
First Name
Rick
Mmmm, that would figure as the top, (in the image), is the exact diameter of the circle where the rotor head sits! I'll have another check of my plans but I have read them over a few times and it never jumped out at me!!
The last build steps in the instructions include these parts. They for a motor as mentioned.
 

Waspie

SMF Supporter
Joined
Mar 13, 2023
Messages
2,601
Points
113
Location
Portland - Dorset
First Name
Doug
I'll grab a seat please . Think I'll sit with Andy then he can explain the finer points as you proceed .

I remember when I was a mere youngster on the beach at Frinton waving to the winch man as they flew along the beach in their yellow SeaKing. He would stand at the open door and wave to people on the beach .
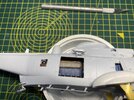
SOP for winchmen. One must pose for the cameras. (Even when it was frowned upon at the local nudist beaches - Studland Dorset)
 

Waspie

SMF Supporter
Joined
Mar 13, 2023
Messages
2,601
Points
113
Location
Portland - Dorset
First Name
Doug
Weather has curtailed play at the moment. The garage, my designated work area is subject to the winds and as it's blowing the proverbial Hoolie out there today I ain't even going to attempt to open the door less paint!! It's already taken toll on a few plants and the garden swing plus canopy have been moved to a more sheltered location. Now if SWMBO had only agreed to me working indoors!!!!
 

Waspie

SMF Supporter
Joined
Mar 13, 2023
Messages
2,601
Points
113
Location
Portland - Dorset
First Name
Doug
Bit of an update. Progress made albeit slow. New puppy is putting pay to any spare time I get these days.
However, managed to get some of the tiny 'bits' fitted and spent an inordinate amount of time masking up the glass!! Did think about masks but I'll use that on the smaller windows and lights. That way I get to experiment with two types of masking. One faux pax that has niggled me. I assembled the undercarriage and painted the white interior as well as the struts without any thought into the final paint. Which I am going to attempt with the airbrush!!! ( I may have to repaint the undercarriage wells post painting) Another lesson learned!
Much of the fiddly bits fitted now.
IMG_0690.JPG

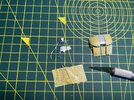
Top canopy I cut the masking tape by eye.
Then with the two side clear parts I taped over the whole section, rubbed them down with a blunt plastic pointer. Once done, I traced the outlines with a pencil and finally cut the borders away leaving the canopy masked off.
IMG_0691.JPG

Undecided yet what to do regards the rotor blades but they can be done after the fuselage paint!!
 

stillp

SMF Supporter
Joined
Nov 17, 2016
Messages
7,234
Points
113
Location
Rugby
First Name
Pete
Instead of repainting the wheel wells after airbrushing the hull, you could just stuff them with wet tissue.
Pete
 

Waspie

SMF Supporter
Joined
Mar 13, 2023
Messages
2,601
Points
113
Location
Portland - Dorset
First Name
Doug
Instead of repainting the wheel wells after airbrushing the hull, you could just stuff them with wet tissue.
Pete
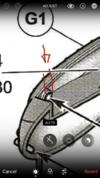
:thumb2: I just knew someone would bale me out with a handy tip! Cheers for that. I did think of using Maskol but then the thought of trying to remove it all from the fiddly bits!!! And it'll be something else I've learned. Cheers for that. I did experiment with masking tape but!! I'll leave it there. A fail!!
 

rickoshea52

SMF Supporter
Joined
Dec 20, 2011
Messages
3,981
Points
113
Location
North West
First Name
Rick
Don’t forget the green tinted windows above the pilots. I used Tamiya clear green on the inside so you get the shiny clear finish on the outside.

A tip for the landing gear - there is a circular recess the leg sits in and pivots on (called trunnions on the real thing). Leave the gears off until the end. Cut the bottom segment of this to make a gap, so your recess is horseshoe shaped, then when you want to fit the legs the pivot point goes between these gaps, for the drag brace and glue the gear in the correct down lock position.

7B41EB1F-ABB4-45DF-874E-1BB052880273.png

An alternative method is to fit the gear but not the drag brace, don’t glue the gear yet. Fold it into the retracted position secured with a small blob of blu Tak until all you painting is done. When ready, position it down, add the drag strut and glue.
 
Last edited:

Waspie

SMF Supporter
Joined
Mar 13, 2023
Messages
2,601
Points
113
Location
Portland - Dorset
First Name
Doug
Don’t forget the green tinted windows above the pilots. I used Tamiya clear green on the inside so you get the shiny clear finish on the outside.
Thanks Rick, I had actually forgotten about that!!! (Doh).

Just noticed on RN Kings, the tinting is predominantly blue!! But as mine is a RAF King - Green it will be!! :thumb2:
 
Top