Great work Allen. My experience with this type of kit very much seems to echo yours. I would spend ages building and painting sub-assemblies, then all of a sudden, it all came together. And then there was an aircraft in front of me.
You are using an out of date browser. It may not display this or other websites correctly.
You should upgrade or use an alternative browser.
You should upgrade or use an alternative browser.
Wingnut Wings 1/32 Halberstadt Cl.II (late)
- Thread starter Allen Dewire
- Start date
Jim R
SMF Supporter
Excellent work Allen. Glad life is treating you better.
- Joined
- Apr 28, 2018
- Messages
- 6,250
- Points
- 113
- First Name
- Bob
Lovely work, again Allen
Great looking plane, enjoying this very interesting build
Great looking plane, enjoying this very interesting build
Just caught up with Allen. Excellent progress and some beautiful details on display. This is another one of those kits I have in the stash so I have a special interest in this thread. Keep up the great work it looks excellent.
Paul
Paul
scottie3158
SMF Supporter
Really looking sweet dude. Glad to hear that life is back on track.
Evening folks,
People say 'time flies when you're having fun'....They lied...Time flies when you're OLD!!! Anyway, I'm late again as usual and luckily things are quiet (so far) across the big pond concerning my brother...I've also been busy setting up a trip to the EME (European Model Expo) with hotel reservations and tickets for 25-26 March........So,
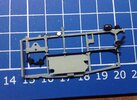
I've been still plugging away trying to get the pit done. A little painting, a few decals and threading the control wires through. While doing the decals, I came across decal #89 on the sheet and spent a half hour trying to find out where it goes in the instructions. I found where it went, looked at the part, but there was nothing to stick it to. HUH!!! I looked at the sprue layout pics and saw there was a round piece on the pit side frame for it. I must have pinged it off with my Bockwurst fingers while handling the part. I punched out a 2.5mm disk and glued it on,
While this was drying. I started working with the decals for the radio and the IP. The radio has 7 decals for it,
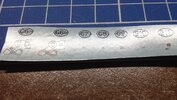
As you may see, some are rather very tiny and you have to lay two decals over each other for the dials. Luckily, the IP only has 4. After a while and some bad words, we had this,
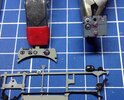
When the nerves are back to normal, I'll attempt the knob cap decals on the radio (G7-G10) or maybe just dab a drop of white on them. The IP was easy and the two on the right were filled with a drop of Micro Krystal Klear for the glass effect. Some of the decals are so small and here is an idea,
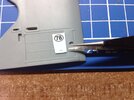
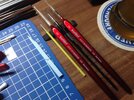
There are some that are even smaller too!!! There was a lot of touchups to do and it appeared my old brushes weren't up to the job being so old and worn out. Had to break out the good ones for this,
I then assembled the joystick stuff with the rigging and glued the fuel tank in. Now, it was time to test fit the pit with the driver's seat that is sandwiched between the frame panel parts. Here is where I found that the close tolerances of the parts played a major role in the build. If the seat doesn't sit 100% on top of the tank, the side support rods won't fit into the frame holes for them. Trimming and fiddling fixed that and the frame went together almost perfectly,
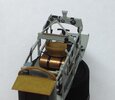
Nothing above is glued except the seat to the tank. The IP is notched to fit into the side frames and the side frames are slotted onto the flooring. I also ran the rigging through it to the rear. There are holes in the rear panel for the rigging too. Next was a test to see if/how the whole thing fit into the fuselage. It didn't, so some work was needed to enlarge the bigger receptacle holes in the fuselage sides. With that done, the two halves fit together (no pics). Here's what it looks like in the right half,
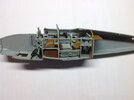
I'm happy with that, but there is still more to add for the fit test. Lastly, we ended up with this,
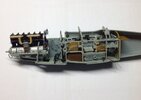
Again, nothing has a drop of glue on it as it was a test fit. The parts fit so well together and the tight. You do have to make sure that the minute mold lines are scraped/sanded off and any paint is also removed, or the parts won't fit the way they were designed to. This kit has tighter tolerances than the B-2 bomber!!! If you are 0.10mm off, the fit is off too. That is in no way a bad thing, but care is needed in assembling the parts.....
That all for this installment of 'How to Put You in a Coma', for now. Again, thank you all for looking in and your patience too. Have a good week!
Prost
Allen
People say 'time flies when you're having fun'....They lied...Time flies when you're OLD!!! Anyway, I'm late again as usual and luckily things are quiet (so far) across the big pond concerning my brother...I've also been busy setting up a trip to the EME (European Model Expo) with hotel reservations and tickets for 25-26 March........So,
Thanks Tim!. The Spandau was a beatch to do and keep it round...Looking very fine Allen. Spandau in particular is superb.
It was real work Dude 2. Just when you thought you were done, more little parts showed up in the instructions...Dude1.
Agree with the painting on those very small parts before fitting . Certainly coming on .
Love that Spandau Allen
Thanks too Neil! Spandau was also the prison in Berlin where Hess was kept till he kicked. I could tell you a good true story about what else was in there, but that's for another time...Spandau became a general term by the allied troops in ww2 for the German machine guns ,whether MG34 or MG42
It was Mark and their music was popular in the 80's. And it was also what I wrote Neil above too. Are you seasick yet???...Now ive googled what a spandau is(thought it was a ballet) i can say very nice job on the gun.

Thanks Bro, but I'm a little upset that you finished your Albatros without sharing your building tips with me. It's ok though and life is kinda up and down, still...Really looking sweet dude. Glad to hear that life is back on track.
Thank you tony and I'm fine. It's a long story about my brother though...I am trying not go too crazy, but this kit does call for the extra work and that isn't going too quickly, I'm afraid. I've never built a kit with such close tolerances as this one though...Fantastic work allen , and no need to apologize for any absence, as long as youre ok . The detail work and general loveliness of this build is great to see , the Spandau looks superb , the kit part with its solid holes just wouldnt have looked right especially at this scale so you were right to go for the PE . Keep up the excellent work mate , cheers tony
That is so true Colin!!! I've been doing and doing and slowly, I can see some progress. I figure this time next year, there could be a plane sitting in front of me. LOL!!!...Great work Allen. My experience with this type of kit very much seems to echo yours. I would spend ages building and painting sub-assemblies, then all of a sudden, it all came together. And then there was an aircraft in front of me.
Thanks Jim and life is a bit better. I do hope it stays that way my friend...Excellent work Allen. Glad life is treating you better.
You are too kind 'Admiral' Bob! I'm finding the history behind these flying machines really interesting too!!!Lovely work, again Allen
Great looking plane, enjoying this very interesting build
Great to see you Paul and thank you too! These kits are really well made and you should break yours out and have a go. The fit is incredible and the molding is first rate. Just wash the parts before you paint them though. There is something on the plastic that just hates paint...Just caught up with Allen. Excellent progress and some beautiful details on display. This is another one of those kits I have in the stash so I have a special interest in this thread. Keep up the great work it looks excellent.
Paul
I've been still plugging away trying to get the pit done. A little painting, a few decals and threading the control wires through. While doing the decals, I came across decal #89 on the sheet and spent a half hour trying to find out where it goes in the instructions. I found where it went, looked at the part, but there was nothing to stick it to. HUH!!! I looked at the sprue layout pics and saw there was a round piece on the pit side frame for it. I must have pinged it off with my Bockwurst fingers while handling the part. I punched out a 2.5mm disk and glued it on,

While this was drying. I started working with the decals for the radio and the IP. The radio has 7 decals for it,

As you may see, some are rather very tiny and you have to lay two decals over each other for the dials. Luckily, the IP only has 4. After a while and some bad words, we had this,

When the nerves are back to normal, I'll attempt the knob cap decals on the radio (G7-G10) or maybe just dab a drop of white on them. The IP was easy and the two on the right were filled with a drop of Micro Krystal Klear for the glass effect. Some of the decals are so small and here is an idea,

There are some that are even smaller too!!! There was a lot of touchups to do and it appeared my old brushes weren't up to the job being so old and worn out. Had to break out the good ones for this,

I then assembled the joystick stuff with the rigging and glued the fuel tank in. Now, it was time to test fit the pit with the driver's seat that is sandwiched between the frame panel parts. Here is where I found that the close tolerances of the parts played a major role in the build. If the seat doesn't sit 100% on top of the tank, the side support rods won't fit into the frame holes for them. Trimming and fiddling fixed that and the frame went together almost perfectly,

Nothing above is glued except the seat to the tank. The IP is notched to fit into the side frames and the side frames are slotted onto the flooring. I also ran the rigging through it to the rear. There are holes in the rear panel for the rigging too. Next was a test to see if/how the whole thing fit into the fuselage. It didn't, so some work was needed to enlarge the bigger receptacle holes in the fuselage sides. With that done, the two halves fit together (no pics). Here's what it looks like in the right half,

I'm happy with that, but there is still more to add for the fit test. Lastly, we ended up with this,

Again, nothing has a drop of glue on it as it was a test fit. The parts fit so well together and the tight. You do have to make sure that the minute mold lines are scraped/sanded off and any paint is also removed, or the parts won't fit the way they were designed to. This kit has tighter tolerances than the B-2 bomber!!! If you are 0.10mm off, the fit is off too. That is in no way a bad thing, but care is needed in assembling the parts.....
That all for this installment of 'How to Put You in a Coma', for now. Again, thank you all for looking in and your patience too. Have a good week!
Prost
Allen
A big thumbs up from me. The cockpit and engine are coming together and sit well in the fuselage. I love the detail you can put into WW1 subjects, they make for such wonderful display models. This will be no acception.
Terrific stuff
Paul
Terrific stuff
Paul
- Joined
- Apr 28, 2018
- Messages
- 11,038
- Points
- 113
- First Name
- Jakko
Spandau is, of course, a Bezirk (“district”, more or less) of Berlin where that prison was located, and also where the weapons factory of DWM (Deutsche Waffen- und Munitionsfabriken) was — which made the MG 08, giving it the nickname “Spandau” in some circles. That nickname was transferred to the MG 34 and 42 in the next world war by some.Spandau was also the prison in Berlin where Hess was kept
Wow, now that everyone is having a Nickerchen (nap). I can slip in an update and at the end, shout real loud and wake everyone up!!!
I decided not to wait until our crap weather got better. High winds, with a mix of rain and snow, I threw the hose out the window and fired up the hissy stick. After some masking, I sprayed the fuselage interior with some Tamiya Desert Yellow. I cleaned the AB and also sprayed the turret for my Panther too. Too much rain and wind, but without paint, the build would be stalled until spring. Anywho,
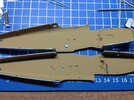
Of course, before you could move on, you have to add a few tidbits like the generator clutch lever (top) and the grease pump (bottom) to the inside. These will never be seen again, but they're there. Now was the time to do the thing a lot of people love so much........Seatbelts...WnW's gives you a set on the etch fret. I'm not a fan of them, but I don't have any HGW sets for WWI wing thingy's. I had to try and use the kit pieces and I spent many hours trying to bend them correctly in the confines of the built-up cockpit. Thinking they were good to go, I coated them in Mr. Metal Primer and 15 hours later, painted them up. After they dried overnight, I attempted to CA them in place.......Now, I hate etch seatbelts even more!!! In the end, we had this,
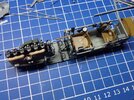
Ok, they really aren't too bad...I had to CA the pilot's belt buckles to the seat, but there wasn't a thing I could do with the observer's belts. I attempted to bend them a bit and got scared they would pop off, so I just left them as they were. I hope to put a fig inside, so maybe they won't be seen. We were now getting near the magic moment of putting the fuselage together, for good. I went back and scoured the instructions to see if I had missed any parts that needed to be added. Of course, there were a few!!!...
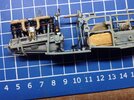
The cooling hose from the water pump (behind the oil pan) to the motor cylinder (in front of the IP), that snakes around the magneto. Also, the cooling hose that that comes down from the radiator on the upper wing, to the water pump on the other side. Here, you can see the control lines from the joystick that go to the flappy things on the rear. I added the radio and a few more things and hoped for the best,
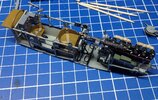
Putting this aside, I went about building and painting the observer's MG. He definitely was a very busy person during a mission. Radio comms, throwing grenades/bombs, shooting at other aircraft, map reading and shouting instructions to the pilot. His puppy,
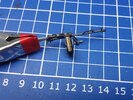
I still have to paint the wood stock and grip and the ammo drum housing. The 2 bare spots are where the Ogie scope mounts on the MG. I put the cockpit into the right fuselage half as a test for fit. Wow!!! But that's for the next post, as well as adding the left side too!!! I can only say (didn't take pics), 3 thumbs up to whoever designed and molded these kitsets!!!!!!!........
NOW, Wake the hell up!!! More tomorrow and some history too...Thanks for having a look and have a great night...
Prost
Allen
You are much too kind Paul! Thank you for kind words and I hope I will not make a mess of this. So far, so good Sir...A big thumbs up from me. The cockpit and engine are coming together and sit well in the fuselage. I love the detail you can put into WW1 subjects, they make for such wonderful display models. This will be no acception.
Terrific stuff
Paul
Yes, very true Jakko and I think about 96% of the folks on here know that Spandau was a district in Berlin. After all, it was in the British Sector before the fall of the wall. A lot of it survived the war and is a true representation of the old Berlin. It also had the best Christmas Market in the whole city in the 80's. It was large and Glühwein for 1 DM was a great thing!!! The U-Bahn ride home was always iffy, as you never knew where you would end up after the heat in the U-Bahn put you to sleep. Cold temps + lotsa Glühwein, then warm ride = serious nap time and not changing U-Bahns at Bahnhof Zoo, like you had to........Spandau is, of course, a Bezirk (“district”, more or less) of Berlin where that prison was located, and also where the weapons factory of DWM (Deutsche Waffen- und Munitionsfabriken) was — which made the MG 08, giving it the nickname “Spandau” in some circles. That nickname was transferred to the MG 34 and 42 in the next world war by some.
Easy Brother!!! Thanks, but we ain't there yet and you know about the seatbelt crap...It does get better though. See below...Wow Dude , just Wow .
I decided not to wait until our crap weather got better. High winds, with a mix of rain and snow, I threw the hose out the window and fired up the hissy stick. After some masking, I sprayed the fuselage interior with some Tamiya Desert Yellow. I cleaned the AB and also sprayed the turret for my Panther too. Too much rain and wind, but without paint, the build would be stalled until spring. Anywho,

Of course, before you could move on, you have to add a few tidbits like the generator clutch lever (top) and the grease pump (bottom) to the inside. These will never be seen again, but they're there. Now was the time to do the thing a lot of people love so much........Seatbelts...WnW's gives you a set on the etch fret. I'm not a fan of them, but I don't have any HGW sets for WWI wing thingy's. I had to try and use the kit pieces and I spent many hours trying to bend them correctly in the confines of the built-up cockpit. Thinking they were good to go, I coated them in Mr. Metal Primer and 15 hours later, painted them up. After they dried overnight, I attempted to CA them in place.......Now, I hate etch seatbelts even more!!! In the end, we had this,

Ok, they really aren't too bad...I had to CA the pilot's belt buckles to the seat, but there wasn't a thing I could do with the observer's belts. I attempted to bend them a bit and got scared they would pop off, so I just left them as they were. I hope to put a fig inside, so maybe they won't be seen. We were now getting near the magic moment of putting the fuselage together, for good. I went back and scoured the instructions to see if I had missed any parts that needed to be added. Of course, there were a few!!!...

The cooling hose from the water pump (behind the oil pan) to the motor cylinder (in front of the IP), that snakes around the magneto. Also, the cooling hose that that comes down from the radiator on the upper wing, to the water pump on the other side. Here, you can see the control lines from the joystick that go to the flappy things on the rear. I added the radio and a few more things and hoped for the best,

Putting this aside, I went about building and painting the observer's MG. He definitely was a very busy person during a mission. Radio comms, throwing grenades/bombs, shooting at other aircraft, map reading and shouting instructions to the pilot. His puppy,

I still have to paint the wood stock and grip and the ammo drum housing. The 2 bare spots are where the Ogie scope mounts on the MG. I put the cockpit into the right fuselage half as a test for fit. Wow!!! But that's for the next post, as well as adding the left side too!!! I can only say (didn't take pics), 3 thumbs up to whoever designed and molded these kitsets!!!!!!!........
NOW, Wake the hell up!!! More tomorrow and some history too...Thanks for having a look and have a great night...
Prost
Allen
Mark1
SMF Supporter
Great job so far Allen all looking very nice indeed.
Very nice! Looks excellent Allen. Never knew these WW1 birds were fitted with radio…..
Scratchbuilder
SMF Supporter
Hello Younger than me,
Just caught up on your wingy thingy build, and mightily impressed I am. Are you going to be making your own turnbuckles for the rigging or obtaining a set from Gaspatch which are really well worth the sheckles you have to pay out - works out to about four bottles of your beer - unopened...
Will be looking forward to more of this build, keep up the great work.
Take care - Prost
Older than you...
Outstanding work Allen.
Neil Merryweather
SMF Supporter
Ooh Allen that's rather wonderful!
Jim R
SMF Supporter
That is real quality work Allen. Looks so neat and full of detail.
Morning All,
Just when you thought it was safe, he's baaaack!!!............(I took pics, cause I forgot yesterday)
Puppy Love Olderthanme...Sorry to hear about your 'incident' and hope you are healing well with no tendon damage Mike. I have a set of Gaspatch turnbuckles in the stash too. What's nice is the holes for them are already pre-drilled and they fit perfectly. This will be a first for me with the rigging. Luckily, I also got my hands on some Infini 0.135 elastic rigging material too. Unfortunately, the buckles cost me about a half case of Wagner's finest beer though, but it's no biggie. Take care of yourself Buddy and I'll PM you later today...
I worked this pic below to show the contact points for holding the pit in place. The red circles are the main contact areas, and the blue area is for when you added the radio mount plate.
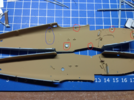
I first put the pit in the right fuselage half and had to use tweezers to press the pins into the holes. The radio plate mounts (blue circle) were the only 2 points that didn't fit 100%. They were about 0.4 mm off. No big deal as I had shaved the mount pins off a bit too much anyway. I then carefully, added the left fuselage half. Again, I had to use some pressure and the tweezers to fit the pins. Voila,
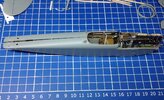
The pit fit tighter than a duck's butt and the pins hold it all together without any glue. None of the cockpit frame saw any glue and only the accessories were glued in place. Even the MG is fitted without glue and it stays where it should be. Totally amazing!!! When I do glue the fuselage together, it should work very well. The rear wing will squeeze the tail section together and,
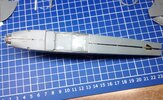
the bottom cover plate will hold the belly together. Again, a few strips of tape will hold the front and forward tail tight while it dries. I'll start at the rear and carefully glue my way to the front, flip her over and do the same on the top. The big thing will be the alignment of them to avoid having to use putty on the seam afterwards. Another pic,
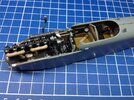
Once it's dried, the fun will begin...I have to mask this whole mess to shoot the camo on the fuselage. I have a plan and I'll have to be really careful not to bust anything off. I see I have to touch up the oil pump with a spot of old brass (below the MG). Must have scraped it with the tweezers while mounting it. The radio and amp are barely visible too. The crank wheel on the side is to raise and lower the radio arial while in flight,
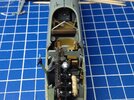
The radio and amp are in there though!!! When you squeeze the halves together, the 2 gun ring horns move up into place perfectly above the radio. They will have to be masked too.......
Lots more to do and I hope to get the fuselage glued together today. I'll let it dry overnight and then see where we stand with the join...
Thank you all once again for your comments, likes and interest in this fun thang!!! Hats off to WnW's too, for a really well engineered kitset. Have a good one and until next time...
Prost
Allen
Just when you thought it was safe, he's baaaack!!!............(I took pics, cause I forgot yesterday)
Thank you Mark. I think finally progress is being made...Great job so far Allen all looking very nice indeed.
Thanks too Tim! I really didn't think they did either. They had wireless radios and the case on the side frame was the amplifier for it. Not all planes carried radios though. I'll have to dig deeper for some more info...Very nice! Looks excellent Allen. Never knew these WW1 birds were fitted with radio…..
Easy Andrew, you are giving me a swelled head (not a hangover), here!!! Much appreciated my friend...Allen,
That really is outstanding. Simply outstanding. It looks a great too.
Very well done.
Andrew
MornHello Younger than me,
Just caught up on your wingy thingy build, and mightily impressed I am. Are you going to be making your own turnbuckles for the rigging or obtaining a set from Gaspatch which are really well worth the sheckles you have to pay out - works out to about four bottles of your beer - unopened...
Will be looking forward to more of this build, keep up the great work.
Take care - Prost
Older than you...
Thanks Boss! I still have to ketchup with your 'Katy' build too. Too many builds and not enough hours in the day...Outstanding work Allen.
Why thank you Mr. Merryweather! So kind of you to say Sir! We (try) aim to please, your aim helps...Ooh Allen that's rather wonderful!
A big thanks too Jim! You can see I got lazy and didn't paint parts that wouldn't be seen though. So far, so good my friend...That is real quality work Allen. Looks so neat and full of detail.
Thanks Brother! I'm calm now and we (luckily) didn't have any snow, yet! See below...Being too hard on your self there Dude 1,those seat belts look ok . Time for a walk I thing in the snow to cool you down
I worked this pic below to show the contact points for holding the pit in place. The red circles are the main contact areas, and the blue area is for when you added the radio mount plate.

I first put the pit in the right fuselage half and had to use tweezers to press the pins into the holes. The radio plate mounts (blue circle) were the only 2 points that didn't fit 100%. They were about 0.4 mm off. No big deal as I had shaved the mount pins off a bit too much anyway. I then carefully, added the left fuselage half. Again, I had to use some pressure and the tweezers to fit the pins. Voila,

The pit fit tighter than a duck's butt and the pins hold it all together without any glue. None of the cockpit frame saw any glue and only the accessories were glued in place. Even the MG is fitted without glue and it stays where it should be. Totally amazing!!! When I do glue the fuselage together, it should work very well. The rear wing will squeeze the tail section together and,

the bottom cover plate will hold the belly together. Again, a few strips of tape will hold the front and forward tail tight while it dries. I'll start at the rear and carefully glue my way to the front, flip her over and do the same on the top. The big thing will be the alignment of them to avoid having to use putty on the seam afterwards. Another pic,

Once it's dried, the fun will begin...I have to mask this whole mess to shoot the camo on the fuselage. I have a plan and I'll have to be really careful not to bust anything off. I see I have to touch up the oil pump with a spot of old brass (below the MG). Must have scraped it with the tweezers while mounting it. The radio and amp are barely visible too. The crank wheel on the side is to raise and lower the radio arial while in flight,

The radio and amp are in there though!!! When you squeeze the halves together, the 2 gun ring horns move up into place perfectly above the radio. They will have to be masked too.......
Lots more to do and I hope to get the fuselage glued together today. I'll let it dry overnight and then see where we stand with the join...
Thank you all once again for your comments, likes and interest in this fun thang!!! Hats off to WnW's too, for a really well engineered kitset. Have a good one and until next time...
Prost
Allen
scottie3158
SMF Supporter
Dude,
Apologies my friend I have missed the updates. But now I have caught up WOW and you wanted tips from me, I don't think so mate. Cracking work keep it coming.
Apologies my friend I have missed the updates. But now I have caught up WOW and you wanted tips from me, I don't think so mate. Cracking work keep it coming.
