Coming along very nicely indeed.
You are using an out of date browser. It may not display this or other websites correctly.
You should upgrade or use an alternative browser.
You should upgrade or use an alternative browser.
Wingnut Wings 1/32 Halberstadt Cl.II (late)
- Thread starter Allen Dewire
- Start date
Superb Allen. Don’t envy you the masking though, quite a lot of fragile stuff in there to snag it…..
Jim R
SMF Supporter
So nice to have such a good fit that you don't risk messing up parts already painted with glue. As Tim says masking will be fun!!
Andy the Sheep
SMF Supporter
My name's Andrea and I'm an Allen's WnW build addict. 
I'm impatiently waiting for the next steps, but, please, leave all impatience to me

I'm impatiently waiting for the next steps, but, please, leave all impatience to me

Just me again,
bug truck build. I will later...
Not really an update, but I'm so glad I didn't glue the fuselage together earlier. Once again, I perused the instructions all the way through, and found I had again missed an important step..........Can you say, Rigging???...Yup I needed to rig the control cables for the flappies and the fin steering thing on the back end, from the inside. That took up the afternoon, but I got it done without pulling the fuselage back apart. Sorry, no pics.......
As I said before, the masking will be very important to paint the fuselage. There are 7 colors used in the camo on it. I will definitely need to work up my hissy stick skills for that. Wings are just lozenge decals and will be a huge test too. I must be crazy!!!.......
Thanks again one and all for dropping in and watch this space....I need a cold one, or three...........
Prost
Allen
You never need to apologize Bro!!! I can't keep up with 1/2 of what's going on here. The people need to slow down building stuff or get jobs or something!!!...Thanks for the kind words and I'm sure you still have some cool tips up your sleeve though, Paul...Dude,
Apologies my friend I have missed the updates. But now I have caught up WOW and you wanted tips from me, I don't think so mate. Cracking work keep it coming.
Thank you Ian and I'm sorry I couldn't find my flyswatter in time to check out your finished FireComing along very nicely indeed.
Thanks Tim and masking will be fun. I think wrapping the rad hose in saran wrap and making a canopy for the rest might do the trick. My foam pieces really won't work this time and the masking has to hold out for 7 sprayings...Superb Allen. Don’t envy you the masking though, quite a lot of fragile stuff in there to snag it…..
You are crazy Andrea!!! Love it!! I think a nice bottle or 3, of Bardolino or your favorite grape will cure you of your addiction my friend. if not, then maybe matron might be your only hope!!!...My name's Andrea and I'm an Allen's WnW build addict.
I'm impatiently waiting for the next steps, but, please, leave all impatience to me
Thanks too John!!! I am dreading the next few steps and doing the wings though....Coming on excellently, Allen.
John.
Well Steve, you probably know more about them than I do. They are fascinating things for their time and must have been pretty wild to fly around in. I guess I have, sort of, caught the WWI wing thingy bug. Wingnut kits are truly great to build and I think the kits are smarter than I am sometimes. Thank you for looking in too, Sir...That looks great.
I confess that I had to look this aeroplane up, as I don't know much about WW1 era machines. I can see you've got some challenges ahead, but if you carry on like this I doubt they'll bother you
Not really an update, but I'm so glad I didn't glue the fuselage together earlier. Once again, I perused the instructions all the way through, and found I had again missed an important step..........Can you say, Rigging???...Yup I needed to rig the control cables for the flappies and the fin steering thing on the back end, from the inside. That took up the afternoon, but I got it done without pulling the fuselage back apart. Sorry, no pics.......
As I said before, the masking will be very important to paint the fuselage. There are 7 colors used in the camo on it. I will definitely need to work up my hissy stick skills for that. Wings are just lozenge decals and will be a huge test too. I must be crazy!!!.......
Thanks again one and all for dropping in and watch this space....I need a cold one, or three...........
Prost
Allen
Last edited:
I know there are lots of potential problems in the build, but you will breeze through them with your skills. Going to be great when you finish it Allen……Just me again,
You never need to apologize Bro!!! I can't keep up with 1/2 of what's going on here. The people need to slow down building stuff or get jobs or something!!!...Thanks for the kind words and I'm sure you still have some cool tips up your sleeve though, Paul...
Thank you Ian and I'm sorry I couldn't find my flyswatter in time to check out your finished Firebugtruck build. I will later...
Thanks Tim and masking will be fun. I think wrapping the rad hose in saran wrap and making a canopy for the rest might do the trick. My foam pieces really won't work this time and the masking has to hold out for 7 sprayings...
You are crazy Andrea!!! Love it!! I think a nice bottle or 3, of Bardolino or your favorite grape will cure you of your addiction my friend. if not, then maybe matron might be your only hope!!!...
Thanks too John!!! I am dreading the next few steps and doing the wings though....
Well Steve, you probably know more about them than I do. They are fascinating things for their time and must have pretty wild to fly around in. I guess I have, sort of, caught the WWI wing thingy bug. Wingnut kits are truly great to build and I think the kits are smarter than I am sometimes. Thank you for looking in too, Sir...
Not really an update, but I'm so glad I didn't glue the fuselage together earlier. Once again, I perused the instructions all the way through, and found I had again missed an important step..........Can you say, Rigging???...Yup I needed to rig the control cables for the flappies and the fin steering thing on the back end, from the inside. That took up the afternoon, but I got it done without pulling the fuselage back apart. Sorry, no pics.......
As I said before, the masking will be very important to paint the fuselage. There are 7 colors used in the camo on it. I will definitely need to work up my hissy stick skills for that. Wings are just lozenge decals and will be a huge test too. I must be crazy!!!.......
Thanks again one and all for dropping in and watch this space....I need a cold one, or three...........
Prost
Allen
So sorry Jim, I missed you in my replies earlier. Brain fart I guess!!! In reality, there is no real way to glue the pit in place after the fuselage is together. And there is no way it could fall apart once it's in there. Great thought when the kit was made. Masking???...Yea it could be tricky, but like I said to Tim, it has to stand up for 7 different color paints on each other. Then a clear coat, decals and then a matt coat on top. I'm nervous my friend...So nice to have such a good fit that you don't risk messing up parts already painted with glue. As Tim says masking will be fun!!
I don't know Tim. A few points are scary when I think about them. the lozenge wing decals are the biggest. Thanks for having faith in me Sir. Time will tell.......I know there are lots of potential problems in the build, but you will breeze through them with your skills. Going to be great when you finish it Allen……
Evening all, from a warm and still windy Bamberg,
Progress has been slowly moving along and after getting the rigging done, from the inside, I could finally glue the 2 halves together. I started in the front and moved my way to the rear,
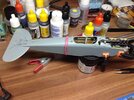
I only like to use 2 clamps as my other ones don't open wide enough. You can see thegranny hairs rigging sticking out of the backside. I glued the next section,
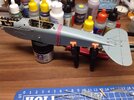
Everything went together quite well and didn't pop apart. While the fuselage was drying, I found more things that needed paint and after looking at some ref pics, did some mods, along with assembling the landing gear,
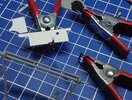
The pics showed the observer's MG had a front sight, so I nipped off the sight from the etch sheet, sawed a slit in the front sight of the MG and CA'd it in place. I still have to add the decal to the Oigee sight and glue it on the MG too. Then comes the ammo drum and that MG thing is finished. After the fuselage had dried, I did a test fit of the steering thing on the rear fin,
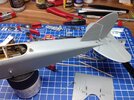
Perfect fit and the only downside was accidently nipping off one of the rigging cables...Oops, Dumb moment...As this sits fixed with a pin into the fuselage, you have the option to do this,
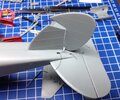
I might give the big fin thing some character and turn it. As I said, it was warm today (16° C), I decided to give the main wings a coat of paint to prep them for the lozenge decals. I use Tamiya paints as I find they have more bite than normal acrylics. Unfortunately, I don't have any that are gloss. I have a bottle of X-22, so I mixed a combo of German gray, XF-62, X-22 and IPA, using my GGFGS* method. I got it wrong, as I didn't use enough X-22 to offset the matt German gray. It went down great, but wasn't even a satin finish to the eye. I let that dry and decided to shoot a coat of X-22 and IPA to shine it up some...
Now my kitchen counter is about 2 meters away from my spray booth and I mix my paint in a syringe on the counter, then take the syringe to my booth. I had cleaned my AB and the nozzle/needle sat on my counter. I went to shoot some IPA, to make sure the AB was clear, grabbed the nozzle/needle, and screwed it on the AB. I began to shoot and the IPA bubbled out of the cup cap. Huh!!!...Tried it again and...Huh!!! I then screwed the nozzle off and....!!!!!!.....Play the Twighlight Zone theme loudy........The needle was GONE!!!!!!...WTF!!! It fits tightly into the nozzle, so there is (usually) no way it could fall out. We're talking about this,
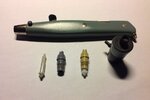
The white needle on the left that goes into the gray nozzle and looks like the tan piece on the right when inserted. Never had a prob before, so I guess today was my (un)lucky day. Grabbed the flashlight and went about looking for it on my hands and knees. I have tan marbled linoleum in the kitchen and similar colored wood flooring in the living room. Looked everywhere, for an hour, and it was nowhere to be found!!! I then broke out my other 0.4 white needle, from an ancient single action and shot the gloss on. The whole time, with the damn music from the Twilight Zone playing in my head!!! In the end, we had this,
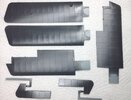
It still doesn't look too glossy (bad pic), but should do the job when applying thenasties decals. I went with dark gray hoping it would dull/darken the lozenge decals when I put them on. At least that's the plan...
I will do another search in the morn and maybe get lucky and find it...And everybody thought Rod Serling was long gone...Thanks for your time and for looking in on this (mis)adventure. I hope you all have a great week and plenty of bench time...Need beer!!!...
Prost
Allen
Note...* GusGoFastGuesstimationSystem
Progress has been slowly moving along and after getting the rigging done, from the inside, I could finally glue the 2 halves together. I started in the front and moved my way to the rear,

I only like to use 2 clamps as my other ones don't open wide enough. You can see the

Everything went together quite well and didn't pop apart. While the fuselage was drying, I found more things that needed paint and after looking at some ref pics, did some mods, along with assembling the landing gear,

The pics showed the observer's MG had a front sight, so I nipped off the sight from the etch sheet, sawed a slit in the front sight of the MG and CA'd it in place. I still have to add the decal to the Oigee sight and glue it on the MG too. Then comes the ammo drum and that MG thing is finished. After the fuselage had dried, I did a test fit of the steering thing on the rear fin,

Perfect fit and the only downside was accidently nipping off one of the rigging cables...Oops, Dumb moment...As this sits fixed with a pin into the fuselage, you have the option to do this,

I might give the big fin thing some character and turn it. As I said, it was warm today (16° C), I decided to give the main wings a coat of paint to prep them for the lozenge decals. I use Tamiya paints as I find they have more bite than normal acrylics. Unfortunately, I don't have any that are gloss. I have a bottle of X-22, so I mixed a combo of German gray, XF-62, X-22 and IPA, using my GGFGS* method. I got it wrong, as I didn't use enough X-22 to offset the matt German gray. It went down great, but wasn't even a satin finish to the eye. I let that dry and decided to shoot a coat of X-22 and IPA to shine it up some...
Now my kitchen counter is about 2 meters away from my spray booth and I mix my paint in a syringe on the counter, then take the syringe to my booth. I had cleaned my AB and the nozzle/needle sat on my counter. I went to shoot some IPA, to make sure the AB was clear, grabbed the nozzle/needle, and screwed it on the AB. I began to shoot and the IPA bubbled out of the cup cap. Huh!!!...Tried it again and...Huh!!! I then screwed the nozzle off and....!!!!!!.....Play the Twighlight Zone theme loudy........The needle was GONE!!!!!!...WTF!!! It fits tightly into the nozzle, so there is (usually) no way it could fall out. We're talking about this,

The white needle on the left that goes into the gray nozzle and looks like the tan piece on the right when inserted. Never had a prob before, so I guess today was my (un)lucky day. Grabbed the flashlight and went about looking for it on my hands and knees. I have tan marbled linoleum in the kitchen and similar colored wood flooring in the living room. Looked everywhere, for an hour, and it was nowhere to be found!!! I then broke out my other 0.4 white needle, from an ancient single action and shot the gloss on. The whole time, with the damn music from the Twilight Zone playing in my head!!! In the end, we had this,

It still doesn't look too glossy (bad pic), but should do the job when applying the
I will do another search in the morn and maybe get lucky and find it...And everybody thought Rod Serling was long gone...Thanks for your time and for looking in on this (mis)adventure. I hope you all have a great week and plenty of bench time...Need beer!!!...
Prost
Allen
Note...* GusGoFastGuesstimationSystem
Thanks Tony, I'm trying...No, I just ran some water through it in the sink to wash out the IPA. I put it back together and laid it on a paper towel on the counter. When I went to screw it back on the AB, BOOM, it was gone... I hope to finally find it in the morn. If not, I still have the other one and a 0.3 (tan one) to use. Really weird though!!!...
Prost
Allen
Prost
Allen
scottie3158
SMF Supporter
Dude, Outstanding mate.
That’s an Aztec airbrush Andrew, no longer made I think. I used one for a few years prior to my Iwatta. Mine was very air hungry, I found my old AS186 could not keep up, and my smart jet struggles. Still got it, but not used it for ages. The nozzles are easily changed for different set ups, grey being general purpose and the one I used most. It was a decent modellers tool, being able to be set up as both single and double action using the roller in the handle. I think Jakko uses one as well.Looking very good Allen and hope you find the missing AB part.
What airbrush do you have? Not seen one of those before.
ATB
Andrew
- Joined
- Sep 4, 2019
- Messages
- 9,561
- Points
- 113
- First Name
- Andrew
Thanks Tim!That’s an Aztec airbrush Andrew, no longer made I think. I used one for a few years prior to my Iwatta. Mine was very air hungry, I found my old AS186 could not keep up, and my smart jet struggles. Still got it, but not used it for ages. The nozzles are easily changed for different set ups, grey being general purpose and the one I used most. It was a decent modellers tool, being able to be set up as both single and double action using the roller in the handle. I think Jakko uses one as well.
Scratchbuilder
SMF Supporter
Coming along at a fair rate Youngerthan me, Pity you lost the needle, I have the same problem with my hair... (More scary science fiction music....)
Cheers
Olderthan you.
Cheers
Olderthan you.
Morning from the Twilight Zone Folks,
Rod Serling decided to give me back my AB needle earlier. I found it under my spray booth stand in a blind spot, along with a few dust bunnies too. Thanks for the concern everyone...
So now that I can drive on and spray the tail wing/fin things white, our temps went back in the toilet...I'll wait and see what this afternoon brings. I also need to finally change the filter in the booth. The gray nose boogers told me so...........
Prost
Allen
Rod Serling decided to give me back my AB needle earlier. I found it under my spray booth stand in a blind spot, along with a few dust bunnies too. Thanks for the concern everyone...
It's all good Dude 2!!! I use the GGFGS method all the time for everything. The same with the Gazinta Method. You know, 4 gazinta 8 = 2 and the like...Sorry to read of your missing needle Dude1, my laugh on your post was for the GGFGS. I use a very similar one , but normally it ends in
Thanks so much Bro!!! Getting there slowly, but surely now...Dude, Outstanding mate.
Thanks Andrew and Tim summed up the AB very well. I bought this one back in the mid 90's from the PX when I was in the Army. It was sold under the brand name Testors and sat in the reduced wares bin for ages. When it was 75% off + 10% more, I snagged it up. Original price was $149.00. It's pretty bullet proof and has a lifetime guarantee. Hope I never need to use it, especially if they aren't in business anymore. It's easy to clean and use for a ham-fisted fool like me. I've never had a prob with air usage with it though...Looking very good Allen and hope you find the missing AB part.
What airbrush do you have? Not seen one of those before.
ATB
Andrew
I'm starting to have that prob too. Olderthanme!!! I just don't get any scary Sci Fi music to go with the loss.....Yet........Coming along at a fair rate Youngerthan me, Pity you lost the needle, I have the same problem with my hair... (More scary science fiction music....)
Cheers
Olderthan you.
So now that I can drive on and spray the tail wing/fin things white, our temps went back in the toilet...I'll wait and see what this afternoon brings. I also need to finally change the filter in the booth. The gray nose boogers told me so...........
Prost
Allen
Jim R
SMF Supporter
