Hi,
these are my update photos (if I can post?) I’ll be happy to answer any questions.View attachment 493883
these are my update photos (if I can post?) I’ll be happy to answer any questions.View attachment 493883
I see there are internal details too. That's an interesting "spicing up" of that old kit.
P.S.: Welcome to this forum, Paul.
That would be correct - for the much and nicely improved kit. But the above is a 1976 toolingI thought it was from around 2014. The older Tamiya kits are maybe less accurate and some were "motorised" but with a bit of effort can build up nicely. I'll enjoy seeing how you get on.
I know the video and it’s pretty good and they have actually done a great job with its restoration. Only thing is it’s a museum piece which more often than not colours are wrong - not a biggy because there was not really a standard but the other thing is that there is no ammo! When the vehicle is loaded up you quickly realise that the inside is just a giant oven with a few seats, a breach, a transmission, fuel tanks and ammo everywhere.Nice, the sleek look of this vehicle always appealed to me.
BTW, for those wondering what the inside of one of these was like:
Not quite the same version, but it’ll do for a good impression.

HI Paul you have not rambled on instrestin on what you are doin but tanks not my thing but how you exsplained what you are doin was good as thats what this forum is all about well done sirWell gentlemen nothing tonight except some backlog. It’s a decent kit but needs a lot of tweaks to get the best out of it.
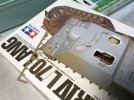
First of all the interior: The kit has no sponsons (the metal sheet that normally goes over the tracks and where ammo is quite often stored. They had to be measured up with all manner of things like callipers etc simply because the shape is irregular. Thankfully this won’t be an issue in the other newer kits (Tamiya, Dragon, Borders)
The roof is fixed. Nothing much one can do except move on.
The fire wall is the first thing to be built along with trying to hack away at the old toy battery holders on the floor and then laying over some sheet plastic.
The Camden shaft was next. That was a struggle until I discovered a better method. Basically 2 pieces of kit sprue one atop the other, cut to size then a sheet of thin plasticard wrapped over and stuck with superglue.
The fuel tanks got me some very good practice with the basics of scratch building. The 2 fuel ports needed to be drilled out and the fore one had to have some 90 degree warped pipe that went into the fuel tank. You can’t really see it but it’s there.
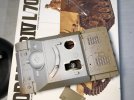
Now I had the basic parameters for the inside schematic so I could add battery boxes, radios on a frame, radio batteries etc, wires, seats, breathing tubes, gas mask canisters etc etc.
The breach was scratch built next after the fume extractor was made - this was quite the pain but in times like this one needs not to panic! The extractor bends down and angles to the left - after some pensive moments I got away with supergluing it in place.
The other more visible pipe is for heating (I think). It runs at all different angles and was made of sprue. There seems to be a foot rest for the loader so I made that and put on an anti slip plate. I always try to steer away from conjecture but none of my reasonable sources said much about this pipe or its weird route. It ends in the Camden shaft under an angled plate. Maybe for ejected shell cases?
There were no periscopes in this kit, either the 2 fixed or the revolving one in the commander‘s hatch so I made one and scrounged periscopes from my spares along with some panther shells to fit inside. Also I hung up an MG 42 using foil straps on the gunners side. It is hardly visible.
Which brings me to the elephant in the room. I’ve seen some great kits built with very good interiors that have a shell case canvas catcher underneath. Its my believe that these were never fitted simply because there was no room under the breach due to how low the jagdpanzer L/48 & L/70 were to the ground. If a bag was fitted the gun would have trouble with elevation.
I have a little bit of touching up to do then I’m done with the interior except for the very important scissor scope.
External:
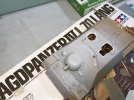
All the basic dimensions seem to be surprisingly accurate. Only the main gun is too short so I lopped it off and scavenged one and had it fitted after drilling to barrel screw holes which are not present in the kit.
some screw holes and rivets also needed to be added as well as the pivot barrel traversing plate and screws on top of the mantle.
The Shürzten was the wrong size but only in so far as one plate was too long (it’s a one piece job) so I sawed it off, cut it down to size and left it separate for more realism. The other perplexing thing that had me doing a lot of head scratching was the actual fitting points of the skirts. I stared at the profile, stared at the kit for an hour. The plates were now the right size but were now too far apart from the detached one (and 2 other ones on the other side) How?!
Then I realised it wasn’t the dimensions of the plates it was the actual fitting of the front plate - it was too far forward. In it’s original form the side skirts would be too far forward covering all of the sprocket in the process.
Just to add that the side skirts are too thick and need some thinning down. The actual ones were only 5mm thick or 0.14 mm thick in 35th scale! No need to go that crazy but I still need to continue working on that. Some of the plates have been done and look much better (rather than being about 30mm thick!)
The roof needs bolt holes as it was bolted down as a single piece. The gunners sight was very incorrectly placed, being placed too far over to the right. Impossible for the gunner to have his sight on top of the breach so that had to be cut out and rebuilt.
Ok, nearly done. I’m sorry I’ve rambled on. I hope some of you are like me
I may need to use some spare Dragon tools in place of the kit ones because of wrong sizes etc but more of that later.
Thats it for now! Thank you for your comments!
OTOH, it was a canvas bag, so elevating the gun would just have collapsed it when it hit the floor. Not great if it’s filled with a couple of empty cases, of course, but there are worse things to have happen.I’ve seen some great kits built with very good interiors that have a shell case canvas catcher underneath. Its my believe that these were never fitted simply because there was no room under the breach due to how low the jagdpanzer L/48 & L/70 were to the ground. If a bag was fitted the gun would have trouble with elevation.
 After attaching photos to your message, click on the text
 Insert… at the top left of one:
Thumbnail and Full image:
Noted! Thanks for the pointer!OTOH, it was a canvas bag, so elevating the gun would just have collapsed it when it hit the floor. Not great if it’s filled with a couple of empty cases, of course, but there are worse things to have happen.
BTW, you can insert the photos into the text of your narrative, which will make it much easier to followInsert…at the top left of one:
… and it will change toThumbnailandFull image:
Click on the first if you want a postage stamp-sized version in the message, on the other to have the full picture instead. This way, you can put them in between the text to illustrate what you’re talking about.
For FULL Forum access you can upgrade your account here UPGRADE