This is pretty much what I have gone for, so good to know I am on the right track.Exactly the way I did mine, But I glued the front fender piece to the rear fender piece on the chassis. I also started building the storage lockers and glued the pieces together. It looked like this,
- Home
- Forums
- Group Builds
- The New Group Builds (2017 on)
- The User Created Group Builds
- 2022 Builds
- Dave's Half track GB: Sept - Nov 2022
You are using an out of date browser. It may not display this or other websites correctly.
You should upgrade or use an alternative browser.
You should upgrade or use an alternative browser.
Ian M's Sd.Kfz.8 12t half track. Trumpeter. 1/35.
- Thread starter Ian M
- Start date
Jim R
SMF Supporter
Taking notes 


Panzerwrecker
SMF Supporter
- Joined
- Mar 2, 2022
- Messages
- 362
- Points
- 93
- First Name
- Los
The suspension set up on the later 7 I am building is slightly different to that of this early variant. I haven't built this kit but I would have thought you can build up the body as a seperate sub assembly though. The only dilemma could maybe be the steering wheel shaft through the bulkhead and whether the fully built up main bodywork integrates off the chassis with the metalwork over the engine.Hi Ian
That's looking really good. Lovely neat work.
I'm waiting to see how you and Los tackle that issueI have no doubt you'll come up with a plan.
I do know the engine will not fit in the bay once both the bulkhead and radiator housing are fitted.
Panzerwrecker
SMF Supporter
- Joined
- Mar 2, 2022
- Messages
- 362
- Points
- 93
- First Name
- Los
I guess cleaning up that rear to side panel joint will be easier to hide off the chassis. That's assuming it's not actually there on the real thing??Exactly the way I did mine, But I glued the front fender piece to the rear fender piece on the chassis. I also started building the storage lockers and glued the pieces together. It looked like this,
View attachment 463614
Once it had dried, I removed it as a total unit and continued to add other parts, including the side panels, only gluing them to the rear panel to get a good fit. Then added the firewall and other tidbits to it off the chassis,
View attachment 463615
You can see the side panels are not glued to the fender. The storage rack w/rails, hood (bonnet), radiator and rear seats are also not glued yet to insure a good fit all around. It's one complete unit and should fit on the chassis with no prob, even with the motor in place. Just double check how far the air-cleaners stick out on the right side. It should fit.....
Sorry again for the pics Ian, but it's better to see it, than me, trying to explain it in words.......
Prost
Allen
Not a picture from my build just a helpful picture from Allens earlier build of this model.I guess cleaning up that rear to side panel joint will be easier to hide off the chassis. That's assuming it's not actually there on the real thing??
Been tinkering away today. Just sorting small things.
Also needed to order some paint and glue!
Oh and stuck 224 bits of track link together. Photos tomorrow
Also needed to order some paint and glue!
Oh and stuck 224 bits of track link together. Photos tomorrow

Jim R
SMF Supporter
224 track parts in one session. No wonder you don't have the energy to give us photos today!! 

Airborne01
SMF Supporter
Try explaining that to my missus - she of the' lace weight, fingering weight, brioche, cable', and the occasional knit and purl expertise ...And on the 5th day he said "Bugger this for a game of soldiers" and took up knitting.


Steve
Blimey, that's about a factor of 10 compared to my stayability patience when tackling individual track links!!Oh and stuck 224 bits of track link together. Photos tomorrow
By clean bench do you mean you swept everything onto the floor again !A mini in box review to start the ball rolling!
Cheers chaps.
Having gotten a nice clear bench, Yes it happens, I got round to taking the sprue shots... LOADS of them.
View attachment 463356
Lots of plastic in the box. All in their own bag. Some had added protection by way of some foam padding to protect some of the more fine parts.
View attachment 463353
As Well as the good old fashioned assembly guide the over-view of the sprues reviles that there are no fewer than 14 sprues of tan plastic. TEN with the single link tracks, One clear, a fret of P.E. a bag with string and chain etc. 6 tyres A large part (rear bed of truck), and a partridge in a pear treeeeeee. phew. Oh a small decal sheet with the dials and number plates options. NO UNIT MARKS!
Colour call outs in the 20 pages of instructions can be seen in the bottom right of page two. So I know the rockercovers are steel! lol.
Time for a closer look at the plastic:
View attachment 463357
The detail looks OK, as to the accuracy, I'll leave that to the experts! Mouldings are reasonably clean!
View attachment 463358
View attachment 463359
View attachment 463360
Some sprues have more blind tabs* than others.
View attachment 463361
View attachment 463362
Would it had hurt them to have actual slats in the radiator guard?
View attachment 463363
View attachment 463364
Yeah. more Louvres to open out... grrr.
View attachment 463372
View attachment 463373
View attachment 463367
View attachment 463370View attachment 463371
Not quite Tamiya but they look to be ok. Have to wait and see.
View attachment 463354
View attachment 463355
Final bit in the box, a colour paint guide.
Summary:
Some of the sprues are a tiny bit fuzzy here and there, but nothing a quick swipe with a sharp blade or a sanding stick wont take care of.
A few colour call outs along the way would be nice.
*blind tab: What I call those little bits of extra plastic that allows/ensures that the moulded part gets enough plastic by letting it fill and overflow. cut of and keep to make filler.
Right then. New blades in the Swanns, glasses cleaned and I am almost ready.

Will follow this closely.
Really I am surprisedHi Ian,
The 12 ton was built by Mercedes Benz, Krupp and Krauss-Maffei. The Famo was built by Fahrzeug und Motoren Werk in Breslau and by Vomag. Sköda, late in the war, built some Famo's with a 12-cylinder diesel motor in them....
Sorry, but I am kind of a nerd on these things and glad you saw the offset rollers on the drive sprocket fix on PMMS. I hope it won't be too hard to fix them. Most of all, have fun!!! If you get tired of the cannon towing idea, I have a suggestion that is more interesting.....
Prost
Allen
As much as it reads like I just down and made the tracks from start to finish, it was a bit here and a bit there. The sprues had 12 links on each. so it was a sprue or two at a time.
So they got made over a whole morning, between other things.
And here they are:
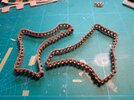
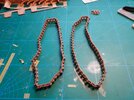
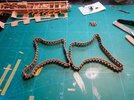
As can be seen quite mobil! a few links are a tad stiff but all can be moved. AND fit the drive sprocket! Yeah!
So they got made over a whole morning, between other things.
And here they are:


As can be seen quite mobil! a few links are a tad stiff but all can be moved. AND fit the drive sprocket! Yeah!
Panzerwrecker
SMF Supporter
- Joined
- Mar 2, 2022
- Messages
- 362
- Points
- 93
- First Name
- Los
Good news Ian. The track links are quite hefty but they are strong once connected. Give the stiff ones a wiggle every 10mins, they soon start moving. If they do harden up just pop them on the bottom run and keep them away from the sprocket or idler.As much as it reads like I just down and made the tracks from start to finish, it was a bit here and a bit there. The sprues had 12 links on each. so it was a sprue or two at a time.
So they got made over a whole morning, between other things.
And here they are:
View attachment 463742
View attachment 463743
View attachment 463744
As can be seen quite mobil! a few links are a tad stiff but all can be moved. AND fit the drive sprocket! Yeah!
Panzerwrecker
SMF Supporter
- Joined
- Mar 2, 2022
- Messages
- 362
- Points
- 93
- First Name
- Los
I recall having to re-position a bunch of stuff on my DB9 12T kit. This was an earlier variant that Trumpeter also sell.
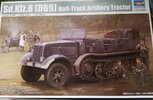
As well as re-postioning parts I had a whole bunch of parts crack and split. The tolerences on some items were tight and I had to open them up but these cracks still appeared. Only kit this has ever happened on!
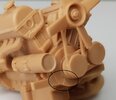
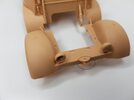
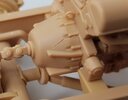

As well as re-postioning parts I had a whole bunch of parts crack and split. The tolerences on some items were tight and I had to open them up but these cracks still appeared. Only kit this has ever happened on!


Scratchbuilder
SMF Supporter
Panzerwrecker
SMF Supporter
- Joined
- Mar 2, 2022
- Messages
- 362
- Points
- 93
- First Name
- Los
They are Mobil enough. Just a bit stiff, if that makes sense.Good news Ian. The track links are quite hefty but they are strong once connected. Give the stiff ones a wiggle every 10mins, they soon start moving. If they do harden up just pop them on the bottom run and keep them away from the sprocket or idler.
