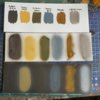
AK 3rd Gen Acrylics.

  • Thread starter Deleted member 7181
  • Start date

JR

Member of the Rabble and Pyromania Consultant
SMF Supporter
Joined
May 26, 2015
Messages
17,275
Points
113
Location
lincs
First Name
John
Well having watched the video it seems to answer most peoples prayers, certainly mine.
Ok if its dearer than say Vallejo , but if your not forever cleaning out the ab it will proves its self to be cost effective.

I have quite a few Vallejo and Amig Ammo but when reordering I will change over to these.
 

john

Administrator
Staff member
Administrator
Joined
Mar 4, 2004
Messages
6,051
Points
113
Location
Halifax
First Name
John
It’s also very quick to dry.
 
  • Like
Reactions: JR
D

Deleted member 7181

Guest
I was impressed by the drying time too. Plus the day after it was pretty hard. I tried scratching it with my nail and took the primer off instead!

Will hopefully have time for more trials tomorrow, busy afternoon at the hospital with yet more tests :rolling:
 
D

Deleted member 7181

Guest
So I've been doing a bit of spraying this morning. If you just want the quick and dirty; there's no way these will lure me away from lacquer paints for spraying but if you are stuck with acrylics then they aren't half bad.

My results might not be too realistic as the temperature in the shed was a little over 10°C. The paints had been kept in the house overnight but by the time I started testing they were ~14°C, tested with an IR pyrometer. Because of this the paints were probably thicker than they should be, and they needed a little coaxing with a hairdryer (low temperature at arms length) to get them to dry.

I started out with a bit of styrene card, cleaned well with IPA, then applied stripes of white, grey and black Mr Surfacer primer, leaving bare plastic areas for up-coming adhesion test. The paints were thinned as near as I could to 50/50 using AK's own thinner since that's what they recommended in the above video as a starting point. Airbrush was H&S Infinity, 0.4mm. My gauge was reading around 18-20 PSI, I tried lower but it just wasn't atomising at all, maybe due to the temperature.

pKyh4IP.jpg

First off was AK11001 White, from their Intense range. It came out a bit splattery compared to the fine atomisation you'd get with a lacquer paint, but flowed out and settled down nicely. Here's one coat

r5AesVB.jpg

And two coats

EHyII4O.jpg

It hasn't hidden the primer 100%, but I'd be happy enough to call that white. So far so good.

AK11088 Deep Red was next, another in the Intense range. A similar story after 2 coats, the primer can just be seem grinning through if you look carefully, but nothing you'd notice on a unified colour substrate.

x67rr9c.jpg

I'll not run through every one, but AK11185 Deep Blue (Intense) and AK11052 Basic Skin Tone came next. The skin tone wasn't from their intense range so it needed 3 coats until I was happy. Sorry about the blurry picture, I was trying not to use too much light and bleach out the colours.

t9DOHQc.jpg

Up to now I'd had no tip dry. Cleaning out between colours was a faff as it is with acrylics, but all colours were spraying ok, bearing in mind the caveat mentioned above of being nowhere near as fine as lacquers, but if you're used to acrylics then I can't see you having any issues here.

Then we get to the joker in the pack. Labelled as AK11207 Aluminium, from their Metallic range. Maybe it's me but I've never seen aluminium look like this, unless it's heavily corroded. I'd call that more of a pearlescent white than aluminium, but there you go.

Kt47Dgk.jpg

I thought maybe it would dry differently, but nope. I got bored after 5 coats and this is what we got. I can still clearly see the primer showing through, and the surface is starting to get very grainy from too much paint build up.

nBvxk1l.jpg

Just for comparison I got some Vallejo Model Air aluminium out. Just a single light coat was needed to bury the primer (straight from the bottle, lumps and all) and it looks much more like the colour I'd expect.

1XSv5SA.jpg

And another shot of all the colours. From this angle the transitions between the different primer colours is all but unnoticeable on most of them.

DpocIKe.jpg

So all in all they sprayed reasonably well, didn't give me any tip dry issues, and apart from the metallic they covered pretty well, especially the intense ones.


Next thing will be trying them thinned down even more to see if I can get better atomisation to allow thin translucent layers that can be built up into shading effects etc, and after they've cured for a day or two I'll see how they've adhered.
 

Dave Ward

Still Trying New Things
SMF Supporter
Joined
Apr 27, 2018
Messages
8,644
Points
113
Location
South Gloucestershire
First Name
David
This is my take on the AK 3rd Generation acrylics ( so far )
These are the six colours kindly supplied by John:
DSCF0328.JPG
Each bottle top has a small dimple, that you can deposit a drop of the paint, to identify the bottle from above..........................
DSCF0329.JPG
I'm doing this in two parts, Paint brush & Airbrush
I'm using white foamboard, primed with Stylnylrez Black & White, and left to dry for about 36 hours.
DSCF0330.JPG
In addition, I'm going to do some masking tests on a model that I knocked up for the purpose ( that's all it's fit for! ), primed with AK grey primer

DSCF0332.JPG

For the paint brush test, I used a No.3 soft brush. I did shake the bottles ( as it says on the side ), then applied one coat to a patch, not going over it at all, using undiluted paint straight from the bottle. Can't say that it dried any faster, or slower than other paint. Temperature 17C, indoors.
I did this to both Black & White boards:
DSCF0335.JPG

Given that black & white are not the most useful primer bases to use for some paints, the result wasn't bad, brush strokes showed up, particularly on the Russian Green/White combination. The Natural Steel and Bronze both looked better on the black priming.
The brush painting is good, but not significantly better than other brands.
The crunch will be the airbrushing & masking tests, which may take a while ( cleaning the airbrush 6 or more times - oh joy! )
and I'll put up the results in the next day or two.
Dave
 
  • Wow
Reactions: JR
D

Deleted member 7237

Guest
Cheers Dave for doing a paint brush test I was one wondering if you could brush paint it or not.
Pete.
 
D

Deleted member 7181

Guest
It's made for brush painting Pete but can be thinned for the airbrush too. The few parts I've brushed in it have come out really well, but haven't yet got around to a proper test. My son has tried a few of the colours on his miniatures and says they compare favourably to his usual paints. Eventually I'll get some pictures out of him!
 

JR

Member of the Rabble and Pyromania Consultant
SMF Supporter
Joined
May 26, 2015
Messages
17,275
Points
113
Location
lincs
First Name
John
Thanks to both of you Andy and Dave.
Some excellent tests being carried out , looking fwd to the others.
The point about the paint not having tip drying is I'm sure going to be a big point in it's favour. Agree with you Andy on that aluminum colour, ok if you want to do heavily corroded !
If the spraying proves coverage wise to be successful I'll be interested .
Do feel though that they have included in the mix a volume of flow improver.

I've found that if I use slightly more than the amount Vallejo recommend and some thinners ( depending on if it's Model Air or Model Colour ) I can achieve a reasonable finish, but don't like the differing results you can get between the two types of paint. Having to have several " recipes " for mixing is not something I want .
 
D

Deleted member 7181

Guest
Do feel though that they have included in the mix a volume of flow improver.
I've just read a very similar comment on a farcebook group from someone that has done much more testing than I have.
 
  • Like
Reactions: JR

JR

Member of the Rabble and Pyromania Consultant
SMF Supporter
Joined
May 26, 2015
Messages
17,275
Points
113
Location
lincs
First Name
John
I've just read a very similar comment on a farcebook group from someone that has done much more testing than I have.
That's interesting Andy, can't see the paint being ground any finer than it it, so it must be in the mix with thinners /flow improver.
 

Dave Ward

Still Trying New Things
SMF Supporter
Joined
Apr 27, 2018
Messages
8,644
Points
113
Location
South Gloucestershire
First Name
David
Part Two - airbrush tests
I used this 0.2mm airbrush, bought from Scale Model Shop last year - 0.2mm being worst for paint choking - it also is one of the easiest airbrushes I have to clean - important when doing multiple colour
DSCF0337.JPG

I sprayed at about 20 psi ( according to my gauge) - a little lower than I normally use ( 25 psi ). I decided to use straight tap water to mix for a/b. Spray tests - same sequence as brush ( top ). There was no problem with tip drying or clogging, with any paint. Temperature 17C, indoors.

DSCF0338.JPG
Mix was 50/50 - until I got to the metallic - you can see that the bronze has splattered, through being too thin ( middle ). I adjusted the mix to 70/30, which was more successful ( bottom ). Can't say the paint dried any faster, or slower than other paints.
Mixing with tap water worked well - I tried IPA, and the results were not promising, the paint seemed to coagulate, or curdle slightly & be a little lumpy - I certainly wouldn't want to attempt spraying with that! ( I mixed the paints in plastic shot glasses, before commiting to the airbrush cup ). The AK thinner worked well, it obviously has more ingredients than just IPA.............
I brush painted the rudders & elevators of the YF-22 with the six colours, then airbrushed the upper & lower wings & upper & lower fuselage, again with the six paints.
DSCF0339.JPGDSCF0340.JPGDSCF0341.JPG

The coverage is a little patchy in places with the 50/50 paint mix, probably 60/40 will be better. A little more experience will give you the correct ratio, or give two coats. The metallics are a bit different, and I bet each one will be have a slightly differing ratio.
I'm going to leave the paints to really dry overnight before I do the masking tests, tomorrow
Dave
 
D

Deleted member 7181

Guest
Great to see some proper testing on a model. I found the same when I tried to thin it with IPA, didn't seem right at all.
 
  • Like
Reactions: JR

Dave Ward

Still Trying New Things
SMF Supporter
Joined
Apr 27, 2018
Messages
8,644
Points
113
Location
South Gloucestershire
First Name
David
Yes, I bought the YF-22 at a pound shop in Gloucester many many years ago for - you guessed it - £1. For that, it was worth a punt - one look in the box, and it was consigned to the not worth the glue pile. I needed to replace my 1/48 Bf-109, it was getting too messy, so as an empty canvas, I threw it together. The fit is truly awful - I had to resist the temptation to do a bit of filing & filling. The 'recessed' panel lines show where the Matchbox trencher ended up. The canopy, which was pretty well moulded, wouldn't fit the cockpit recess at all! At last, it's going to have an actual display purpose!
Dave
 
Joined
Jan 4, 2020
Messages
576
Points
63
Location
Bramley, Hampshire
First Name
Gary
I think people were hoping for something "special" but maybe it takes a while to get used to them. But as John alluded to another process in mixing and dealing with is a hassle.
 
  • Like
Reactions: JR

Dave Ward

Still Trying New Things
SMF Supporter
Joined
Apr 27, 2018
Messages
8,644
Points
113
Location
South Gloucestershire
First Name
David
Masking Tests, I used Tamiya Masking sheet, offcuts from a Russian tank camo scheme, and as such some irregular shapes. I rubbed the edges down firmly, but expected bleed along the trench like panel lines........................DSCF0347.JPGDSCF0348.JPG
Using the same airbrush, and same air pressure & tap water, I tried to do darkest over lightest, lighter over darkest, and so on. I took a little more care in mixing ratios, especially the metallics. I had no problem with spraying, no clogging, or other hiccups
DSCF0349.JPGDSCF0350.JPG
I left the model for about an hour, or so, the paint was touch dry..................

DSCF0355.JPG
This Rubber black over Dark Sand
DSCF0354.JPG
Dark Sand over Rubber Black

DSCF0352.JPG
Russian Green over French Blue
DSCF0353.JPG
French Blue over Russian Green

DSCF0351.JPG
Tyre Black & Bronze over Natural Steel
DSCF0356.JPG
Natural Steel over Bronze

You'll have to excuse the oversprays & minor errors....................... obviously I'd take much more care, if it was the model I was testing.
There was no signs of paint lifting at all, there were areas where there was some bleed, but that was expected. All in all pretty successful.
My thoughts on AK 3rd Generation Acrylics:
The paints brushed pretty well, straight from the bottle - apart from the Russian Green, which didn't cover well, both brush & airbrush.
All airbrushed smoothly, with no tip drying, or clogging, once you get the mixing ratios right, they should be able to do one coat finishes ( apart from the Russian Green! ). The metallics sprayed particularly well, once the mix ratio was sorted ( c. 60/40 ). One thing I did notice, cleaning the airbrush so many times, was that they didn't seem to leave a lot of residue - cleanup was easy.
No problems in masking - I did leave the primed model for 24hrs to eliminate any primer lift.

So, what about AK 3rd Generation? It's a good paint, and airbrushes well, the metallics were very good. - It'll take a little while to get used to the mixing ratio, which I have to say seems doesn't seem that high. The ratio was 50/50 - If I use Vallejo Model Color for my airbrush, I normally mix 25/75, so the AK bottle won't last as long. One thing I do find disappointing is that IPA seemed to cause coagulating problems, luckily tap water worked well, I don't like having to use a bespoke thinner!
I may try some more metallics - Aluminium & Gun Metal, but I'm not going to rush out and buy any of the 3rd. generation standard colours, I don't think they show any massive advance over other brands at the moment. Maybe when I'm more familiar with the characteristics, I may change my mind, but not now.
Many thanks to John for supplying me with the paint samples.
Dave
 
Joined
Jan 4, 2020
Messages
576
Points
63
Location
Bramley, Hampshire
First Name
Gary
Good job Dave. I have a couple to try which I'll mainly use for brushing on small components but I'll keep an eye out as people will start to use them
 
Top