Neil Merryweather
SMF Supporter
Right then, I’m going for it!

This is a resin kit from Tommy’s War, and comes with somewhat of a reputation, I believe.
And if it all goes pear-shaped I am blaming @Steve Brodie for his post in Scratchbuilder's Thread here. I’ve never built a resin kit before but I’ve been a professional model builder for almost 40 years- how hard can it be….? And if not now-when?
Actually I was using this kind of polyurethane resin at work before people started using it for kits. Ooh it was a game-changer then- before that I was using a mix of fibreglass resin A and Isopon car body filler for moulding figures –needless to say it was very smelly and very messy! And before somebody says ‘what about casting resin?’ -I can’t remember why, probably it was easier to post-process as casting resin was designed to be polished so was very hard and brittle.
Another good reason for doing this now is that at least Tommy’s War is still up and running at the moment, in case there are any issues with the kit.
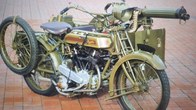
Anyway here’s the obligatory ‘sprue’ shot.

The instructions appear to be well written and well-thought out, but we’ll wait and see. My only beef so far is there are no actual colour references other than colour photos of the completed model-not terribly helpful. I’m not someone who gets too hung up on that kind of thing, but I will be doing tests with the Model Air greens I already have to find the best fit –I’m certainly not brush painting it with acrylics(sorry @Spanner). I’ve found lots of pics online of restored examples, so I’m reasonably content I can find something.
I’ve checked all the bits are present and washed them in detergent (I know some people don’t bother but I don’t want to cock up the paint for such a rookie mistake).
I haven't built a kit since lockdown (Spitfire 1-48) and I don't remember doing an AFV in my maturity at all-unless you count my 1/76 scale Higgins Boat ...
I wonder if I''ll be tempted to go all @scottie or @Jakko on it and add nuts and bolts you wouldn't know were missing? Can I be bothered?-probably not, but you never know.
I'm already considering how to make a rider for it...
So here we go!
This is a resin kit from Tommy’s War, and comes with somewhat of a reputation, I believe.
And if it all goes pear-shaped I am blaming @Steve Brodie for his post in Scratchbuilder's Thread here. I’ve never built a resin kit before but I’ve been a professional model builder for almost 40 years- how hard can it be….? And if not now-when?
Actually I was using this kind of polyurethane resin at work before people started using it for kits. Ooh it was a game-changer then- before that I was using a mix of fibreglass resin A and Isopon car body filler for moulding figures –needless to say it was very smelly and very messy! And before somebody says ‘what about casting resin?’ -I can’t remember why, probably it was easier to post-process as casting resin was designed to be polished so was very hard and brittle.
Another good reason for doing this now is that at least Tommy’s War is still up and running at the moment, in case there are any issues with the kit.
Anyway here’s the obligatory ‘sprue’ shot.
The instructions appear to be well written and well-thought out, but we’ll wait and see. My only beef so far is there are no actual colour references other than colour photos of the completed model-not terribly helpful. I’m not someone who gets too hung up on that kind of thing, but I will be doing tests with the Model Air greens I already have to find the best fit –I’m certainly not brush painting it with acrylics(sorry @Spanner). I’ve found lots of pics online of restored examples, so I’m reasonably content I can find something.
I’ve checked all the bits are present and washed them in detergent (I know some people don’t bother but I don’t want to cock up the paint for such a rookie mistake).
I haven't built a kit since lockdown (Spitfire 1-48) and I don't remember doing an AFV in my maturity at all-unless you count my 1/76 scale Higgins Boat ...
I wonder if I''ll be tempted to go all @scottie or @Jakko on it and add nuts and bolts you wouldn't know were missing? Can I be bothered?-probably not, but you never know.
I'm already considering how to make a rider for it...
So here we go!


")