Los's 1/35 Trumpeter Sd.Kfz 7 KM m11

Jim R

SMF Supporter
Joined
Apr 27, 2018
Messages
13,754
Points
113
Location
Shropshire
First Name
Jim
Hi Los
A nice choice of kit. I am building the same kit, a different version, but I'm sure it shares many parts. It will be nice to follow your build.
 

Panzerwrecker

SMF Supporter
Joined
Mar 2, 2022
Messages
362
Points
93
First Name
Los
Hi Los
A nice choice of kit. I am building the same kit, a different version, but I'm sure it shares many parts. It will be nice to follow your build.
Hi Jim

Recently replied to your build post ref some build issues you might like to be aware off. I built this very kit about 7 years ago without knowing about the pitfalls so looking forward to a more pleasurable build this time. Let me know if you need any help as I have built a few of these Trumpy 7's now and like to think I know my way around them.

Looking at your build progress pics it looks like you replaced the kits levers with metal parts. Good call as they need to be threaded through the main cab floor moulding later on and are easily broken.

Los
 

Panzerwrecker

SMF Supporter
Joined
Mar 2, 2022
Messages
362
Points
93
First Name
Los
This was my first attempt at this kit. It’s a grubby beaten-up over weathered mess now but well worth keeping on so I don't mess up new builds with techniques I haven’t yet tried and tested. The tracks don't fit on the sprockets at all well as I didn’t know about the 'offset' fix and as I glued my idler stub axles to the frame the tracks were saggy on one side and 'tight as' on the other. The radiator housing also impedes the engine fan if fixed a gnat’s chuff too rearward and the front engine mounts also need to be fixed perpendicular to the frame as that can also cause fit issues of the engine inside the bay. All little things that can frustrate a build.

170914 201.jpg

SdKf7 KM M11a.jpg

This kit has now become a painting 'Guinea pig' and road surface track template. The paint looks way better than it did originally as all sorts of new techniques have been tried on it. My build mistakes ref the engine had it removed completely, and the cargo bed is also removable so I can mess about with paint effect over wood.

So don't throw away those kits you were never 100% happy with................
 

Allen Dewire

Proud Rabble Member
SMF Supporter
Joined
Apr 27, 2018
Messages
4,105
Points
113
Location
Bamberg
First Name
Allen
Nice kit for the build Los. Good that Terry did really in-depth studies and posted the fixes. Trumpy has the same prob with their 12 ton kit's drive sprocket roller offset too...

Prost
Allen
 

Panzerwrecker

SMF Supporter
Joined
Mar 2, 2022
Messages
362
Points
93
First Name
Los
This Trumpeter kit # 01507 has many identical sprues to their other '7' kits so the same issues and 'fixes' apply. The common issues and fixes can be found here: https://www.perthmilitarymodelling.com/reviews/vehicles/8ton_flak/8ton_flak.html

Looking at old logs for this kit I noted:

The main issues appear to be with the drive sprocket roller offset, the chassis length and fender rivet detail profile and the strange mix-up of trailer features. Fixes for sprocket are found in the link above. The large rivet detail on the front edges of the fenders is incorrect as Trumpeter had mistakenly copied them from a restored vehicle and not the wartime vehicle.

The fender shape mistake and chassis length would be time consuming and difficult to overcome so they will have to be ignored. As for the running gear it is a good idea NOT to glue the idler arms as per the instructions as leaving them loose will aid a perfect track fit and track sack can be optimised. Gluing the gear levers AFTER the cab floor had been located is also advisable.

I am sure there will be a few others but hopefully I will remember them when construction begins.


Gern

'Stashitis' victim
SMF Supporter
Joined
May 17, 2009
Messages
9,705
Points
113
Location
Stourbridge
First Name
Dave
Welcome aboard Los. Yet another different kit making for an excellent variety of builds.
 

Jakko

Way past the mad part
SMF Supporter
Joined
Apr 28, 2018
Messages
10,837
Points
113
First Name
Jakko
The bench seat is also wrong for the artillery tractor version, like you have here :smiling3: From researching this vehicle for the Dragon it I built earlier this year, it seems to me the seat with the cut-off right front corner was only used on the /1 and /2 FlaK vehicles, not the “/0” tractor. Dragon gets that part right, but makes a total hash of the rest of the cab interior and the load bed, both of which Trumpeter seems to have done much better …

Maybe the best solution for an accurate model would be to combine the two kits?
 

Panzerwrecker

SMF Supporter
Joined
Mar 2, 2022
Messages
362
Points
93
First Name
Los
The bench seat is also wrong for the artillery tractor version, like you have here :smiling3: From researching this vehicle for the Dragon it I built earlier this year, it seems to me the seat with the cut-off right front corner was only used on the /1 and /2 FlaK vehicles, not the “/0” tractor. Dragon gets that part right, but makes a total hash of the rest of the cab interior and the load bed, both of which Trumpeter seems to have done much better …

Maybe the best solution for an accurate model would be to combine the two kits?
I forgot about the cab interior issues. If I recall the Dragon 'Late' wooden sided cargo version had a seperate drivers seat and a bench. Pretty sure there is an issue with the instrument display too but cant remember if it is on the DML or Trumpy kit.

Your right about combining both kits. It does sound the best way to build the most accurate kit but proably quite an expensive exersise. Not seen anyone attempt it so far:tongue-out3:
 

Jakko

Way past the mad part
SMF Supporter
Joined
Apr 28, 2018
Messages
10,837
Points
113
First Name
Jakko
The Dragon instrument panel seems to be that of the original (all-steel cab) version, stuck into the simplified cab of the late version. It should be a sheet metal piece that completely fills the space between both side walls. The seats in the cab aren’t really right either, nor are the back wall or the vertical wall below the seats, while the battery box and little fuel tank (under the dashboard) are missing completely.

The cargo bed in this kit is that of the /1 and /2, with reinforcements underneath and on beefy supports meant to take the recoil of an AA gun, rather than the much simpler version of the gun tractor which Trumpeter does have right. The hinges on the folding side and rear panels are also too sturdy, the spare wheel carrier underneath is too big, and all the bolt heads under the cargo bed are missing entirely. More here :smiling3:

As I think I mentioned there, I wish I had bought the Trumpeter kit instead of the Dragon one. I didn’t know about chassis length issues at the time, but I think I still would have gone that route. Or combine the best features of the two, even.
 

Jakko

Way past the mad part
SMF Supporter
Joined
Apr 28, 2018
Messages
10,837
Points
113
First Name
Jakko
Reproduction manuals, it says, scanned from originals and cleaned up. Thanks for that site, I will need to see if there’s something here that I might need …
 

Panzerwrecker

SMF Supporter
Joined
Mar 2, 2022
Messages
362
Points
93
First Name
Los
OK, so here we go with a first session at the bench with this kit.

It’s been a while since I last built an un-armoured Trumpeter 8 Ton. I have built this one before, but it’s got to be at least 10 years ago. I built their Flak 43 variant recently but that has the strengthened rear load bed supports to take the weight of the gun platform. It also has the armoured cab.

Compared to the Dragon versions the moulding detail is a little ‘chunky’ and although there was no flash present there are plenty of pin holes, many of which are visible. There is also a fair bit of mould offset so again that does require cleaning up. From experience many of the witness marks for attachment points can be a little narrow so again, opening them up before fitment makes life easier.

I did make some notes about the issues I had with the first outing of this kit so along with the published ‘fixes’ I will try and point them out as I go along.

Trumpeter Sd.Kfz.7 8t Km.11 Late version. Kit 01507​

20220922_205842.jpg

What’s inside the box?​


These are the sprues included in the kit. In the substantial and large kit box there are ten main trees in grey plastic and six brown trees for the tracks. The rear canvas cover is separate as are two frets of photo-etch, the clear film for the screen, some string to simulate the winch cable, some wire (also for the winch system) three rubber tyres and a decal sheet. The decal sheet does include the cab dash instrument gauges.

20220922_205330.jpg

20220922_205521.jpg

20220922_205601.jpg

20220922_205624.jpg

20220922_205640.jpg

20220922_205720.jpg20220922_205735.jpg20220922_205804.jpg

20220922_205819.jpg

20220922_205418.jpg

20220922_205454.jpg

Build time.​

Trumpeter go with a multi-part affair for the chassis and whilst it has far more detail than any Dragon equivalent it is a bit fiddly to assemble. I much prefer the Dragon one piece affair. It sacrifices detail but much of it is unseen once assembled and it is a much stronger sub assembly and saves at least a couple of hours of work.

Following the instructions, we commence in step 1 with the gearbox. This is fitted between the chassis frames so it cannot be added later. I will not add the photo etch or levers (parts D13, D38 and D54) until it is ready to receive the cab floor as they are easily broken.

20220922_221748.jpg

Step 2 builds up the basic chassis. Whilst this looks simple on paper the fact that the gearbox sub assembly built in step 1 does not actually provide any real structural rigidity makes it tricky to line it all up and keep it straight! Help is it at hand if you utilise part A41 (shown in step 3) and dry fit it between the frames to get the correct spacing but first of all you need to get everything connected;)

The front leaf spring assembly connect the two chassis legs at the front and the flat rear tray (part WA15) connects them together at the rear. You also have to fit the gearbox inbetween. The gearbox connection points to both chassis legs rely on just the tiny and imprecise ends of part A7. The weight of the gearbox tends to make it droop making both legs in the middle bend inwards at the top! Not the best engineering as the gearbox will connect both winch and engine shaft in later steps! The only reference for lining up the gearbox straight is to sight it up using the two holes behind the sprocket housing in the frames. I found it easier by connecting just one side of the gearbox to one chassis leg first. Once lined up and dry connect one side of both the front leaf spring assembly and the rear tray to one chassis leg. It doesn’t matter what side, its just essential for those parts to stay perpendicular.

Once both these connections are dry you can safely connect both halves together. Dry fitting part A41 mentioned above will also aid keeping both sides parallel. TBH the upper middle parts of both legs have way too much flex and don’t get any rigidity until the fuel tank in step 7 is attached. There’s plenty of manhandling beforehand so beware!

20220922_2321813.jpg

Step 3 connects the myriad of parts that connects the suspension pick up points. Plenty of clean-up is needed especially on parts D23 and D24 so dry fitting everything before committing placement is recommended. There are also two small pieces of photoetch to add in this step and they need to be assembled correctly as the holes in them accept the winch housing.

20220922_234843.jpg

Progress to step 3 so far.

20220923_000842.jpg
 

Attachments

  • 20220922_232813.jpg
    20220922_232813.jpg
    46.9 KB · Views: 1
  • 20220922_232842.jpg
    20220922_232842.jpg
    63.5 KB · Views: 0
  • 20220923_000842.jpg
    20220923_000842.jpg
    58.8 KB · Views: 0
  • 20220923_000859.jpg
    20220923_000859.jpg
    64.8 KB · Views: 2
Last edited:

JR

Member of the Rabble and Pyromania Consultant
SMF Supporter
Joined
May 26, 2015
Messages
17,282
Points
113
Location
lincs
First Name
John
Very detailed post Los. Great reading.
That chassis would be test in its self, couldn't see me managing that at all .
Will follow .
 

Panzerwrecker

SMF Supporter
Joined
Mar 2, 2022
Messages
362
Points
93
First Name
Los
Very detailed post Los. Great reading.
That chassis would be test in its self, couldn't see me managing that at all .
Will follow .
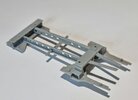
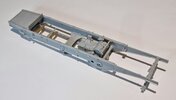
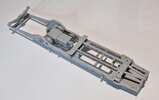
Cheers John. No, its not the best engineered assembly. It does thankfully all line up well once connected but they could have instructed the steps better. Trying to glue it all together at once is frusutrating. Another option is to leave the gearbox off until both the front and rear connections are almost cured. It will then 'pop in' as there is so much flex in both legs.

Screwing this basic chassis step up has so many implications for proceeding parts if it is out of alignment. ICM engineer a lot of there softskin chassis's in this manner but usually include all manner of crossbeams for strength.
 
  • Like
Reactions: JR

Tim Marlow

Little blokes aficionado
SMF Supporter
Joined
Apr 27, 2018
Messages
16,798
Points
113
Location
Somerset
First Name
Tim
Great build and write up so far Los. It’s nice to know the pitfalls and their cures explained buy an experienced guy such as yourself.
 
Top