Los's 1/35 Trumpeter Sd.Kfz 7 KM m11

Panzerwrecker

SMF Supporter
Joined
Mar 2, 2022
Messages
362
Points
93
First Name
Los
Los looking good so far I will follow along.
Welcome aboard

This looks rather nice Los. I will follow with interest.
Cheers Ian. Popular choice on this GB it seems.

Great build and write up so far Los. It’s nice to know the pitfalls and their cures explained buy an experienced guy such as yourself.
Thanks Tim
Always a more pleasurable build second time around.;) Good to watch all the other posts on the other GB Trumpeter 7 kits as there is always something new to learn.
 

Panzerwrecker

SMF Supporter
Joined
Mar 2, 2022
Messages
362
Points
93
First Name
Los
Another small session had me build up a few more steps

Starting where we left off, step 4 builds up the engine. This is a nice rendition of the HL62/64TUK engine and apart from one area that needs work to ensure it fits in the chassis, only requires a few extras to produce an authentic looking lump. The area that can cause issue with fitment concerns part E19. This fits into the transmission bellhousing part E36. Unfortunately, it is a little thick and although it fits inside part E36 it does NOT sit flush. What this means is that by attaching the bellhousing assembly to the back of the engine without sanding it flush, will extend the whole engine assemblies’ length slightly and it will no longer fit on the four chassis engine mounts. As both the front mounts are separate parts it is easy to damage them whilst trying to get the engine to fit. This issue has been on all the HL62TUK engines that I have built up by Trumpeter and is an easy fix if you know about it.

20220926_33011528.jpg

I will not be leaving any engine side panels off so I have just built up the basic engine as the sump is visible on the finished model.

20220925_66193856.jpg

Step 5 adds all the inner chassis components and as mentioned above the two front engine mounts are separate parts. Make sure these are added well before you pop the engine on them as they are easily distorted if not fully cured. Another tip in this step is to build up the fuel tank (parts A10, A11, A42 and D59) from Step 7 BEFORE adding its chassis attachment brackets (parts D41, D42, D43 & D44) This will allow you to use it as a spacing template to ensure the tank fits. Fitting the brackets first has them spaced too close together and 99% of the time the tank will not fit.

20220925_212550ff.jpg


I won’t be adding any cabling to my winch, and I have also left off the securing bars and rods (part PE-WA17)

20220925_2120098.jpg

The rear chassis panel in step 6 has many components, even the tiny external cable roller is unnecessarily engineered in two parts! The tow bar part A39 had huge mould offset in my kit and required a fair bit of work to look decent. Although not fitted yet in the pic below Part PE-WA19 can be seen fully installed only in the final ‘Install shown’ image in the step 6.

20220926_011622.jpg

Moving on to step 7 the winch assemble is added and this is where any incorrect correct spacing of the two photo-etch pieces (PE-WA5 & WA6) from step 3 will rear its ugly head. They are however easily accessible if they do need re-positioning. You are instructed to add all four leaf springs in this step. The holes in the chassis for the rearmost springs B18 will likely require deepening a little with a drill. IMO, they don’t locate securely enough without doing this. Also, it is advisable to move straight on to step 8 before the leaf spring to chassis connections cures. This is because all the axle location brackets (Parts A3, A4 & the B35 x 2) connect to the ends of the leaf springs. Whilst the leafsprings are still plyable you can line them all up neatly. Lastly, part A22 is asking to be knocked off if attached in this step. It can be safely added just before the bodywork goes on in step 17.

20220925_2120271.jpg

Another tip in step 8 is to leave the idler axle mounting points (parts A17, A18, A19 & A20) un-glued until you are ready to position the tracks. This way you will be in control of the final track fitment. This will prevent an overly tight or loose fit of the tracks and give the opportunity of getting the perfect ‘sag’ you want. In fact, as the idler wheel to idler mount has such a weak connection I found it best attaching these two parts together well before any tension might weaken the joint from fitting the tracks. You can always drill and pin them together for an even stronger bond.

Progress so far. Fuel tank dry fitted as it will be painted separately and help get some paint into all the knocks and crannies below it.

20220925_212516.jpg
 

Attachments

  • 20220925_212021.jpg
    20220925_212021.jpg
    111.4 KB · Views: 0
Last edited:

Ian M

Administrator
Staff member
Administrator
Moderator
SMF Supporter
Joined
Dec 14, 2008
Messages
19,805
Points
113
Location
Falster, Denmark
First Name
Ian
A very interesting and informative build thread Los. (where does that name come from?)
 

Ian M

Administrator
Staff member
Administrator
Moderator
SMF Supporter
Joined
Dec 14, 2008
Messages
19,805
Points
113
Location
Falster, Denmark
First Name
Ian
Yes mate. Los is not a name you see/hear much. You are er, em.... the first lol
 

Ian M

Administrator
Staff member
Administrator
Moderator
SMF Supporter
Joined
Dec 14, 2008
Messages
19,805
Points
113
Location
Falster, Denmark
First Name
Ian
Just noticed I have mounted the external cable guide bracket on the rear panel upside down
On my build I have NEVER put so any parts on the wrong way round/up/order. Fortunately noticed most befor the glue was 100% so could soften it up again.

So you are doing very well if thats the first one!
 

Jakko

Way past the mad part
SMF Supporter
Joined
Apr 28, 2018
Messages
10,954
Points
113
First Name
Jakko
Nice work. I get the impression that in terms of fit and ease of construction, there really isn’t all that much to choose between the Dragon and Trumpeter versions of this vehicle.
 

Panzerwrecker

SMF Supporter
Joined
Mar 2, 2022
Messages
362
Points
93
First Name
Los
Nice work. I get the impression that in terms of fit and ease of construction, there really isn’t all that much to choose between the Dragon and Trumpeter versions of this vehicle.
Cheers jakko. Not a great deal of difference, no, apart from the simpler one-piece Dragon chassis. Far simpler in detail too but I prefer it to this Trumpeter multi-piece affair. As you mentioned in another post and in ref to your abondoned Dragon kit I might have a go at kit bashing them one day. In fact, this Trumpeter kit was likely purchased for this reason but I never got another Dragon version, so it crept to the back of the pile. I have had the Dragon 'late kit' built awaiting paint for a long while. It’s very much a slimline version of this kit but with far more inaccuracies. Side by side this kit is a 'chunky monkey' :smiling2:
 

Panzerwrecker

SMF Supporter
Joined
Mar 2, 2022
Messages
362
Points
93
First Name
Los
A few unexpected hours in the cave last night had me completing a few more steps.

Step 9 has you build up the steering box, shaft, and wheel. The instructions have you attach the wheel to the shaft and then the shaft to the chassis. I would recommend NOT attaching it to the chassis just yet. You still must add wheels and tracks, turn it upside down to add the exhaust etc before then, so it is asking for trouble to add it in this step. This part attachment is also relevant depending on whether you prefer to add the bodywork to the chassis before or after painting. The instructions have you add the bodywork in step 17 so if you go down this route, add both in step 18 BEFORE the firewall (part WD12) goes in. If you want to keep both chassis and bodywork separate then keep both shaft and steering wheel loose until you do finally add the bodywork to the chassis.

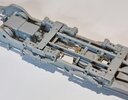
Steering shaft and wheel alongside the idler axle assemblies
20220926_203348.jpg

The track wheel axles (parts B29) do not need to be glued in. They are a smooth friction fit even after ridding them of mould seams and give the bonus of articulating all the wheels if you wish. They most definitely won’t fall out so no real need to glue unless you must.

20220926_203152.jpg

The front axle and steering are constructed in step 10 and here you are instructed not to cement the hubs to the axle beam. Having the wheels free to steer is a nice option. However, the steering linkages do not all rotate UNLESS you pin them. To have a ‘working system’ requires a whole bunch of extra work. Unlike many other kits you do at least get the option to position them in a turned position without too much extra work. Take note though. If you do decide to turn them, this impacts the layout of other steering linkages in step 11.

The process of fitting them is a little tricky as in effect you must line up the holes in both part D19 (D20) and B45 before dropping the pin (B33) in to secure. The tolerances are way too tight IMO so to avoid snapping the pin whilst inserting I would recommend opening the holes in all four parts with a micro drill and making sure the shaft of the pin (B33) is sanded smooth.

20220926_203231.jpg

20220926_203241.jpg

Unfortunately, once built up the hubs are extremely ‘wobbly’! If left this way, both wheels will ‘splay out’ under the weight of the model. There are two ways of correcting this. The first is to simply glue parts D17, D20 and B45 in place once you are happy with the wheel direction, or a thin plastic card shim can be added and drilled to parts B45.

As for the steering linkages there is a diagram in step 11 to show how the steering box linkages attach to both the steering box and the steering rod connecting the driver’s side hub knuckle. This diagram shows the wheels in the straight-ahead position. If you turn the wheels this obviously effects the layout. Confusingly, compared to the arrowed connection drawing of the built-up linkage assembly next to the chassis, the construction stage drawing is drawn upside down!

20220926_203806.jpg

I opted to assemble the steering as per step 10 using a heated blade to ‘squish’ down the tops of the pins on each side of the tie bar (D8) so I could turn both wheels together before gluing them in position. The steering rod connection to the driver’s side hub bar is a strange one. The instructions in step 10 and the diagram in step 11 both show it as attached from below, but it interferes with the tie bar this way! I simply attached it from above.

My wheels are turned to full lock and the linkages adjusted to suit
20220926_234628.jpg

Step 12 has you connecting the roadwheel pairs. This includes the two idler pairs. Fit on mine was not the best due to the overside tab on one side. It kept forcing the pair apart. The tubular connection is nice and straight so its simpler to cut the tabs down or remove them all together. I then glued my idler wheels to their stub axles which I built up in step 8. These are engineered to slot into the back of the rearmost suspension arm plates and will be adjusted in or out to optimise the track sag.

Depending on how you like to construct and paint the wheels will determine how you plan out adding the wheels in step 13. I like to paint my wheels separately, but the interlocking system of wheels makes this process a bit more involved. Leaving the inner and outermost wheels separate is usually the easiest option.

The sprocket housings locate onto the chassis and part B40 on them locates into the gearbox pins behind the hole (we lined the gearbox up with) in the chassis.

20220926_234641.jpg

Taking a break from cleaning up wheels I skipped to step 16 and looked at how I could rework the incorrect seat layout in the cab. Trumpeter have opted to add a single bench instead of a separated driver’s seat and added a cut-out on the passenger side. The back rest moulding (part WA3) is two evenly spaced cushions. Looking at Hilary Doyle’s scale drawings in Panzer Tracts No 22-4 both the bench and back cushions are two different sized seats. The driver’s side is smaller, and the back cushion is also a lot thicker. In addition, the drawings show a single enclosed battery box sat against the side panel on the driver’s side and not two exposed batteries side by side like the kit has!

20220927_102600_resized.jpg

Using the existing back cushion moulding I cut a portion off one side and re-attached it to the other. Using the drawings, I split the one-piece bench into two and filled in the cut-out section. As for the metalwork underneath, I utilised part WB3 to extend the front panel, filled the void and used plastic card to replace the lip and panel top.

I have yet to add plastic card to make the drivers back rest thicker, blend in the back cushion and the bench to simulate two separate cushions.

20220927_010306.jpg
 
Last edited:

Allen Dewire

Proud Rabble Member
SMF Supporter
Joined
Apr 27, 2018
Messages
4,122
Points
113
Location
Bamberg
First Name
Allen
Just did a quick ketchup Los and appreciate the extra "love" you're putting into this build. Correcting all the inaccuracies is time consuming, but well worth it in the end. Very nice and clean work Sir. Keep it coming...

Prost
Allen
 

Jakko

Way past the mad part
SMF Supporter
Joined
Apr 28, 2018
Messages
10,954
Points
113
First Name
Jakko
The track wheel axles (parts B29) do not need to be glued in. They are a smooth friction fit even after ridding them of mould seams and give the bonus of articulating all the wheels if you wish. They most definitely won’t fall out so no real need to glue unless you must.
For comparison: on the Dragon kit they’re a tight fit that I wouldn’t say articulates much, or at all. The axle arms are also a different design, looking like a single-piece forging without the discs that are in the Trumpeter version.

Using the existing back cushion moulding I cut a portion off one side and re-attached it to the other. Using the drawings, I split the one-piece bench into two and filled in the cut-out section. As for the metalwork underneath, I utilised part WB3 to extend the front panel, filled the void and used plastic card to replace the lip and panel top.
The driver’s seat cushion was also about twice as thick as the passengers’, with a cut-out in the vertical panel below the seats to accommodate this — see my stripped Sd.Kfz. 7 for what I consider a reasonable attempt at all of this (minus the cushions). Compared to the Dragon kit, at least that panel seems to be set at the right depth in your kit: slightly behind the front of the side walls, not flush with those as per Dragon. I do notice that an access panel is missing on the left front of that same panel, below the battery box.
 

Panzerwrecker

SMF Supporter
Joined
Mar 2, 2022
Messages
362
Points
93
First Name
Los
Excellent blog.
Cheers Paul
Just did a quick ketchup Los and appreciate the extra "love" you're putting into this build. Correcting all the inaccuracies is time consuming, but well worth it in the end. Very nice and clean work Sir. Keep it coming...

Prost
Allen
Thanks Allen. Always a big fan of Terry Asley over on his PMMS site. His work made some tricky kits far more enjoyable to build and made some kits a total no go. Nothing worse than spending hours of pleasure at the bench only to have the instructions blow all your hard work out of the water by spitting in your face three pages later. I know many will read the instructions thoroughly through before starting and many will make notes, but it is not always obvious until you tuck into those sprues what you’re in for. Especially when the parts have absolutely no resemblance to the image on the CAD drawing. I'm always up for a challenge but you do have to wonder about some manufacturers research and kit engineering.
 

Panzerwrecker

SMF Supporter
Joined
Mar 2, 2022
Messages
362
Points
93
First Name
Los
For comparison: on the Dragon kit they’re a tight fit that I wouldn’t say articulates much, or at all. The axle arms are also a different design, looking like a single-piece forging without the discs that are in the Trumpeter version.


The driver’s seat cushion was also about twice as thick as the passengers’, with a cut-out in the vertical panel below the seats to accommodate this — see my stripped Sd.Kfz. 7 for what I consider a reasonable attempt at all of this (minus the cushions). Compared to the Dragon kit, at least that panel seems to be set at the right depth in your kit: slightly behind the front of the side walls, not flush with those as per Dragon. I do notice that an access panel is missing on the left front of that same panel, below the battery box.

Looking at the PT book I cannot find any clear pics of the axle arms on the KM11. This is what the drawings show. It also confirms the steering rod to the hub knuckle is attached above the tie rod
20220927_190744.jpg

Thanks for the info on the seat. I will look back over your build log
 
Last edited:

Jakko

Way past the mad part
SMF Supporter
Joined
Apr 28, 2018
Messages
10,954
Points
113
First Name
Jakko
Those drawings appear to show the Dragon version of the axles.
 
Top