Panzerwrecker
SMF Supporter
- Joined
- Mar 2, 2022
- Messages
- 362
- Points
- 93
- First Name
- Los
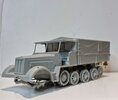
Before I add all the smaller and fragile items and get the sub-assemblies ready for paint here are my thoughts on this kit.
I have made a few variants of Trumpeters Sd.Kf.7 mainly because I really like the vehicle itself. They were an imposing looking halftrack and looked fascinatedly old fashioned towards the latter stages of the war. No amount of extra tin was going to disguise their crew protection inadequacies and insufficient off-road abilities. Mobile Flak guns based on tank chassis were already on the drawing board. TBH the painting and weathering is much more enjoyable than the construction phase on any of these halftracks for me, but they don’t build themselves

AFAIK Tamiya, Dragon, and Trumpeter are the only 1/35 manufacturers of this 8T halftrack in plastic, and the ‘late production’ cargo variant has been released only by the latter two manufacturers.
It is the second in a series of variants released by Trumpeter since 2008. The Flak 41 variant in 2021 being the ninth incarnation. Whilst it’s not up to modern standards it is in no way a terrible kit. It is however frustrating to build in places and this is purely down to some odd engineering and the parts count on small details. I don’t believe any of the main mouldings have ever been updated. These types of vehicles are also difficult to handle and work out how best to paint.
There is very little flash present but too many important connecting parts do suffer from some quite bad mould offset. In general, if attachment points are cleaned almost everything fits without too much fuss or any serious alterations. The scale appearance of some of the metalwork parts are a bit ‘chunky’ and the wood grain on the cargo bed is far too exaggerated but overall, it is acceptable. The Dragon kit exceeds in both these areas.
Unfortunately, unlike the Dragon slide moulded one piece chassis they have gone with a multipiece affair, and this can complicate matters. Any slight deviation in lining up parts in the early build stages will almost certainly have consequences for further part fitment and this ultimately, can too easily spoil a build. There are also way too many small fragile items added far too early in the build steps! The cab operating levers being a prime example. They simply will not survive the handling of subsequent building steps. Another issue that I find frustrating is the way they have engineered the metalwork parts so that lining it all tightly becomes a far more difficult task than it needs to be.

The instruction sequence could have been thought out better in places although they do not suffer from overly complicated steps and the dreaded miss identification of parts.
As for accuracy, there are a few fundamental issues. Taking aside the very slight overall scale length and fender arc inaccuracies, of which most modellers, including myself would not be too concerned with, there are some glaring anomalies and omissions. The sprocket really does need a makeover so sourcing a good replacement is worthwhile. I am hoping a 3D set will be forthcoming very soon
The cab seat layout is from the Flak variant and not the cargo version. Again, a fair bit of work is required to make good. The cargo area adds incorrectly laid out wooden panels and is missing the tall wooden equipment rack. The rear back-to-back bench is missing and instead two separate benches are provided. The spare wheel location shown in the instructions is also incorrect. As for additions or omissions during production these can all be easily addressed. For later built vehicles the inertia starter cover place and profile bulge in the fender and the firm emblems on the radiator housing will need to be removed. Steel pins for the starter and smaller headlights will need to be added.

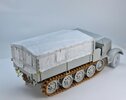
What is nice to see is a full canvas tilt for both the cargo and cab areas and a full set of instrument dials. There is quite a large photo-etch count which lifts the overall appearance and none of it is tricky to apply.
It sounds like I’m knocking the kit a fair bit but TBH having built the Dragon equivalent, that has just as many issues. Just some different ones! They include the equipment rack but use the heavier cargo bed framework that the flak variant came with. They have also made the same mistake with the cab seat layout. See Jakko’s post https://www.scale-models.co.uk/threads/sd-kfz-7-half-track-post-war.38509/page-6 for more details.

In summary, to build an accurate version of this last production model without scratch building too many parts, I would suggest a kit bash combination of the two. This should give the best results, but I haven’t seen anybody attempt it yet!
I have made a few variants of Trumpeters Sd.Kf.7 mainly because I really like the vehicle itself. They were an imposing looking halftrack and looked fascinatedly old fashioned towards the latter stages of the war. No amount of extra tin was going to disguise their crew protection inadequacies and insufficient off-road abilities. Mobile Flak guns based on tank chassis were already on the drawing board. TBH the painting and weathering is much more enjoyable than the construction phase on any of these halftracks for me, but they don’t build themselves
AFAIK Tamiya, Dragon, and Trumpeter are the only 1/35 manufacturers of this 8T halftrack in plastic, and the ‘late production’ cargo variant has been released only by the latter two manufacturers.
It is the second in a series of variants released by Trumpeter since 2008. The Flak 41 variant in 2021 being the ninth incarnation. Whilst it’s not up to modern standards it is in no way a terrible kit. It is however frustrating to build in places and this is purely down to some odd engineering and the parts count on small details. I don’t believe any of the main mouldings have ever been updated. These types of vehicles are also difficult to handle and work out how best to paint.
There is very little flash present but too many important connecting parts do suffer from some quite bad mould offset. In general, if attachment points are cleaned almost everything fits without too much fuss or any serious alterations. The scale appearance of some of the metalwork parts are a bit ‘chunky’ and the wood grain on the cargo bed is far too exaggerated but overall, it is acceptable. The Dragon kit exceeds in both these areas.
Unfortunately, unlike the Dragon slide moulded one piece chassis they have gone with a multipiece affair, and this can complicate matters. Any slight deviation in lining up parts in the early build stages will almost certainly have consequences for further part fitment and this ultimately, can too easily spoil a build. There are also way too many small fragile items added far too early in the build steps! The cab operating levers being a prime example. They simply will not survive the handling of subsequent building steps. Another issue that I find frustrating is the way they have engineered the metalwork parts so that lining it all tightly becomes a far more difficult task than it needs to be.
The instruction sequence could have been thought out better in places although they do not suffer from overly complicated steps and the dreaded miss identification of parts.
As for accuracy, there are a few fundamental issues. Taking aside the very slight overall scale length and fender arc inaccuracies, of which most modellers, including myself would not be too concerned with, there are some glaring anomalies and omissions. The sprocket really does need a makeover so sourcing a good replacement is worthwhile. I am hoping a 3D set will be forthcoming very soon
The cab seat layout is from the Flak variant and not the cargo version. Again, a fair bit of work is required to make good. The cargo area adds incorrectly laid out wooden panels and is missing the tall wooden equipment rack. The rear back-to-back bench is missing and instead two separate benches are provided. The spare wheel location shown in the instructions is also incorrect. As for additions or omissions during production these can all be easily addressed. For later built vehicles the inertia starter cover place and profile bulge in the fender and the firm emblems on the radiator housing will need to be removed. Steel pins for the starter and smaller headlights will need to be added.
What is nice to see is a full canvas tilt for both the cargo and cab areas and a full set of instrument dials. There is quite a large photo-etch count which lifts the overall appearance and none of it is tricky to apply.
It sounds like I’m knocking the kit a fair bit but TBH having built the Dragon equivalent, that has just as many issues. Just some different ones! They include the equipment rack but use the heavier cargo bed framework that the flak variant came with. They have also made the same mistake with the cab seat layout. See Jakko’s post https://www.scale-models.co.uk/threads/sd-kfz-7-half-track-post-war.38509/page-6 for more details.
In summary, to build an accurate version of this last production model without scratch building too many parts, I would suggest a kit bash combination of the two. This should give the best results, but I haven’t seen anybody attempt it yet!


")


