You are using an out of date browser. It may not display this or other websites correctly.
You should upgrade or use an alternative browser.
You should upgrade or use an alternative browser.
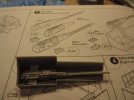
Sukhoi Su-27 Flanker B Trumpeter Scale 1:32
- Thread starter arb65912
- Start date
What did you refer to?That’s one of the disadvantages of building big planes right there

Oh, OK.Having to use so many clamps to keep the wing halves together
 That is OK. I just wanted a good bond. I like that scale as I can see details better. 

Oh, OK.
that's one of the reasons i do 1/32 as well. Also the fact my fingers are fat like pigs nipples
Niho
SMF Supporter
Go for it, some informed modellers/historians here....Sukhoi Su-27 Flanker B Trumpeter Scale 1:32 and what triggered this post and my presence here in forums.
I work with my friends on models for X-Plane flight simulator. Facebook link is here CRJ-700 Facebook Group, and our website is here Delta Wing Simulations
Please do not take is as any form of advertisement, it is just for these who would like to look, no harm done.
I will be working on the SU-27 UK for the mentioned above simulator and in order to make a realistic 3D model, I needed some materials more than just pictures as pictures do not show the details and the way aircraft is built.
There are shapes and places that even the best pictures cannot give one the idea how are they constructed/built.
That was the major contributing factor to buy Su-27 Flanker B Trumpeter Scale 1:32 kit.
I was going to just glue the major components to see how the design look.
After joining this forum, I found out that there is many great, friendly people here willing to help, answering questions etc.
That had changed my original plan and instead of just putting it fast and roughly together, I will try to make a nice scale build out of it.
And for me, a learning curve too
Edit; Ouuff fit issues, clamps etc....
Fight on
Nick
Thanks, Nick!!! ")
I had a terrible time at the beginning to grab little parts with fingers, but I have to say it gets MUCH better. I wish I had a little miniature finger set though.that's one of the reasons i do 1/32 as well. Also the fact my fingers are fat like pigs nipples

- Joined
- Apr 28, 2018
- Messages
- 10,797
- Points
- 113
- First Name
- Jakko
There’s this really neat gizmo for that:

Buy some (different brands are also available) with pointed tips and with either straight or rounded ones, and you can probably get most parts into position fairly easily. Possibly after some practice
Buy some (different brands are also available
) with pointed tips and with either straight or rounded ones, and you can probably get most parts into position fairly easily. Possibly after some practice There’s this really neat gizmo for that:
Buy some (different brands are also available
Thanks, Jakko!
Oh yes, I was smart enough just few days ago and got them.
I got this little part glued using the tweezers shown on screenshot but with fingers only..... I do not think so.
I got the normal and reverse action or whatever they call it. Necessity I would say.


I will know soon. I am sure they will do the job.Those self locking tweezers are very handy for holding small parts for painting as well.
Andy.
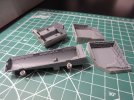
Here is the news, I broke the canopy.......
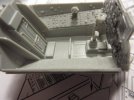
So at this point I will not worry about cockpit look which I messed up to start with and just concentrate on the outside.
Learned something the VERY hard way, just life.
Somone might ask, how the h...l did you do it?
Well, I was just dry fitting it and it seemed to be too narrow, so I tried to open it up.
The plastic parts from the sprue are much more flexible and can be deformed if overbend carefully so I thought the same will happen with the canopy. I was wrong!
The broken canopy did not stop the fun.
I wanted to paint a bit (airbrush newbie here as well) and I realized that the gun had to be removed from the bay for that. Removed it and broken it too. Reglued and it will be fine.
I wanted to paint a bit (airbrush newbie here as well) and I realized that the gun had to be removed from the bay for that. Removed it and broken it too. Reglued and it will be fine.
Attachments

And FINALLY, it was time for the airbrush.
Love it. Finish is so much better than when paining by hand.
Lots of learning even for the first "real" painting time, no testing.
Made me setup for airbrush cleaning, better than first time but still needs lots of improvements. I am talking cleaning setup, using the airbrush is a totally different animal. 
I could not stop looking at the finish, so cool.
Love it. Finish is so much better than when paining by hand.
Lots of learning even for the first "real" painting time, no testing.
Made me setup for airbrush cleaning, better than first time but still needs lots of improvements.
I am talking cleaning setup, using the airbrush is a totally different animal. I could not stop looking at the finish, so cool.
Attachments
- Joined
- Apr 28, 2018
- Messages
- 10,797
- Points
- 113
- First Name
- Jakko
Oops …Well, I was just dry fitting it and it seemed to be too narrow, so I tried to open it up.
The plastic parts from the sprue are much more flexible and can be deformed if overbend carefully so I thought the same will happen with the canopy. I was wrong!
 Clear polystyrene is brittle, the pigments in coloured polystyrene not only make it opaque but also more flexible. Aircraft canopies are probably the worst bits in this respect, because of their shape they tend to be easier to break accidentally than more or less flat pieces like car windshields, headlight lenses, etc.
- Joined
- Sep 4, 2019
- Messages
- 9,496
- Points
- 113
- First Name
- Andrew
Did not know that! Thanks!the pigments in coloured polystyrene not only make it opaque but also more flexible. .
Today, I was browsing thru supplies, hundreds and hundreds of them.... and a question popped up in me head.
Can you use Tamiya primer and then paint some Vallejo acrylic coats?
I am not even close to that stage, of course but I would love to know your opinions on that.
Another question, can I use acrylic paint (base coat) on non-acrylic based primers?
Just curious on all these things.
Can you use Tamiya primer and then paint some Vallejo acrylic coats?
I am not even close to that stage, of course but I would love to know your opinions on that.
Another question, can I use acrylic paint (base coat) on non-acrylic based primers?
Just curious on all these things.
Tamiya primer then Vallejo paint….Definitely yes! Done that hundreds of times. The grey Tamiya primer is far better than the white primer though. It adheres better.
Acrylic paint over non acrylic primer….again definitely yes.
I have used almost everything paint wise over almost everything else primer wise over the years with no issues as to compatibility. As long as the primer is allowed to properly dry then the overlying paint does not react.
Acrylic paint over non acrylic primer….again definitely yes.
I have used almost everything paint wise over almost everything else primer wise over the years with no issues as to compatibility. As long as the primer is allowed to properly dry then the overlying paint does not react.