Nice John - should be a lot better to assemble. Hobbyboss stuff is quite good
John,
as far as I can tell, the only difference between yours, and the Izhorsky version is the turret - the rest is the same I believe
View attachment 336059
Dave
Simon and Dave thanks, looking forward to the new Hobbyboss arriving this week. Will be put to one side for a while.
Come on in ,John, the water's lovely!
let's see that baby in the drink, it will be brilliant.
Or you could always try aeroplanes.........

A start has been made on the base Neil, sealants at the ready.
oops!!
Not the best result I have seen. Looks like you have a great solution mate. Wonderful support from the guys. Look forward to seeing what comes out of the ashes.
Sorry, sorry I didn't mean to suggest you set fire to it. Oh


Its ok Steve, no it wasn't any good, but it will be soon.
John.
-----------------------------------------------------------------------------------------------------------------------------------------------------Progress has been made, a section of pink foam was found in the heap of that will come in useful at some point. Sure we all have one.

Adopting Simons idea of the T38 swimming I found a piece of suitably thick foam. Thick enough to allow me to sink the hull into a pre cut hole. I could have removed some of the hull by saw, but the amount that would be left to attach the front sprockets on would have been very little. With this in mind I did the deep hole as I had done with the Panzer.
First was the setting out.

Measures approx 185 mm x 170.

Above you can see my rough lines for cutting away the front foam.

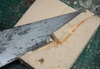
Cutting through the foam to the line , as above.

Once the first cut had been done a curved line was cut into the foam from the top. Then more cutting into the line from the front edge. This will give you this, after a slight twisting of the saw and chisel to remove the curved section.

Once the bench top was clear of bit the model was placed in the middle and an outline drawn round, leaving enough room for the tracks and outer parts. Taking a Stanley knife and making lots of cuts in each direction allows the foam to be removed with ease, though cleaning has to be done to the base.

The tank is now placed into position for checking.


I then glued the foam to a section of 9 mm ply and placed some weights on the top.

To the sides ca be seen the edge section of 6 mm ply, I had a beautifully figured sheet in the work shop for years. It wasn't often a sheet would appear like this so had to be kept for special use !
Tomorrow I hope to get the sides on, i've allowed about 6mm all round to allow for plaster for the bank and top and for the " water "
Thanks for looking in.
John .
Suppose this should be in the Diorama section , sorry.

 I’m sure something was getting built then I see it got unbuilt....and where’s the fire
 ?
? Nearly a fire but managed to control myself .Well the Hobby Boss should have instructions that may make sense!