You are using an out of date browser. It may not display this or other websites correctly.
You should upgrade or use an alternative browser.
You should upgrade or use an alternative browser.
Building a Diorama.
- Thread starter wonwinglo
- Start date
D
deakon
Guest
polystyrene packing is a favourite of mine [its free]..cuts with a hot knife to almost any shape..and the weight saving is very important..the papier mache i use is almost like a paper paste...and is very workable...and it dries rock hard.and will "hold" everything together on the base..
ive decided that this diorama will depict...a concrete gun emplacement for the Flak 38..made from plaster castings .cut and detailed by hand..on the right handside at the top of the rise. gently sloping down to a river..where a vehicle has stopped to allow the crew to have a break and take on water
[possibly my half finished Tiger 1]..and rising up away from the left handside of the vehicle..on the other shore...the rock formation..a tree or two..and a figure perhaps as a point of focus.... im thinking of building a trench in front of and underneath the Flak 38..so i can throw in some dio accessories from the spares box.
Dont worry there will be plenty of barbed wire.....D....
D
deakon
Guest
today i spent. making slabs of concrete.using the lid from a box of bulldog clips as a mold...i use Herculite casting plaster..[just like plaster of paris but much lighter] ...this dries in around half an hour....when i had four slabs...i measured off the area on the baseboaed.where it was to be sighted...and cut the pieces to size..using the scribe and snap method..see pic...
I test fit and sand down where needed...and fix together with superglue..these bonds will be reinforced later with milliput, i place the piece on the baseboard. to test fit. and measure the distances needed by any pieces.that are underneath the floor slab up against the groundwork..
dont forget the whole piece will be embedded into the groundwork..at a later stage. so perfectly straight lines are not critical on the underside..
so after assembling all the pieces i had cut.. i put the assembled gun emplacement aside to dry a while
it still has a little work to be done..like filling and sanding. and some texture added to make it look more like cast concrete.but you get the idea! it should be a nice piece of scratchbuild when its all finished and painted..
finally a pic of the emplacement.complete with flak gun. tomorrow im making wooden stairs..to fit from the groundwork to the doorway of the emplacement..and ill probably make a start on the rock formations..
Please can i ask those of you with questions.. to PM them to me this is to save space in this thread. so i can keep it as concise as possible.I will endeavour to reply to your queries in my next post..thanks....D....
R
rjwood_uk
Guest
looking lovely. i hope you dont mind compliments taking up space in the thread lol
i can tell this is going to be a masterpiece!
i can tell this is going to be a masterpiece!
N
Nigel.D
Guest
lov it mate go for it!!! the veirling is the nuts
B
Bunkerbarge
Guest
I actually think the questions and answers along the way elaborate on the build thread and generate more interest from more people.
I don't want to tell you how to do your own thread but I was going to ask a question and writing it somewhere else where the picture wasn't posted seemd to stick it out on a limb so to speak.
Anyway let us know where you want us to add question/comments etc. As Barry says the space isn't an issue.
I don't want to tell you how to do your own thread but I was going to ask a question and writing it somewhere else where the picture wasn't posted seemd to stick it out on a limb so to speak.
Anyway let us know where you want us to add question/comments etc. As Barry says the space isn't an issue.
D
deakon
Guest
no worries guys post away....i was just trying to be thrifty with the space but as that isnt an issue!!!! lets ave it!!
B
Bunkerbarge
Guest
Is the Veirling the same unit fitted to later U-Boats?
It looks just like the one fitted to U-535, if any of you were lucky enought to get a look around her in Birkenhead before the museum shut thier doors early this year.
It looks just like the one fitted to U-535, if any of you were lucky enought to get a look around her in Birkenhead before the museum shut thier doors early this year.
G
Gaz
Guest
Probably ,the Germans tried to fit the flakvierling to just about everything...
Go to "uboat.net" and put in u-441.
think they also put the AA onto some captured T34 's.
Go to "uboat.net" and put in u-441.
think they also put the AA onto some captured T34 's.
B
Bunkerbarge
Guest
I've just had a look at my photo's and I remember now. The one on U-535 is actually unusual in so far as it is one of the rare two barrelled versions.
The four barelled one was the more common and was fitted to later u-boats.
View attachment 14733
View attachment 14734


The four barelled one was the more common and was fitted to later u-boats.
View attachment 14733
View attachment 14734
R
rjwood_uk
Guest
the mobelwagen had a one barelled 3.7 flack on the top of it
D
deakon
Guest
ithink youll find it is ......its the only quad 20mm weapon. i can find.that was used by axis forces...but dont hold me to this..............
OH and ive spent all afternoon in the boozer....so dont expect an update this evening .....although i will try my besht!........hic.....
OH and ive spent all afternoon in the boozer....so dont expect an update this evening .....although i will try my besht!........hic.....
D
deakon
Guest
right ..a couple of pics of the work i managed this morning before being called to the pub...ive decided to model the stairs in concrete. rather than wood. also im going to put an access ladder and a hatch in the top of the emplacement..its starting to look buisiness like and is comming along nicely..

Another angle wouldve been better...but you get the idea!!!!
Another angle wouldve been better...but you get the idea!!!!
D
deakon
Guest
today i added some more concrete to the emplacement.another piece from the same cast.was added to the underside of the bomb protection..i made stairs from another piece of plaster i had cast yesterday...and marked where the rung ladder and access hatch were to be situated....

next i made the metal rung ladder from bent lead wire...and an access hatch from balsawood and detailed it with some grandt line boltheads..
i textured the whole of the construction with a piece of heavy gauge glasspaper,, to give the appearance of cast concrete..it dosent show up too well in the pics yet ..but it will once painted..i then scribed and cut the access-hatch hole ..using my rotary tool..and fitted the wooden hatch in position..

I added a figure to better gauge scale...and put the rungs into the backwall

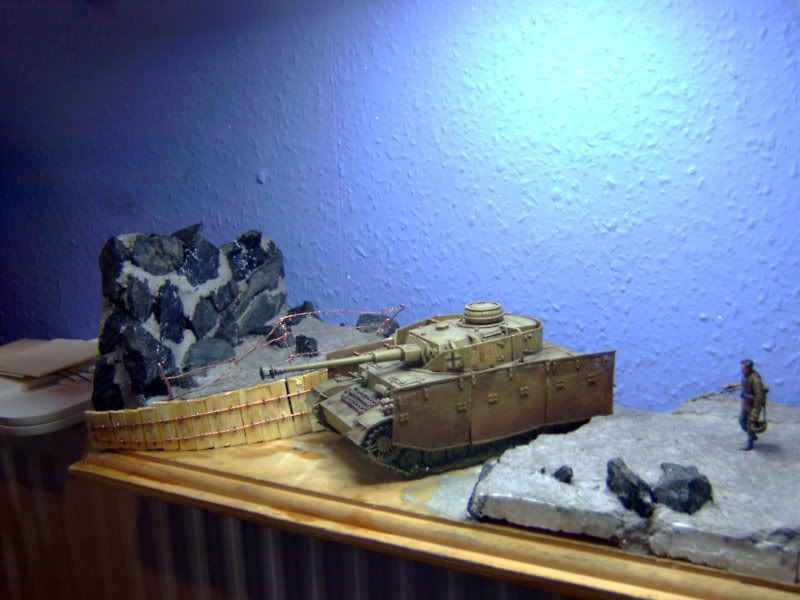
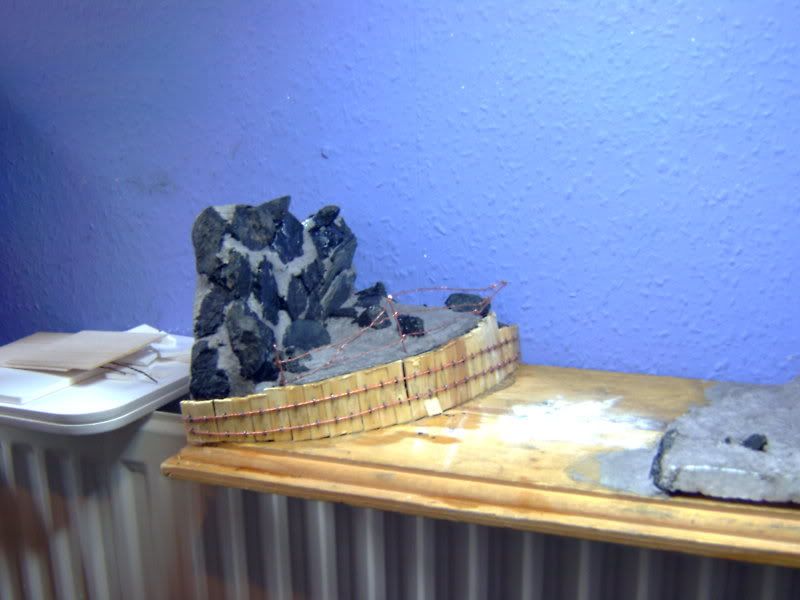
on the other side of the baseboard.. i started the rockface , i split pieces of coal and slate along the natural compession lines so they split easily..and fixed them to the formers with white glue..some of them were pushed into the polystyrene..to aid the sit..when i add the groundwork...


i carried some of the rock pieces over to the other side of the dio..to tie in both sides...

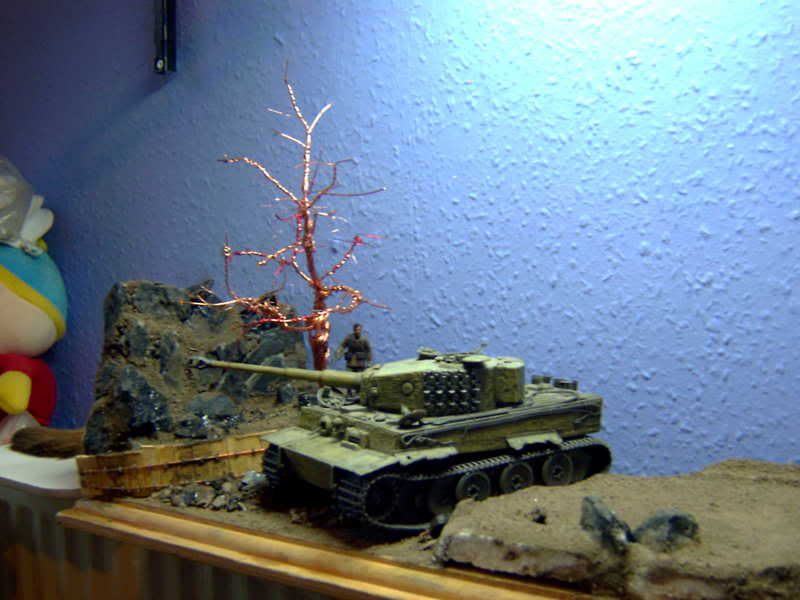
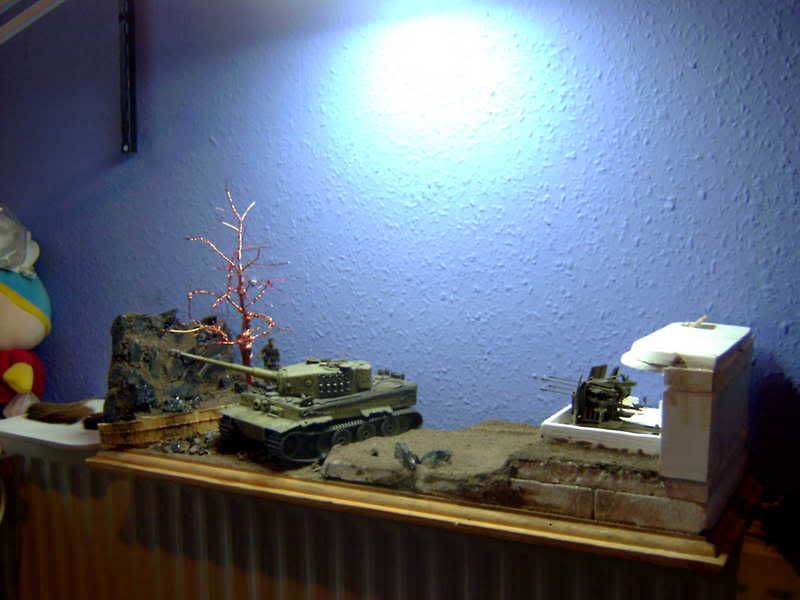
Finally this evening..a couple of pics with the flak gun in position and a figure to set scale.....After dinner im going to tap the top of the emplacement with a hammer to create some stress fractures..and knock out some chunks..to represent the poor quality of occupied workforce concrete..[slave labourours dont do high quality work and sabotage was rife].....ill post pics of the results later this evening..............D........


next i made the metal rung ladder from bent lead wire...and an access hatch from balsawood and detailed it with some grandt line boltheads..
i textured the whole of the construction with a piece of heavy gauge glasspaper,, to give the appearance of cast concrete..it dosent show up too well in the pics yet ..but it will once painted..i then scribed and cut the access-hatch hole ..using my rotary tool..and fitted the wooden hatch in position..
I added a figure to better gauge scale...and put the rungs into the backwall
on the other side of the baseboard.. i started the rockface , i split pieces of coal and slate along the natural compession lines so they split easily..and fixed them to the formers with white glue..some of them were pushed into the polystyrene..to aid the sit..when i add the groundwork...
i carried some of the rock pieces over to the other side of the dio..to tie in both sides...
Finally this evening..a couple of pics with the flak gun in position and a figure to set scale.....After dinner im going to tap the top of the emplacement with a hammer to create some stress fractures..and knock out some chunks..to represent the poor quality of occupied workforce concrete..[slave labourours dont do high quality work and sabotage was rife].....ill post pics of the results later this evening..............D........
R
rjwood_uk
Guest
this is looking great Deakon!!!
do you have any pictures of already completed ones to show us as examples of your work?
do you have any pictures of already completed ones to show us as examples of your work?
D
deakon
Guest
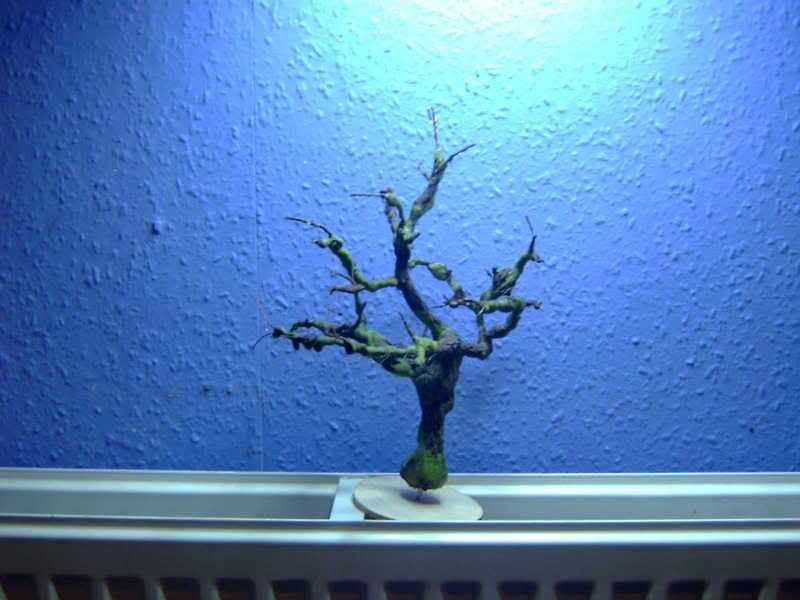
friday.. i mixed up some papier mache...from old newspaper strips..and left it soaking overnight..i like a smooth mix..so i knead it with my fingers..to seperate as much of the fibres as i can...then i squeeze out as much of the water as i can.and rub it through my fingers..to get lots of nice loose..semi dried pellets..if it dries out before im ready to use it it can be re-wetted .and used..i take a guess as to how much i needed for the rockface ..and used white glue to mix the pellets in.this goes on the formers quite well and can be pushed into nooks and crannies with the blunt end of a pencil or somesutch tool..and can be kept workable by using wet fingers to press it into the base..this dried overnight .and it set rockhard..looks pretty good so far...
there semms to be a problem with photobucket i cant get the pic posted.. ill try later.........AHA>>>>>
ok barbed wire.. i stripped a length of household electrical flex to get at the fine copper wire inside...i take six..strands of this and twist them together in my motortool..this gives me the wire...to make the barbs i took a single piece of the copper wire ..and wrapped it arount the "Wire" and trimmed it off leaving the barbs much longer than the finished piece to aid manufacture..this i repeated every three or four millimeteres..[guess]..the barbs will be slid closer together after trimming..the two bits at the bottom are made with pipe cleaner wire and copper barbs..and are a little too thick for this scale but will look the bizz in 1:6th..i prefer the first method..looks pretty good when painted up..this takes a little patience but its worth the hassle..IMHO..
R
rjwood_uk
Guest
lovely. you can add this to my barbed wire thread (linked somewher at the bigining of this thread) if you want!
great stuff!
great stuff!
D
deakon
Guest
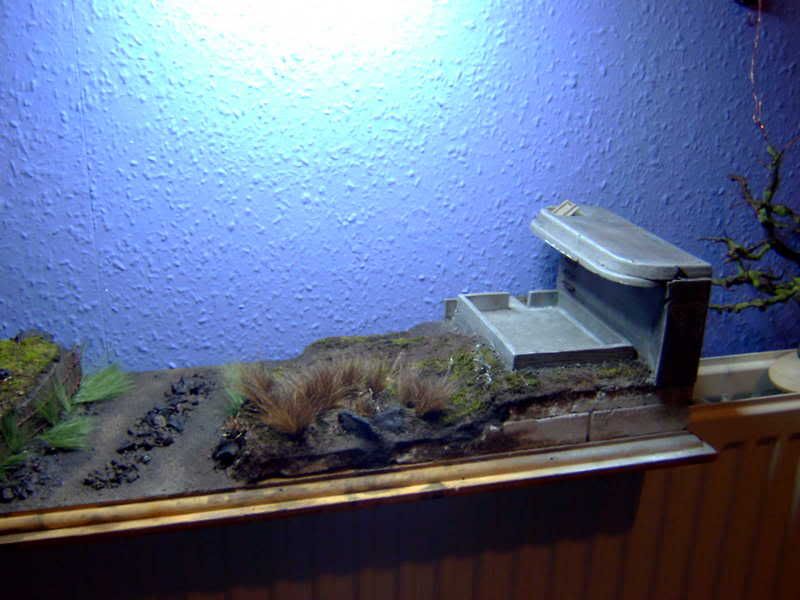
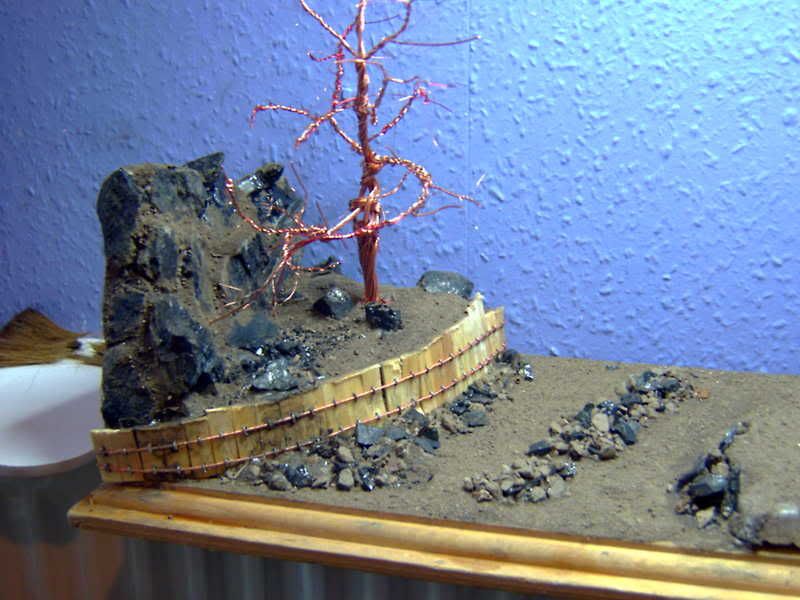
Mon...today i finished putting down the groundwork [earth] on the baseboard..i smoothed out a path way with a wet finger.and pushed up the mounds of earth by the side..to add a little depth..the path runs from the emplacement steps to the riverside....i pushed the emplacement and thesteps into the groundwork and built up around it by pushing the papier mache against it again with the wet finger..i also added some planking under the rungs..in balsawood..the cracks in the casement were made by tapping [gently] with a hammer..and using superglue in the cracks..i made the reinforcing rods from lead wire..and fixed them with superglue.. i trimmed one of the lengths of barbed wire i made yesterday. and coiled it up ..ive temporaraly fixed it to the base with wooden pegs and a loop of leadwire.....the barbed wire posts in these pics were made from a thicker guage copperwire. bent with pliers..to form the loops where the barbed wire goes through..the wire was fixed to these using superglue..and pushed into the groundwork for the pics......
the wooden retainers along the earthbank..are made from lollipop sticks trimmed to length..and stuck on with white glue..im going to make a retaining strap..to be riveted along the planking..from lead foil....D.....
the wooden retainers along the earthbank..are made from lollipop sticks trimmed to length..and stuck on with white glue..im going to make a retaining strap..to be riveted along the planking..from lead foil....D.....
Last edited: