Some great and inspiring work going on here John.
Top modelling for sure.
Nikita (Boot Chucker) Khrushchev
Thanks Ron................. Its so enjoyable, but the best is yet to come ........!
Right good evening all .
Having had one of Christine's friends here for a week bench time was some what restricted, but I did manage the odd hr in the afteroons and evenings.
I concentrated on the ceilings , loose bricks and wall sections, skirting board esp for Si,

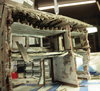
and the outer roof timbers. attached. Most of the roofing was traditional wooden trusses covered with metallic sheets. Copper sheet and lead were a common materials.
Firstly the top floor ceiling was done. I finally did a cut into the joist side to make the look of laths appear when a brown Vallejo acrylic wash was applied. ( I knew It would come in one day

) I pretty much saturated the card with water and a little wash , this caused the card to be come softer and easily bend


Later I painted the edged in an Old wood colour from Amig The timbers had been given a cheap acrylic paint wash of black, heavily watered down.
Whist this was drying I set to on the brick, several coats of acrylic paints were used, two cheap ones and then a couple of Amig for the darker brown and the very light bricks .


The brick sections on the right have had pigment dragged over them and finally wiped over with a damp make up sponge. The ones to the left are waiting for the pigment I may paint some of the white foam with a mortar grey acrylic.


Pigment applied waiting for the grey mortar paint.
Last night I cut some white card for the ground floor ceilings, this time as the joists were already in place I scribed cut lines across the width to give the impression of lath. I also did some break lines then whetted the card. Leaving it for about an hour to soak in I twisted the card in to bent shape. Once this was completed I cut with a scalpel the damage lines through the card. Now left with several sections I cut now with a sharp pair of scissors the lath sections that would have appeared as the plaster flew off. Some of the sections were then glued to the exposed lower ceiling joists, the other matching section will lay on the ground.

Another shot from under to show the damaged ceiling.

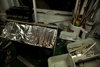
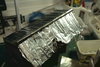
Some of the bricks have been finished, these next photos show some sections in a temporary position.


The exposed foam still need to have some color added. Note the door linings have been glued in .

Roof has been boarded with some balsa sections, I can see the odd one needs some adjustment and a final trim top and bottom will be done. At this point I shall start to apply the kitchen silver foil for the copper sheet.
The rear which will have more damage will take a lot longer.
Guttering to be fitted, down pipes, pewter gutter brackets.
Then the remains of the windows, a final light coat to the stone front. eaves to be capped and the capping on the roof decided.
Thoroughly enjoying this part of the dio.

Comments welcome, thanks for staying with it.
John.


 570
570