Sukhoi Su-27 Flanker B Trumpeter Scale 1:32

Joined
May 5, 2022
Messages
201
Points
63
Location
Lindenwold, New Jersey, USA
First Name
Andrzej
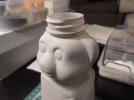
Today I was excited to try the AK Interactive Grey Surface Primer. :smiling:

First, I thinned it about 1 to 3 with same brand thinner and it did not work, splatter. :disappointed2:
I have no experience at all with setting up pressure and trigger position (Grex Tritium.TG7) .
I used 20 psi and trigger in the middle of the range and needle is 0.3 mm.

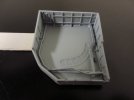
Then I tried straight from the bottle, and it worked, the results were only depending on my lack of skills.
Tomorrow I will try sanding and scratching to see how hard and resistant it is but for now, I love what I see. :tongue-out3:
 

Attachments

  • IMG_1182.JPG
    IMG_1182.JPG
    91.1 KB · Views: 6
  • IMG_1183.JPG
    IMG_1183.JPG
    93.4 KB · Views: 3
  • IMG_1184.JPG
    IMG_1184.JPG
    109.9 KB · Views: 5

rtfoe

SMF Supporter
Joined
Apr 29, 2018
Messages
7,518
Points
113
Location
Malaysia
First Name
Richard
Fractures are harder to rectify as they appear in the clear plastic and not on the surface so it's either to get a new canopy or live with the fracture. He had the canopy opened so it's less obvious if you want to look into the cockpit.

Cheers,
Richard
 
Joined
May 5, 2022
Messages
201
Points
63
Location
Lindenwold, New Jersey, USA
First Name
Andrzej
Fractures are harder to rectify as they appear in the clear plastic and not on the surface so it's either to get a new canopy or live with the fracture. He had the canopy opened so it's less obvious if you want to look into the cockpit.

Cheers,
Richard
Thanks, Richard.
I was looking for new canopy, they used to make a replacement but not anymore as far as I could search.
I will leave with the fracture, see my original post, it will totally serve the purpose.
I will have canopy closed so it is another factor.
Cheers, AJ
 

Jim R

SMF Supporter
Joined
Apr 27, 2018
Messages
13,759
Points
113
Location
Shropshire
First Name
Jim
Hi AJ
Good progress and it sounds as if your enjoying things. The balance between air pressure, paint dilution and spraying distance is something that gets easier the more you practice. There are no hard and fast rules. Those Tamiya polishing compounds which Tim recommended are very good.
Jim
 
Joined
May 5, 2022
Messages
201
Points
63
Location
Lindenwold, New Jersey, USA
First Name
Andrzej
Hi AJ
Good progress and it sounds as if your enjoying things. The balance between air pressure, paint dilution and spraying distance is something that gets easier the more you practice. There are no hard and fast rules. Those Tamiya polishing compounds which Tim recommended are very good.
Jim
Thanks, Jim.
Practice makes perfect they say so it will get better. I think that in addition to what you said, brands will act differently to some degree.
Yes, I do enjoy everything a lot!!!! :smiling:
 

Jim R

SMF Supporter
Joined
Apr 27, 2018
Messages
13,759
Points
113
Location
Shropshire
First Name
Jim
brands will act differently to some degree
Very true. I have fallen into the trap of buying lots of different paint brands. I fell for the advertising :rolling:
I wish I had found one I really liked and stuck with it to get used to how it behaves.
 
Joined
May 5, 2022
Messages
201
Points
63
Location
Lindenwold, New Jersey, USA
First Name
Andrzej
Very true. I have fallen into the trap of buying lots of different paint brands. I fell for the advertising :rolling:
I wish I had found one I really liked and stuck with it to get used to how it behaves.
Yes, it gives me a headache with all these available items, I try to read reviews, but some are simply contradictive.:confused:
 
Joined
May 5, 2022
Messages
201
Points
63
Location
Lindenwold, New Jersey, USA
First Name
Andrzej
I wanted to show you the short video (not scale modeling but sure creating something) of my SU-27 B in so called Plane Maker.

This is the program associated with flight simulator that will allow developer to make Flight Model of the aircraft.
What you see is only made for the purpose of calculating all parameters for the Flight Model.
What you will see in simulator, is 3D model that will need to be made in software called Blender and exported so it goes together with whatever is created in mentioned above Plane Maker.

There will be tons of work on both programs, but it is a start. ;)

Cheers, AJ

 
Joined
May 5, 2022
Messages
201
Points
63
Location
Lindenwold, New Jersey, USA
First Name
Andrzej
Today, I also played with airbrush.
I prepared everything, ready to start.
I pressed the trigger on airbrush, NOTHING!
I am thinking, OK paint is too thick, I diluted, pressed the trigger...NOTHING, not even a drop, just air coming out.
I diluted even more, it did not look right, it was looking almost like water, tried again... NOTHING!

At this point I started thinking, what is happening, it cannot dry THAT fast.
I looked at the front and pulled the trigger (at the angle so I do not spray in my face in case it starts working. :tongue-out3:
I looked closely and what did I see?
Needle is NOT moving. BINGO.
When I was cleaning the needle last time, there is a little nut that needs to be tighten so the needle can be moved back when pressing the trigger and I simply...... did not tighten that nut.
Isn't that a great lesson learned? A bit hard way but still. :cool::nerd:

Attached are repainted gear wheels wells and nose gear well as I used WRONG paint, I used Ocean Grey and it supposed to be bluish grey.
 

Attachments

  • IMG_1187.JPG
    IMG_1187.JPG
    93.5 KB · Views: 4
  • IMG_1188.JPG
    IMG_1188.JPG
    94.8 KB · Views: 4

rtfoe

SMF Supporter
Joined
Apr 29, 2018
Messages
7,518
Points
113
Location
Malaysia
First Name
Richard
Today, I also played with airbrush.
I prepared everything, ready to start.
I pressed the trigger on airbrush, NOTHING!
I am thinking, OK paint is too thick, I diluted, pressed the trigger...NOTHING, not even a drop, just air coming out.
I diluted even more, it did not look right, it was looking almost like water, tried again... NOTHING!

At this point I started thinking, what is happening, it cannot dry THAT fast.
I looked at the front and pulled the trigger (at the angle so I do not spray in my face in case it starts working. :tongue-out3:
I looked closely and what did I see?
Needle is NOT moving. BINGO.
When I was cleaning the needle last time, there is a little nut that needs to be tighten so the needle can be moved back when pressing the trigger and I simply...... did not tighten that nut.
Isn't that a great lesson learned? A bit hard way but still. :cool::nerd:

Attached are repainted gear wheels wells and nose gear well as I used WRONG paint, I used Ocean Grey and it supposed to be bluish grey.
One good lesson I learned is to add a small drop of thinner into the paint cup fir a dry run. This loosens any tiny left over dried paint residue and to see if the flow is good.
Good start on your 3D wire frame. Yes the fracture on the canopy will not be a problem as you only need shape and dimensions in your actual work. And if you're not a revit counter then leaving the fracture as a new canopy is impossible to obtain is okay. Try dipping the canopy in Future Varnish...it might seep into the fracture and lessen the outcome. It's worth trying.

Cheers,
Richard
 

Jakko

Way past the mad part
SMF Supporter
Joined
Apr 28, 2018
Messages
10,846
Points
113
First Name
Jakko
did not tighten that nut.
That sort of thing happens to everyone at some point :smiling3: Some months ago, I had a very hard time getting my airbrush to spray, and after a lot of fiddling about in much the same way as you, I eventually discovered that I had been turning the knob on this thing:

Inline air regulator.jpg

the wrong way … This is a quick-release coupling on the end of the air line, so the airbrush plugs into it, but unlike most it has an airflow regulator in it, and I had been turning that further closed every time when I was trying to get more air :rolling:
 
Joined
May 5, 2022
Messages
201
Points
63
Location
Lindenwold, New Jersey, USA
First Name
Andrzej
One good lesson I learned is to add a small drop of thinner into the paint cup fir a dry run. This loosens any tiny left over dried paint residue and to see if the flow is good.
Good start on your 3D wire frame. Yes the fracture on the canopy will not be a problem as you only need shape and dimensions in your actual work. And if you're not a revit counter then leaving the fracture as a new canopy is impossible to obtain is okay. Try dipping the canopy in Future Varnish...it might seep into the fracture and lessen the outcome. It's worth trying.

Cheers,
Richard
Thanks for the tip, Richard. :smiling:

In my case, the airbrush was perfectly clean as I took it apart in including spraying nozzle and needle so there was nothing there, but I like the idea, will be doing it.;)

That 3D airframe is NOT what you will see in simulator, it is only for the software to calculate all parameters for the Flight Model, what you will see will be made in Blender. I will post as I go. :cool:

It seems that Future Varnish is not available in US, do you know any alternative I could/should try? :confused:
 
Joined
May 5, 2022
Messages
201
Points
63
Location
Lindenwold, New Jersey, USA
First Name
Andrzej
That sort of thing happens to everyone at some point :smiling3: Some months ago, I had a very hard time getting my airbrush to spray, and after a lot of fiddling about in much the same way as you, I eventually discovered that I had been turning the knob on this thing:

View attachment 453523

the wrong way … This is a quick-release coupling on the end of the air line, so the airbrush plugs into it, but unlike most it has an airflow regulator in it, and I had been turning that further closed every time when I was trying to get more air :rolling:
I have the same airflow regulator, but mine at least shows the arrow with increasing thickness indicating more flow.
Probably a nice thing but I haven't tried it yet, the negative thing is that I will not know what my pressure is anymore.
Right now, I set that airflow regulator to max and just watch my pressure in compressor gauge, but I will definitely give it a try next time.
 

Tim Marlow

Little blokes aficionado
SMF Supporter
Joined
Apr 27, 2018
Messages
16,802
Points
113
Location
Somerset
First Name
Tim
It’s this stuff Andrzej…
Basically a floor wax….
 

stillp

SMF Supporter
Joined
Nov 17, 2016
Messages
7,232
Points
113
Location
Rugby
First Name
Pete
One good lesson I learned is to add a small drop of thinner into the paint cup fir a dry run. This loosens any tiny left over dried paint residue and to see if the flow is good.
When I've cleaned my airbrush I put a few drops of isopropyl alcohol in the cup and press the trigger to check that there is no bubbling, I then leave the alcohol in the airbrush until it's next needed, when a quick blow-through will blast any remnants of paint out.
Pete
 
Joined
May 5, 2022
Messages
201
Points
63
Location
Lindenwold, New Jersey, USA
First Name
Andrzej
When I've cleaned my airbrush I put a few drops of isopropyl alcohol in the cup and press the trigger to check that there is no bubbling, I then leave the alcohol in the airbrush until it's next needed, when a quick blow-through will blast any remnants of paint out.
Pete
That's a great advice, Pete. Thanks!!!!!

@stillp But if I leave it for a few days it will be OK?
 

stillp

SMF Supporter
Joined
Nov 17, 2016
Messages
7,232
Points
113
Location
Rugby
First Name
Pete
Yes, put the cover on the cup and it should last for a week or more.
Pete
 
Top