Horses??? I think we’re talking Dinosaurs.Damn Rick, I never knew horses had wires..............Learn something new every day here..............
You are using an out of date browser. It may not display this or other websites correctly.
You should upgrade or use an alternative browser.
You should upgrade or use an alternative browser.
1/35 MINI-ART Ya - 12 SOVIET ARTILLERY TRACTOR. 35052
- Thread starter JR
- Start date
- Joined
- Apr 28, 2018
- Messages
- 10,950
- Points
- 113
- First Name
- Jakko
It’s why Death stopped using a skeletal steed and got Binky instead: no more need to stop to wire bits back on.I never knew horses had wires..............Learn something new every day here..............
Thanks Steve, the engine was fun, the next section ----- well I'll let you know laterA very nicely detailed engine JR. Great work on the tracks. It all looks pretty good mate. Keep it comin

You know what your talking about Paul, I'll leave you and Dude 1 to discuss the finer pointsLooks like a Cat?

Am I having fun !It's a Jimmy (GMC) 4-banger sent in quantities to Russia in the Lend-Lease Act. These and a whole lot of other things like tanks, armored recon cars, trucks and the like. The engines enabled the factory to start producing these tractors again with little modifications.....
Dude 2, I did warn you about the torsion bar units. Just take your time and glue them in place, unless of course you want to set this puppy on uneven landscape. Nice job on the motor and the tracks Buddy!!! Are you having fun yet???
Prost
Dude 1
 well at least I was warned. Just going to take my time and shout when I get stuck.
Neil can't see you having a problem with anything having just witnessed your recent offering. Can't imagine you building a car, thought Horses and Infantry were more your line.Looking good John, makes me feel like digging one of my cars out of the stash... but not yet, too many unfinished projects at the moment
Hi John
You'll crack the tracks - keep at it
Jim
Morning Jim, hard to see even with the optovisor, those pins are none existent, but cause a lot of trouble when you try to clip the sections together.
Coming along famously John, good job.
Andy.
Thanks Andy.
Yes you did, talk about needing several sets of hands, and small ones too. Going to do a few more track links then wait until I have the wheels on to give me a better idea.Looking good so far, John. I did say the torsion bars were a bit tricky! The knack with the sprockets & idlers is gluing thr right numbers of links together on the bar, allowing to dry for a few minutes, then peeling off whilst still flexible, and forming around the sprocket/idler
Dave
Thanks all, I'll beat it into submission , might not be the correct way of building those torsion bars, but I need to find an easier way.
Dzhon.
John,might not be the correct way of building those torsion bars, but I need to find an easier way.
I have a vague recollection of gluing the swing arms in the correct position, then fudging/fettling the torsion bars to fit - obviously giving any hope of them 'working' - but it's not a flexible track, so maki8ng them moveable seems a bit pointless.....................
Dave
It's a Jimmy (GMC) 4-banger sent in quantities to Russia in the Lend-Lease Act. These and a whole lot of other things like tanks, armored recon cars, trucks and the like. The engines enabled the factory to start producing these tractors again with little modifications.....
Dude 2, I did warn you about the torsion bar units. Just take your time and glue them in place, unless of course you want to set this puppy on uneven landscape. Nice job on the motor and the tracks Buddy!!! Are you having fun yet???
Prost
Dude 1
I should’ve known that by the valve cover and the blower intake a thought that looked familiar I learn how to drive trucks on these two cycle engines
Mark1
SMF Supporter
I done the same on my t55,there where some short rods to use instead of the torsion bars if you want it on flat ground.John,
I have a vague recollection of gluing the swing arms in the correct position, then fudging/fettling the torsion bars to fit - obviously giving any hope of them 'working' - but it's not a flexible track, so maki8ng them moveable seems a bit pointless.....................
Dave
That's what I have just done Dave,John,
I have a vague recollection of gluing the swing arms in the correct position, then fudging/fettling the torsion bars to fit - obviously giving any hope of them 'working' - but it's not a flexible track, so maki8ng them moveable seems a bit pointless.....................
Dave
had to find an easier way, and this is it. Leaving the parts to dry at the mo, all are in correct alinement as per the drawing.Will do the other ends and assemble after I've had a break.Good Lee, can you remember the wiring by any chanceI should’ve known that by the valve cover and the blower intake a thought that looked familiar I learn how to drive trucks on these two cycle engines
Hi Mark, good to know that I'm not alone.The model will be in for repair so should think they would have found some flattish ground.I done the same on my t55,there where some short rods to use instead of the torsion bars if you want it on flat ground.
I'll have a look later Rick, soon have the head off !The firing order for the straight 4 cyl. 2 stroke is 1-3-4-2.......if it has a 90 degree crank it's 1-4-3-2.......which is your JR?
It depends on how you number the cylinders!! In the UK, cylinder No.1 is the furthest away from the flywheel, but other countries/makers have different ideas - No.1 cylinder being the nearest to the flywheel! You can imagine the confusion that could cause, if you weren't in the know!! Standard cranks were known as even fire, whilst 90 degree cranks as odd fire. Luckily I mostly worked on normal 4-stroke diesels!
Dave
Dave
John. Diesels don’t have spark plugs. Doesn’t matter on the firing order because there’s no wires to go to the block and no distributor.Good Lee, can you remember the wiring by any chance
Hi Mark, good to know that I'm not alone.The model will be in for repair so should think they would have found some flattish ground.
")
and each pipe has to have the same length!Still, it needs an injector pump and pipes to said injectors.
Andy.
Dave
This type of engine one had one main fuel line
This type of Engine only had one main fuel line to the injectors
Lee,when I read that I thought good less to do , then Rick , Andy and then Dave shattered my illusions with talk about fuel lines.John. Diesels don’t have spark plugs. Doesn’t matter on the firing order because there’s no wires to go to the block and no distributor.
Should I put the covers on and forget the engine lol
Rick, Andy and Dave thank you for your knowledge on the engine, just look away when I come to detail it !
--------------------------------------------------------------------------------------------------------------------------------------------------------------------------------------------------------------------------------------------------
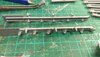
Continued to glue the torsion bars together.


Marking then up with pencil on the face side.

Realised at the end I could have glued the length with the end fitted into the box section, by gluing the bar itself then fitting the cap . This would have left the end section to fully work. Oh well , not too bothered as its going to be set in a work shop.
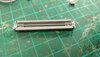
Ends of the frame were easy enough


Rear end

Next came to frames, now many of you know how I struggle to get frames to remain flat and square, this time I can announce that it worked


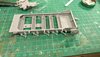
Just one more for your edification .

The engine placement is tomorrow, seems a straight foreword fit. There's a couple of very small locating points on the torsion bar plates, good job I kept then in the right order !
Thanks for looking in, comments more than welcome.
Dzhon.
Attachments

Steve Jones
Steve Jones Scale Modelling Site
OMG! What a great update JR. Coming together really well. Looks a difficult build but your doing a terrific job my friend
Thanks Steve
OMG! What a great update JR. Coming together really well. Looks a difficult build but your doing a terrific job my friend