Good evening.
As promised I few photos of the build. Haven't found it easy this time around, the first one in 2016
View attachment 368501
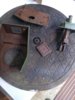
I remember this well only my 4 th build and it was a perfect fit this one has unfortunately been a struggle with the warping, still its nearly built and will be ok when sunk into the river.
View attachment 368504
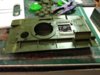
You can see the bend marks in the track guards, after lining up the top with the hull there was a massive gap at the front.
View attachment 368505
Held down with some strong making tape it eventually stuck.
Spent some time doing the fuel pipes on the engine, enjoy this part even as its so fiddly for me, but the result ids well worth it as the hatch will be open.
View attachment 368506
Couldn't face using the PE on those screens, would have defeated me, more for the likes of Paul , Mike and Simon , well in fact most of you

Moving on I did the gun assembly, not all of it as it was too much , nothing seemed to want to fit, so where as the first one has a move able gun this one is fixed.
 View attachment 368509
View attachment 368508
View attachment 368507
View attachment 368509
View attachment 368508
View attachment 368507
The turret ring was well out of shape, I heated it up , and still managed to get it up side down ! Oh well just like me.
View attachment 368510
These have been primed as tomorrow I want to do some apply some chipping fluid, then a coat of off white.
View attachment 368512
Front hatch, will spray some black inside as have no seat !
Now some advice please, last time I used Fruils, no problem but this time as it is going to be in water up to the track guards I'm using the kit ones.
Having studied the drawings I'm lost, it appears to give a quantity but the actual drawing shows differing amounts. Just read it again at this size and it makes some sense !!!!!
View attachment 368514
View attachment 368515
So ignore the last bit.
Comments welcome, thanks for looking in.
John.


 , you've not seem me with a roll of masking tape have you, it's quite frightening.


 would the roof fit, no ! Ok at the back but out a the front leading edge. This in turn threw the front out and left a large gap at the top. Having wrapped the whole thing up in tape to try to hold it while the glue dried, I then found that I'd hadn't prepared the back section to take the metal barrel. At this point I hacked the front of the plastic part of the gun off, yes you guessed it, the complete breach and gun snapped off the internal mounting. So now no breech to be seen from the open door, the front with the metal barrel is on. Squadron green filler to most of the edges of the turret. Oh just to compound things one section of curved track has come apart ! Just not my day.