T-18 / MS1 another 1/35 Russian Tank

scottie3158

SMF Supporter
Joined
Apr 27, 2018
Messages
12,760
Points
113
Location
Spalding
First Name
Paul
John,
This might work for you when assembling the tracks assemble them on masking tape on the sticky side. Run the glue into the gaps then wrap them around the wheels and sprockets the tape will support them while they form and dry.
 

JR

Member of the Rabble and Pyromania Consultant
SMF Supporter
Joined
May 26, 2015
Messages
17,361
Points
113
Location
lincs
First Name
John
Right, thanks for the abuse from certain quarters, expected and enjoyed :smiling: Dude 1 and Rivet( Mr Jones )
Great work John
Lee, thank you buddy .
Dude 2,

You are kind of losing me here John....Why the pics out of Frankenstein's dungeon??? The poor guys didn't have a chance under the knife, but are looking good…..

And what does making icing for your cake have to do with model building??? You should really wash that spatula handle as it looks pretty dirty. And why is there a dent in your cake??? Did you have the oven set to the wrong temp again???

Have you been sniffing the Rhodendron's again??? I warned you about that Buddy!!!

Coat on, door found...……………..

Prost
Dude 1
Dude 1, the knife handle in modern parlance has a patinia to it, and there fore has to be left intact to retain the look and feel of the item in question.
The cake icing was doing well until a large bluebottle attempted to land on it .At this point I attacked the bluebottle with a hammer , thus the dent !


do not like the look of your sandwich spread :thinking:
Bob, that spread is very rich in natural ingredients, quite benifical to the elderly, very good poor for binding the output of the gut !

I’m just glad he clarified that brown splodge is paint and not something scavenged from the garden! :surprised:
No that is coming later Simon :smiling::nerd:.

That reminds me - I must have a peanut butter sandwich for tea tonitie :smiling5: :smiling:

Great update JR. Looks like you have been very busy. Keep at it mate

Thanks Steve , I see that cheque has arrived .


John,
This might work for you when assembling the tracks assemble them on masking tape on the sticky side. Run the glue into the gaps then wrap them around the wheels and sprockets the tape will support them while they form and dry.
Paul, a good idea, I shall try that in the morning .:thumb2::thumb2::thumb2:.

Flicking through the pictures I wondered what the heck you were doing with Lee Armstrong's footprint!
Andy :smiling::smiling::smiling::thumb2::thumb2::thumb2:.

Right thank you for those inspiring comments. :tongue-out3::nerd:
Don't you just love this forum, full of the wackiest, helpful, and madest bunch of people you could wish to meet .:smiling2:
 

JR

Member of the Rabble and Pyromania Consultant
SMF Supporter
Joined
May 26, 2015
Messages
17,361
Points
113
Location
lincs
First Name
John
Right standby to be amazed or amused. :smiling2: possible both.

I took Paul's advice :thumb2::thumb2::thumb2::thumb2::thumb2:and used the tape method, that was fun fighting with a length of tape the wrong side up and trying to untangle one hand while sticking another section of tape with the other hand to the first.
Getting that done was exciting , the best was yet to come.

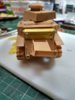
I managed to stick 30 odd track links down and applied glue to the section !
The only problem I had was some of the links hadn't glued very well. now you could blame me, but reading what Simon said about cleaning them up and the size I think I did quite well.
I don't think If I had put the top section on as the distructions said I would have got any tracks on,will be interesting to see hoe Simon gets on.
The few that came apart had to be glued on the model , this proved to be awkward as you had to feed in the two pin into the 3 pin, its a good job the glue allowed some movement, but I still had to revert to CA to do it quickly.
Used cooper wire for some of the handles, the others were to small . lost one and found another that would do. These had to go on the back of that PE , so CA again. Normally I glue the tweezers to the part, this time it was the whole bottle to my hand, the CA ran down the out side and of course I didn't see it until too late.:disappointed:

The right good eye has been troubling me this week, I had been able to do some work with out the optivisor, but the last few days its been :poop: have to keep blinking to clear it.
With out more ado


IMG_20190923_200252519_HDR.jpg

IMG_20190923_200241438_HDR.jpg
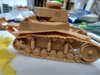
You can see the miss fitting links, just over from front wheel.

IMG_20190923_200232389_HDR.jpg
Good job I didn't use the black glue ! Jut can see the where I've been
That gap above the doors is due to the fact that I fitted that damned section of PE before I fitted the top , had I done it the other way the gap would be gone. As it was I had to hack a section off the rear top before I could even get the top part forward.
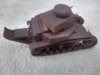
Suppose I should put in some filler, but to tell the truth I just can't be bothered anymore. Each time I attempt to build a kit there is a part that defeats me and it end up looking a mess.
The only thing I really enjoy is the buildings and the diorama.
John.
 

Attachments

  • IMG_20190923_200223709_HDR.jpg
    IMG_20190923_200223709_HDR.jpg
    110.8 KB · Views: 4
  • IMG_20190923_200253655_HDR.jpg
    IMG_20190923_200253655_HDR.jpg
    85.6 KB · Views: 4

JR

Member of the Rabble and Pyromania Consultant
SMF Supporter
Joined
May 26, 2015
Messages
17,361
Points
113
Location
lincs
First Name
John
Morning, first thanks to Si and Simon for their pm's.
Seeing the trouble Simon was experiencing made me feel it wasn't just me.
To day hope to get some paint on, the then the dio.
Figures coming on, filler done so sanding next. Don't know if I will use some Hornet heads yet.
Right time for another strong black coffee !
 
D

Deleted member 6559

Guest
Sorry to hear that the eye's have been playing up John, but it hasn't stopped you doing a cracking job.
 
  • Like
Reactions: JR

Steve Jones

Steve Jones Scale Modelling Site
Joined
Apr 27, 2018
Messages
6,698
Points
113
Location
Plymouth
First Name
Steve
Sorry to hear about the eye sight mate. Don't worry about build issues. We all have them. Its the art of covering them up which is the fun part. Looking forward to seeing the dio. Keep yer chin up mate.
 

JR

Member of the Rabble and Pyromania Consultant
SMF Supporter
Joined
May 26, 2015
Messages
17,361
Points
113
Location
lincs
First Name
John
Sorry to hear that the eye's have been playing up John, but it hasn't stopped you doing a cracking job.
Thanks Peter, you of all people know the frustration that problems bring with eyes.

Sorry to hear about the eye sight mate. Don't worry about build issues. We all have them. Its the art of covering them up which is the fun part. Looking forward to seeing the dio. Keep yer chin up mate.

Hi Steve, thanks, feeling a lot more like my self today, just got to me yesterday and the day before.
----------+++++++++++++------------------


Primer has been applied, using some new A - Might one shot, seems good, no thinning or retarder used .Only done a couple of thin coats up to now.

IMG_20190924_131840829_HDR.jpg

15693280968322418977998789750979.jpg

Colour not right photo wise, that backing stuff is fawn .
 

Attachments

  • IMG_20190924_131849834_HDR.jpg
    IMG_20190924_131849834_HDR.jpg
    88.9 KB · Views: 5

Jim R

SMF Supporter
Joined
Apr 27, 2018
Messages
13,815
Points
113
Location
Shropshire
First Name
Jim
Hi John
Hope all's well with your sight.
Base, figures, tank - all coming together now. As for problems - we all have good days and bad days and things that go well and things that defeat us. We keep at it though :tongue-out3:
Jim
 

JR

Member of the Rabble and Pyromania Consultant
SMF Supporter
Joined
May 26, 2015
Messages
17,361
Points
113
Location
lincs
First Name
John
Hi John
Hope all's well with your sight.
Base, figures, tank - all coming together now. As for problems - we all have good days and bad days and things that go well and things that defeat us. We keep at it though :tongue-out3:
Jim
At last a reply from the only near sane one.
Thank you Jim.
To the rest , Paul, 570, & Rick.
thanks for the laugh.
Dzhon
 

Si Benson

SMF Supporter
Joined
Apr 27, 2018
Messages
3,332
Points
113
First Name
Si
Me again,
Completely missed the small picture of your build all primed up in the bottom corner....that looks great to me :thumb2:
 

JR

Member of the Rabble and Pyromania Consultant
SMF Supporter
Joined
May 26, 2015
Messages
17,361
Points
113
Location
lincs
First Name
John
Me again,
Completely missed the small picture of your build all primed up in the bottom corner....that looks great to me :thumb2:
Yes Si , just realised what I did.
IMG_20190924_132829554_HDR.jpg

IMG_20190924_131849834_HDR.jpg


Bit dark setting as the background is light fawn. The coat is a little thin, its the first time I've used the new A-Mig one shot, says to use a .3 or .4 needle , but left my .2 in and did a very light spray at around 18 psi.

Made up some filler tonight, added little colour from an acrylic tube of artists paint and plonked the other one in the mud.

IMG_20190924_201231564_HDR.jpg

IMG_20190924_201241251.jpg

IMG_20190924_201250984_HDR.jpg

The base colour will be darkened as the filler and soil are added. Need to do this in layers as the figures have to be added digging out the front . As in photo 1 , the amount of mud thrown up on to the road side at the front will be from the 2 crews as they dig it out.

Thanks for jollying me up:smiling:
 
Top