Allen's 1/48 Revell Mosquito B Mk. IV

JR

Member of the Rabble and Pyromania Consultant
SMF Supporter
Joined
May 26, 2015
Messages
17,378
Points
113
Location
lincs
First Name
John
So Allen which Beach do you go to?......I usually am at Sun of a Beach when the weather's right!! :tongue-out3: But yer wing thing is coming along nicely......yeah the Brits drive on the WRONG side of the road but that's what happens when you swing swords instead of Colts!;)
Rick .When we started driving there was no other side of the road !
Excuse us again !
 

stillp

SMF Supporter
Joined
Nov 17, 2016
Messages
7,240
Points
113
Location
Rugby
First Name
Pete
Rick .When we started driving there was no other side of the road !
Excuse us again !
A few years ago I spent a few days at a meeting in Malta. Coming back I realised that I hadn't noticed which side of the road they drive. A lady in my office who owns a holiday flat in Malto was surprised when I asked her, and answered "In the shade"!
Pete
 

yak face

Wossupwidee?
Staff member
Moderator
SMF Supporter
Joined
Jun 13, 2009
Messages
12,445
Points
113
Location
sheffield
First Name
tony
Great start allen , im sure youll have no problems once you get into it , know what you mean about the revell paint call outs , surely nobody in their right mind mixes all the colours using only revell paints in those ridiculous ratios ! I can see the only type of mixing going on here will be alcoholic :thumb2::astonished: prost! Tony
 

Allen Dewire

Proud Rabble Member
SMF Supporter
Joined
Apr 27, 2018
Messages
4,122
Points
113
Location
Bamberg
First Name
Allen
Thank you so much for the wonderful posts Gentlemen!!! You're the best and I'm still giggling over them....Gotta love this forum!!!.....

Pete, A good friend and his wife were on vacation on Malta and went to take a tour on a local bus. The driver told them to please have the correct fare as he couldn't make small change. Why???...Because his drivers seat was a wooden crate with a small cushion on it and the small change kept falling out of his pockets, all over the floor and into the crate when he drove.....Oh and the bus was over 40 years old too.................

Tony, Thanks Sir and it is a quite fun build. Mixing is also good!!! One day Weizen beer, the next day Pils and so on.....Ahh, retired life is great!!!

Now a serious question... Is Vallejo 71.305, Int. grey green, FS34373, the proper color to paint the interior??? I slobbered it all over it today and when it dried, it looks sort of light in color. Just wondering and TIA for any help.........

Prost
Allen
 

Ian M

Administrator
Staff member
Administrator
Moderator
SMF Supporter
Joined
Dec 14, 2008
Messages
19,807
Points
113
Location
Falster, Denmark
First Name
Ian
Now a serious question... Is Vallejo 71.305, Int. grey green, FS34373, the proper color to paint the interior?
Yes. Valljo chose not to us the BS number, but the colour should fe fine...its maybe a tiny bit on the lighter side but good enough lol.

Coming along very well Allen. We'll make a flyboy of you yet.
 

Allen Dewire

Proud Rabble Member
SMF Supporter
Joined
Apr 27, 2018
Messages
4,122
Points
113
Location
Bamberg
First Name
Allen
Thank you Ian, I thought my eyes were going buggy for a moment. A flyboy??? maybe, but only in 1/32 I'm afraid Sir!!!........
 

Allen Dewire

Proud Rabble Member
SMF Supporter
Joined
Apr 27, 2018
Messages
4,122
Points
113
Location
Bamberg
First Name
Allen
Evening Fine Folks,

Yes, even being infected with the BS-19 crap, work goes on trying to assemble as much as I can to make painting easier...As for the BS side, I'm doing fine and have no complications at all. It's like having a light cold and my finger tips tingle. I have to be extra careful when I pick up parts and the like, as they tend to fall out out of my fingers because I didn't grip them enough. The only down side is blowing your nose sometimes. It's like trying to blow out rubber cement!!!...Weird, but true........

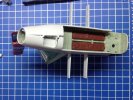
I have spent the last day and a half trying to get the pit to fit inside of the fuselage halves. The kit is very decent in the fit so far and I've had no probs really, till now...

IMG_3037.JPG
The topside fit is good, but without a ton of pressure, the bottom gap is tough to close. I have been scraping, sanding, whittling, fiddling and all forms of other work, but can't get a nice join of the parts. It's also tough as you really can't see where it may be hanging up inside. It is at a point that I can glue the bottom pretty tight, let it dry overnight and then glue the top joins together, hoping the bottom one doesn't pop apart..........Next, I assembled the landing gear/motor garages,

IMG_3040.JPG
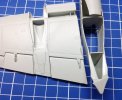
They were a bit fiddly, but with careful gluing in steps, they went well without any gaps that might require putty. The kit comes with 2 V-10s that are nicely detailed, but I decided to leave them out. To display them, you have to do some surgery to cut open the side doors. Maybe next time........In the pic above, you can see the triangle cutout and the triangle raised part on the wing. They slide over the wing with ease, but the damn tringle doesn't fit into the raised piece for a good fit. More scraping and all other forms of abuse hasn't worked so far. Again, you can't see under it to tell where the prob is either,

IMG_3038.JPG
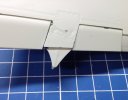
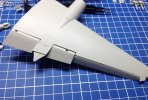
And the tail piece won't fit flush onto the wing. I haven't tried the other one yet and can only hope it fits better than this one. I'll make another stab at it in the morn.........What is really nice, is the flappy things on the big wings do move and that's pretty cool,

IMG_3039.JPG
Nothing like a little action in this department. Slowly but surely we are getting somewhere here. On a final note, I did order a set of canopy masks and should have them Tuesday. I hope this BS19 is on it's way out and/or over with before I need to apply them. Don't think tingly finger tips and tiny masks are a good working combo!!!........

Thanks for looking in and thanks again for not posting get well wishes on the Latest Acquisitions thread. I know your thoughts are with me good people and I greatly appreciate that. Take care and keep on snipping and slinging!!!...........

Prost
Allen
 

Jim R

SMF Supporter
Joined
Apr 27, 2018
Messages
13,849
Points
113
Location
Shropshire
First Name
Jim
Glad you're feeling ok Allen. Shame the fit of some parts is not good. It's better to have the top fuselage fit well because if that join has to be messed with then there could be a knock on problem with the canopy.
Jim
 

Mini Me

SMF Supporter
Joined
Jun 1, 2018
Messages
10,162
Points
113
First Name
Rick
Nice progress Allen. Glad you are up to the little "ankle biters" this kit has to offer.....the flaps do look good in the down position......if this wil be sitting on its landing gear, I recommend you leave 'em in the down position. Adds loads of interest. ;) :thumb2::thumb2:
 

yak face

Wossupwidee?
Staff member
Moderator
SMF Supporter
Joined
Jun 13, 2009
Messages
12,445
Points
113
Location
sheffield
First Name
tony
Good progress allen , regarding the fit of the nacelles - is the rear bulkhead of the wheel well the problem? It looks to be sticking up a little proud of the top of the nacelle. Cheers tony
 

Mickc1440

SMF Supporter
Joined
Apr 27, 2018
Messages
4,305
Points
113
Location
Sheffield
First Name
Mick
Don't you just love a kit that fights :smiling5: I'm sure you'll boss this one into shape and hope the annoying virus does one soon.
 

Ian M

Administrator
Staff member
Administrator
Moderator
SMF Supporter
Joined
Dec 14, 2008
Messages
19,807
Points
113
Location
Falster, Denmark
First Name
Ian
And the tail piece won't fit flush onto the wing. I haven't tried the other one yet and can only hope it fits better than this one. I'll make another stab at it in the morn.........What is really nice, is the flappy things on the big wings do move and that's pretty cool,
I think Tony has found your problem..
Good progress allen , regarding the fit of the nacelles - is the rear bulkhead of the wheel well the problem? It looks to be sticking up a little proud of the top of the nacelle. Cheers tony
In your photo of the Nacelle (the bit the motor and wheel go in ) the rear bulkhead is very high which is what we think is stopping the top part going down fully.
 

Allen Dewire

Proud Rabble Member
SMF Supporter
Joined
Apr 27, 2018
Messages
4,122
Points
113
Location
Bamberg
First Name
Allen
Morn All from a very warm Bamberg! 32° C and it isn't even noon yet........

Mark - Thanks and I am finally getting this puppy into shape, more slowly than surely.......

Jim - So true my friend and I have almost got it to the point of a good fit. Feeling fine but still positive though....

Rick - Thanks Buddy! The kit is putting up a little resistance, but no biggie. I too love the stuff that moves and adds character.....

Mick - So true and you gotta love it. maybe that's why I love my armor so much! Wing thingy's are ok, but not every day Sir....

Tony - Thanks for that and it was exactly what the prob was. Funny, the destructions will have you attach one side of it and glue all the pieces into it. Then add the other side to close it all up...HUH!!! And what if it doesn't fit properly???....Back to square one I think...Got it sorted now....

Ian - Thanks too and like I said to Tony, it was a case of Intense Re-assessment Of The Situation (IROTS)...In plain English, I turned my brain back on!!!...Should be ok and look the part when they're glued on. I hope your ankle is much better and the pain is almost gone too.......

Getting too hot to paint so I will make a stab at the landing gear assembly today. That's the bummer living under the roof when it's hot. Thanks again guys and please try to stay cool.......

Prost
Allen
 

tr1ckey66

SMF Supporter
Joined
Mar 6, 2009
Messages
3,686
Points
113
First Name
Paul
Good progress Allen - the wings and nacelles look to have given you a bit of a fight but you've beaten them into submission.
Looking forward to seeing this Mozzy when complete.
Cheers
P
 

adt70hk

I know its a bit sad but I like quickbuild kits!!!
SMF Supporter
Joined
Sep 4, 2019
Messages
9,526
Points
113
First Name
Andrew
Allen

Glad to hear you got it sorted out!

ATB.

Andrew
 

Strenko J

Faithful rabble apprentice
SMF Supporter
Joined
May 1, 2018
Messages
583
Points
93
Location
Pennsylvania
First Name
Joe
I’m just going to kick back and watch your fine build (and enjoy the rabbles harassment of course)
if you don’t mind Mr D..lol
 

Allen Dewire

Proud Rabble Member
SMF Supporter
Joined
Apr 27, 2018
Messages
4,122
Points
113
Location
Bamberg
First Name
Allen
Afternoon Good People,

The weather has finally cooled off and I am back from the (almost) dead and BS19 free at last. It was time to hit the table and do something on this puppy over the past 2 days...

Paul, Andrew and Joe - Thanks for the vote of confidence guys!!! I'm not normally a wing thingy builder and this bird has had me going half crazy at times. I have beaten it into submission, but luckily not with a hammer (like I wanted to)........

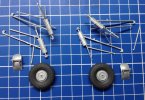
We started out with the landing gear jobbies and got ones side assembled. I was afraid if I built it all together, I wouldn't be able to get the tires onto the axle stubs without busting something,
IMG_3042.JPG
I painted up the tires in AK rubber tires and hairy sticked the rest in Tammy flat aluminum. Yes, I find I can brush Tammy paints rather well on smaller pieces using the dunk and dip method. I dunk the brush in water and then dip it in the paint and go at it. If it starts to smear, I dunk the brush back into the water to keep it flowing. More paint when needed and more water if needed. It does work, but you have to play around a bit to get in the rhythm of it and you can get very decent results too!!! After the paint, I could build it together,
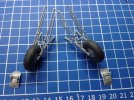
IMG_3046.JPG
Yes, I let the paint dry first....I have to admit that the kits landing gear is not the most stable on this planet and I have real worries about it supporting the Mossie when she's done. I now know how Barry felt with his GWH P-61. I also didn't use the mag wheels for the tires as I didn't think this baby was going turn some fast laps at Donington Park or Silverstone any time soon!!! So with this done, it was time to turn to the driver's compartment. I wanted to get this finished and close her up to see how the canopy was gonna fit and get on with the rest of the build....

I want to thank Tony (yakface) for his solution to his seatbelt problem on his Mossie. I immediately nicked it went about making some for mine. I have wine foil for my scratchy projects lying around and,
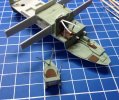
IMG_3044.JPG
No, they don't improve TV reception one bit, but saved so much time trying to make some out of tape and tidbits. And no wine was harmed in making them either!!! Added a little color and we had this,
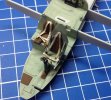
IMG_3047.JPG
Let's remember the 10 foot rule here folks! Not too shabby really and look the part. Thanks again Tony. Time to add the radios and close her up. Just before I went to glue it together, I was hit by a stoke of genius and remembered that I had to add the IP inside before gluing. DOH!!! Ok, back on track now. I only glued the front top together to try and get a good fit. After it's dries I can glue the back and then the bottom together,
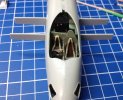
IMG_3048.JPG
The seam looks worse in the pic than it really is. A little sanding and it should smooth out. Another view and yes, the IP is there and hard to see,
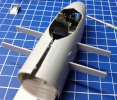
IMG_3049.JPG
Would have looked kinda dumb without it I suppose. I was also worried that the seat sat too high and the canopy would hit it. A quick test fit (no pic) proved me wrong. That's about all for now. I'm building the bombs for the belly and need to paint that whole affair so I can install it......

Now I have to try and catchup on all the stuff I missed here on the forum over the past week or so. Thanks again for looking and have a great week....

Prost
Allen
 
Top