Andrew's 1/72 Tamiya Mosquito Mk XIII

adt70hk

I know its a bit sad but I like quickbuild kits!!!
SMF Supporter
Joined
Sep 4, 2019
Messages
9,514
Points
113
First Name
Andrew
Best looking wheelbarrow's I've seen in a long time Andrew. Can't carry a damn thing but they look great!!! I love the Vallejo Metal Colors too. I never tried spraying them yet though, just doing hairy stick work. BTW, great work on the Mossie too!!!...

Prost
Allen

Allen

Apologies, completely forgot to acknowledge your post!!! They're not bad looking wheelbarrows are they, if if you can't carry anything!! ;) And obviously glad you're liking the Mossie!


Coming along very nicely Andrew :smiling3:

The undercarriage is looking good, I found that on my build it seemed a little frail but was more robust when in situ.
Fingers crossed you manage to get it all finished in time after all the work you’ve put into it.

Looking forward to seeing it all done, good luck :thumb2:

Geoff.

Geoff

Thanks for stopping by to comment. I'm sure that the undercarriage will be fine it's sometimes you begin to doubt yourself.


Thanks again gents.

ATB.

Andrew
 

adt70hk

I know its a bit sad but I like quickbuild kits!!!
SMF Supporter
Joined
Sep 4, 2019
Messages
9,514
Points
113
First Name
Andrew
Hi all

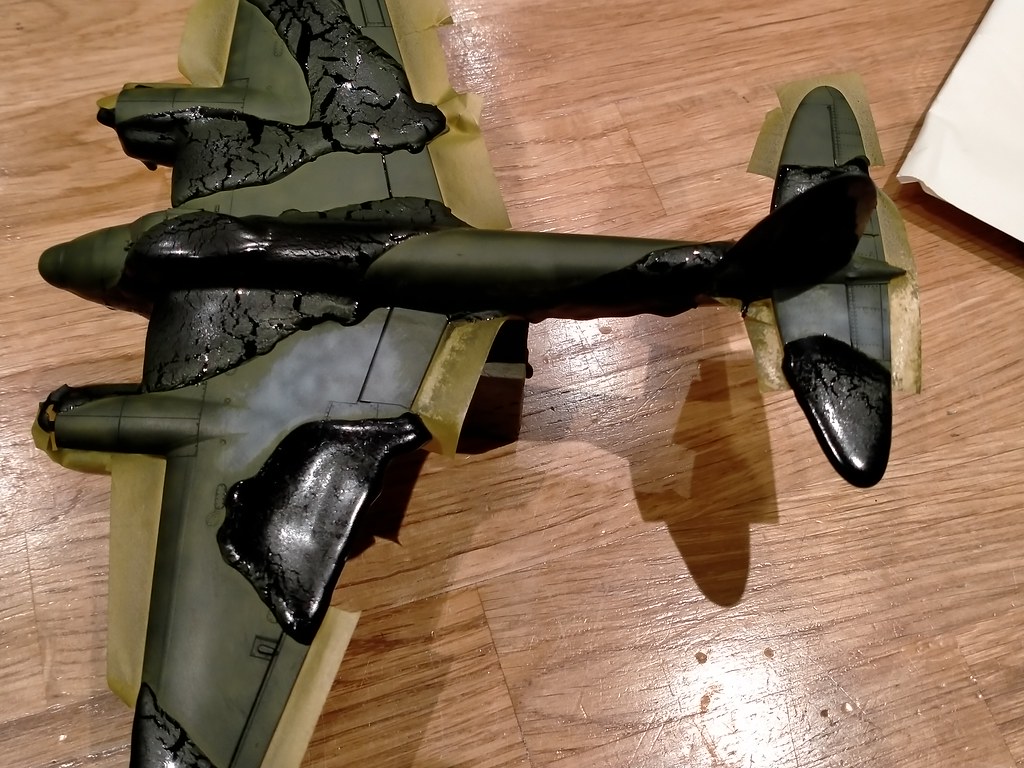
So a full month after the grey went on, the green went on and not very well. :disappointed2::disappointed2:

I had masked with AK Masking Putty (also known as silly putty that kids play with) and whilst it is very odd stuff to work with it, I found it very easy to use. I basically did a very fine roll along the camo edge, squished it down and then filled in the gaps with thin sheets of it and hey presto. As @Tim Marlow suggested I did it in very thin layers and even after a week plus there was minimal creep, even on vertical surfaces, and where there was I simply used a cocktail stick to trim as required. What minimal creep there was on the flat surfaces was actually a benefit, as it very nicely smoothed out the rough edges.

In terms of the green paint, I thinned to the usual consistency, had it at the usual pressure at the normal distance and did it in very thin coats but kept getting tide marks. It would run and even pile up in places....very odd. On the port wing and stabiliser I have to clean the paint off twice before I was vaguely happy. Hopefully weathering will hide the worst!!:cold-sweat::cold-sweat:

Given the patterns made by the paint, I have come to the conclusion that the putty was deflecting the airflow slightly even though it sprayed on very thin. I've never had it with masking tape unless I've been stupid. I will therefore have to play around with he holy triumvirate of pressure, distance and consistency next time I use it.

Interestingly, the putty when rolled on not fully cured paint is actually very good at smoothing down lumps and bumps without any ill effects as I discovered by accident!

Up next is painting the nose a slightly lighter shade of grey, as per the real plane.

ACW as usual.

Andrew

---------------------------------------------------------


The masking putty
This is a very thick/viscous non-Newtonian fluid, which according to Wikipedia "...is a fluid that does not follow Newton's law of viscosity, i.e., constant viscosity independent of stress. In non-Newtonian fluids, viscosity can change when under force to either more liquid or more solid. Ketchup, for example, becomes runnier when shaken and is thus a non-Newtonian fluid."

In this case the putty is very hard if you hit itbut in it's 'unstressed' state flows very slowly. It also seems to slightly regain it's volume after it has been in place for a while and dries to what looks almost glass smooth, and yet is still very tacky to the touch showing fingerprints even with the lightest of touches. It also feels slightly greasy but isn't and comes off without any problems, even after a week plus and importantly without leaving any marks.


You can see where I have just laid it across the root of the port wing and fuselage.


And after half an hour so, almost an glass-like look.....


Here you can it creeping down and dripping off......with a small sample of what came off the nose and wings....


The Dark Green
Not a great success and went on thicker than I would have liked due to me trying to correct the problems in a rush. The mottling is though more obvious than in the pictures.

After I took this, I carefully attacked the raised edges and worst of the raised paint with a 1200 grit sanding stick, which has surprisingly worked quite well. I'm hoping a bit of weathering will help blend the worst in. I will be blaming the bad paint job on the port stabiliser on ground crew after it was repaired in early '45 following flak damage!! ;) :smiling5:


The two problem patches....:crying::crying:


The big reveal......the problem patches are clearly visible as these were taken prior to my light sanding but as always the dreaded digital zoom makes it a bit worse than in real life...but still not my best work.


My excuse for my bad paint job! :tongue-out2: In all seriousness it had always been my intention to date my plane post the repairs to this damage by making the grey less mottled and so reflect that this will have been repainted. The grey has been topped up since taking the above shots.


adt70hk

I know its a bit sad but I like quickbuild kits!!!
SMF Supporter
Joined
Sep 4, 2019
Messages
9,514
Points
113
First Name
Andrew
Whist I was waiting for the green to dry, I took my home-brew off black/brown wash and gave the undercarriage a pin wash to add a bit of depth in the nooks and crannies. I also gave the whole undercarriage and the inside of the wheel well covers a very light overall wash of the same colour, as they all looked a bit too new and toy-like to my eye, even though I had used 'dark' aluminium. The oil tanks got a a heavier wash to mucky them up a bit

On the theme of oil tank colours, does anyone actually know what the correct colour was? Tamiya calls out for a reddy brown as some of you have done but others have done silver and I've found some 'experts' claim that it was silver and produced photos but of restored plane. I have though seen one shot from a Lincoln or Lanc showing the reddy-brown colour. Just curious as I have four other Mossies in the stash.

ATB

Andrew

 
Last edited:

The Smythe Meister

Born to be WILD....... until about 9pm
SMF Supporter
Joined
Jan 30, 2019
Messages
5,761
Points
113
Location
Devon
First Name
Andy
Excellent update Andrew :smiling3:
Despite your concerns I think that's looking great,(remember,we are out own worst critics!!),the mottling looks proportionately subtle,and the pin wash really adds the finishing touch with the panel lines/details ;)
Excellent work Sir, you should be pleased with that for sure. :smiling3:
 

Tim Marlow

Little blokes aficionado
SMF Supporter
Joined
Apr 27, 2018
Messages
16,820
Points
113
Location
Somerset
First Name
Tim
Great update. Strange about the green paint, but it could be disruption in the airflow as you suggest. Looking very mossy like now though, and you’ve managed to keep the preshade, which isn’t easy under dark colours. As to the undercart tanks, I seem to remember us doing that on another thread. The red brown, as I recall, is the self sealing coating, so in wartime conditions it’s pretty much essential I would say. Post war, when there is more time, they may well have had silver paint over the top of that. Restored planes may well be finished the same way.
 

adt70hk

I know its a bit sad but I like quickbuild kits!!!
SMF Supporter
Joined
Sep 4, 2019
Messages
9,514
Points
113
First Name
Andrew
Excellent update Andrew :smiling3:
Despite your concerns I think that's looking great,(remember,we are out own worst critics!!),the mottling looks proportionately subtle,and the pin wash really adds the finishing touch with the panel lines/details ;)
Excellent work Sir, you should be pleased with that for sure. :smiling3:

Thanks Andy much appreciated! You are right, we are own worst critics and I'm beginning to warm to it!


Great update. Strange about the green paint, but it could be disruption in the airflow as you suggest. Looking very mossy like now though, and you’ve managed to keep the preshade, which isn’t easy under dark colours. As to the undercart tanks, I seem to remember us doing that on another thread. The red brown, as I recall, is the self sealing coating, so in wartime conditions it’s pretty much essential I would say. Post war, when there is more time, they may well have had silver paint over the top of that. Restored planes may well be finished the same way.

Thanks Tim, glad you're liking it. One thing I had forgotten to say was that the tide marks tended to follow the line of masking putting, hence my thoughts about the airflow. It is looking very Mossie like isn't it, even with the slightly iffy paint job.

Thanks for the info on the oil tanks, now you say it I think I may have read something along those lines somewhere else on the web. Whatever the case, I think the reddy/brown adds a bit more interest to the model.

The paint work looks great Andrew, the mottling looks really nice

Thanks Mick. Really pleased with the grey. The only problem with masking as I did was getting the balance between the grey and green right, the green is probably a touch too solid IMHO but hopefully my weathering plan will blend the two.


Thanks again guys much appreciated.

Next up the gloss coat!

All the best.

Andrew
 

adt70hk

I know its a bit sad but I like quickbuild kits!!!
SMF Supporter
Joined
Sep 4, 2019
Messages
9,514
Points
113
First Name
Andrew
Good afternoon all

May I present a very shiny Mossie following the application of a gloss coat, which can only mean one thing.........I spilt my floor polish everywhere! ;)

Ok....so it does of course mean DECALS!!!!

More posts to follow!

ATB.

Andrew


Lee Drennen

Box Stock Builder with a Twist/ Rabble Member
SMF Supporter
Joined
Apr 29, 2018
Messages
5,712
Points
113
Location
Wortham Mo
First Name
Lee
Andrew the updates look great I like the shadowing effects looking good my friend. Sorry I’m late again.
 

adt70hk

I know its a bit sad but I like quickbuild kits!!!
SMF Supporter
Joined
Sep 4, 2019
Messages
9,514
Points
113
First Name
Andrew
Looking good Andrew...
.... BRING ON THE DECALS :smiling3:
Looks very nice Andrew, looking forward to seeing it come to life with the decals :thumb2:

Geoff.

Thank you gentleman, glad you're liking it. The decal journey has already started and is proving to be a bit bumpy......but more about that later!


Looking good andrew , the mottling came out great , that masking putty looks very sinister though !

Thanks Tony. I was very pleased with the mottling, especially on the grey. Hadn't noticed the putty like that before but now you mention it you're right!


Very nice indeed.

Thanks for the support Ian, much appreciated!!


Andrew the updates look great I like the shadowing effects looking good my friend. Sorry I’m late again.

Lee, glad you're liking it and no need to apologise, your support is always appreciated.


Thanks again for the support chaps!

All the best.

Andrew
 

adt70hk

I know its a bit sad but I like quickbuild kits!!!
SMF Supporter
Joined
Sep 4, 2019
Messages
9,514
Points
113
First Name
Andrew
Hi all

And so I have finished the decals, which were something of a bumpy ride both figuratively and literally......mostly my fault even though I tried to be very careful:disappointed2:

I mostly used the AM decals and with the thick Tamiya ones for the smaller stencils....except in one very obvious case......:sad:. The AM decals were very nice on the whole and very fine but that in itself caused problems....:sad:

So as I said, it was something of a bumpy ride:
  • The largest Tamiya decals (first time I have used theirs on a plane and OMG!!!) were the red crossed boxes between the fuselage and engines.....right where there were the most bumps/rivets.....I have lost count of how many applications of various decal solutions I have tried and I don't think I can get it any better and even slightly damaged one in the process.
  • The serial number decals needed threes hand because of the angle and in both cases I got them in a virtual knot - they were so fine they just kept curling up - but in the end I managed to rescue them both.
  • Then somehow I managed to wreck one of the serial number's letter 'H'. I had some other Hs on the AM decal sheet but they are all slightly smaller. :sad:
  • I managed to damage three of the four dotted lines under the rear of the fuselage (don't ask) but fortunately I could replace them with the night fighter red ones.
  • Worst though was the Lonesome Polecat decal......the skunk on it bears no relation to the one on the plane......very 'cute' looking, wrong pose, looking in the wrong direction and too much black. I can only assume they just downloaded something off the web. There is a very old AM set with a much better rendition but that is no longer available and so I had no choice but to uses the truly naff looking one I had bought. Needless to say it has left me somewhat disappointed after all the hard work....:sad-face::sad-face:

This will get a top coat of either gloss or satin today. It will then have to go back in the box until Christmas when I will open one of my presents, at which point I should be able to finish it just in time for the deadline.

ACW as usual.

Andrew


Tim Marlow

Little blokes aficionado
SMF Supporter
Joined
Apr 27, 2018
Messages
16,820
Points
113
Location
Somerset
First Name
Tim
Looks good with the stickers on Andrew. See what you mean about the polecat though. The decal looks like Pepe Le Pew from looney tunes…..
As to the “Red Cross“ decals, awful aren’t they. Best thing you can do is use a sharp scalpel to prick all the air bubbles then use another coat of decal solution. The air needs to be able to get out for them to flatten down. Otherwise you just soften the decal over an air bubble. Might need several more attempts, but doing this each time does improve things….
 

adt70hk

I know its a bit sad but I like quickbuild kits!!!
SMF Supporter
Joined
Sep 4, 2019
Messages
9,514
Points
113
First Name
Andrew
Looks good with the stickers on Andrew. See what you mean about the polecat though. The decal looks like Pepe Le Pew from looney tunes…..
As to the “Red Cross“ decals, awful aren’t they. Best thing you can do is use a sharp scalpel to prick all the air bubbles then use another coat of decal solution. The air needs to be able to get out for them to flatten down. Otherwise you just soften the decal over an air bubble. Might need several more attempts, but doing this each time does improve things….

Pepe-le-pew.....I knew it reminded me of something. Just a real shame though to get that something fundamentally wrong.

The red cross decals are awful aren't they, it's a real shame that they have to go over the one part of the plane where there are a lot of bumps in one place. I had tried the bubble pricking but have just given it another go. The edges are a problem in a different way as the decals just go over the top and don't have even film settle down on the other side.


Looks good Andrew :smiling3:
Tis a shame about those decals.... I had a bad time with mine too. :sad:
As Tim says though,they are salvageable and can come out not too bad. ;)

Thanks Andy.....I had heard that Tamiya wingy decals were bad but I couldn't believe how thick they were. The 'good' news (if that is the right word) is that I have another three Tamiya Mossies in the stash and so by the time I have done the fourth one, I should have it down pat!!

Thanks again chaps.

Andrew
 

yak face

Wossupwidee?
Staff member
Moderator
SMF Supporter
Joined
Jun 13, 2009
Messages
12,416
Points
113
Location
sheffield
First Name
tony
Shame about the decals andrew , the ‘keep off‘ boxes on the wings are the bane of every mossie kit . As Tim says try pricking the bubbles with a pin and see if some of the decal softener can get underneath . The mistake with the polecat is baffling , if a decal maker is going to offer alternative decals , the very least they could do is a bit of research and get them correct . Looking good though and im intrigued as to what this xmas pressie is , cheers tony
 

adt70hk

I know its a bit sad but I like quickbuild kits!!!
SMF Supporter
Joined
Sep 4, 2019
Messages
9,514
Points
113
First Name
Andrew
Shame about the decals andrew , the ‘keep off‘ boxes on the wings are the bane of every mossie kit . As Tim says try pricking the bubbles with a pin and see if some of the decal softener can get underneath . The mistake with the polecat is baffling , if a decal maker is going to offer alternative decals , the very least they could do is a bit of research and get them correct . Looking good though and im intrigued as to what this xmas pressie is , cheers tony

Thanks for stopping by Tony. As I said to Andy I have three other Tamiya Mossies in the stash and so should have it sorted by third one. I also have the new Airfix B. XVI in the stash and I know from experience that their newer decals are much better than Tamiya's and so it will be interesting to see how that particular decal goes down on their kit,

As for the skunk, it really, really is baffling.....it's not like there is not plenty of info out there about it.....

As for the Chrissy present you will have to see.....as long as Alan doesn't spill the beans!

Thanks as always for stopping by.

All the best.

Andrew
 
Top