Looking good Dale.
- Home
- Forums
- Military Vehicles
- Military Vehicles Under Construction
- Armoured Vehicles Under Constuction
You are using an out of date browser. It may not display this or other websites correctly.
You should upgrade or use an alternative browser.
You should upgrade or use an alternative browser.
Tamiya - Daimler Dingo MkII - 1/35 (1972)
- Thread starter dalej2014
- Start date
rtfoe
SMF Supporter
Dale, if you haven't purchased the wire for aerials try metal guitar strings. The smallest nos. 1 or 2. They're cheap and stiff. You'll need real wire cutters or you'll destroy your nippers trying to cut them. They're coiled but spring out when released.
Cheers,
Richard.
Cheers,
Richard.
dalej2014
SMF Supporter
Thank you. I was able to buy some from a local model railway shop. It's an Aladdin's cave of materials for dioramas. I also like that I'm supporting local business buying there. Appreciate the thought though, cheers.Dale, if you haven't purchased the wire for aerials try metal guitar strings. The smallest nos. 1 or 2. They're cheap and stiff. You'll need real wire cutters or you'll destroy your nippers trying to cut them. They're coiled but spring out when released.
Cheers,
Richard.
Guitar wire is sold in “thou” sizes, ie 008 thou, 009 thou etc. upwards. This is thousandths of an inch. Working on a good rule of thumb, 040 thou is about 1mm, so a 010 thou string is about 0.25 mm. Don’t get the coated ones, just normal slinkies will do you. You also don’t need the wound strings…..Dale, if you haven't purchased the wire for aerials try metal guitar strings. The smallest nos. 1 or 2. They're cheap and stiff. You'll need real wire cutters or you'll destroy your nippers trying to cut them. They're coiled but spring out when released.
Cheers,
Richard.
Nickel silver straight pin wire is also readily available in sizes from about 0.3mm in 0.1 mm increments. It is also stiff, straight, and a lot easier to cut…
dalej2014
SMF Supporter
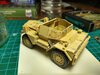
Dialled back the chipping a bit, as it seemed a bit much, and added some "rust" using Winton Burnt Sienna. I have to say the shade is spot on, and I like the effect. I think this part of the weathering is done, so time to lock it in with a varnish coat. Moving on tomorrow to some buff filters to start lightening, then adding some pigment "sand" in some nooks and crannies. Oh, wheels will need a coat of powder too:

Note to self - add some more weathering in the interior.
Note to self - add some more weathering in the interior.
Jim R
SMF Supporter
Hi Dale
Looking good. Each effect is changed by the next layer/process. Your buff filter and then pigments will tie things together.
Jim
Looking good. Each effect is changed by the next layer/process. Your buff filter and then pigments will tie things together.
Jim
dalej2014
SMF Supporter
Thanks Jim. Appreciate thatHi Dale
Looking good. Each effect is changed by the next layer/process. Your buff filter and then pigments will tie things together.
Jim

Mark1
SMF Supporter
That's coming along nicely 
dalej2014
SMF Supporter
Thank you MarkThat's coming along nicely
Coming on nicely Dale.
Blimey, there’s an echo in here LOL…Coming on nicely Dale.
dalej2014
SMF Supporter
Thanks TimComing on nicely Dale.
dalej2014
SMF Supporter
Thank you AndrewLooking good Dale.
Andrew
scottie3158
SMF Supporter
Dale,
Looking good the chipping is not overdone.
Looking good the chipping is not overdone.
dalej2014
SMF Supporter
Thank youDale,
Looking good the chipping is not overdone.
CarolsHusband
SMF Supporter
The chipping looks spot on to me.
dalej2014
SMF Supporter
CheersThe chipping looks spot on to me.
dalej2014
SMF Supporter
So I think this is getting there now. I varnished with "lucky" matte, then applied a buff filter to some top panel areas. I also tried using some pastels for weathering with white spirit carrier. This appeared too dark to me, so I tried some fine semolina, which has an almost white sand colour. It was not a success, going "clumpy" as it picked up the WS. I'll need to get some bird sand to see the results I want.
I also still need to paint the figures for the vehicle. There are three included.
The tires also need a lighter coat of grey, and some "sand" pigment. Then I want to add some details; Inside the vehicle should be a radio. I won't attempt to create that, but instead make a small plastic card box, and cover in "tarp" (green stuff). I also want to make some green stuff sand bags with micropore tape for "hessian". I may then add some more stowage until I get the look I'm after.
Finally I will have a go at doing a small desert base for this. Nothing fancy, just sand, rocks, scrub and maybe a sign or two, and an odd oil drum.
NB my phone keeps trying to colour this as "food"? The colour closer to reality is the lighter shade photos. I think this is more accurate as any desert vehicles will soon bleach in the sun!


Any comments and critique welcome at this stage, along with ideas, feedback and suggestions. Thanks all.
I also still need to paint the figures for the vehicle. There are three included.
The tires also need a lighter coat of grey, and some "sand" pigment. Then I want to add some details; Inside the vehicle should be a radio. I won't attempt to create that, but instead make a small plastic card box, and cover in "tarp" (green stuff). I also want to make some green stuff sand bags with micropore tape for "hessian". I may then add some more stowage until I get the look I'm after.
Finally I will have a go at doing a small desert base for this. Nothing fancy, just sand, rocks, scrub and maybe a sign or two, and an odd oil drum.
NB my phone keeps trying to colour this as "food"? The colour closer to reality is the lighter shade photos. I think this is more accurate as any desert vehicles will soon bleach in the sun!
Any comments and critique welcome at this stage, along with ideas, feedback and suggestions. Thanks all.
Attachments
dalej2014
SMF Supporter
Oops. Realised after posting I'd lost all the pin wash detail. More artistic than realistic, but I really like the way it makes the model pop. So it was out with the "engine grime" again:


There, that's better.
There, that's better.